Last updated on 3 months ago
设计模式 1. 设计模式-代理模式 概念 代理模式(Proxy Pattern)。属于结构型模式。为其它对象提供一种代理以控制对该对象的访问。
代理的概念很简单,就是想调用A类方法时,不直接调用,而是通过调用代理B类的方法,由B类方法去调用A类的方法。
模式中的角色
Subject(抽象对象):它声明了真实对象和代理对象的共同接口,这样一来在任何使用真实对象的地方都可以使用代理对象,客户端通常需要针对抽象对象角色进行编程。Proxy(代理对象):代理对象与真实对象实现相同的接口,所以它能够在任何时刻都能够代理真实对象。代理对象内部包含有对真实对象的引用,所以她可以操作真实对象,同时也可以附加其他的操作,相当于对真实对象进行封装。RealSubject(真实对象):它定义了所代表的真实对象,在真实对象角色中实现了真实的业务操作,客户端可以通过代理对象间接调用真实对象中定义的操作。
栗子 一个害羞男孩追求一个叫如花的女孩,但是自己不敢送礼物,就找了一个朋友代理他给如花送礼物
1 2 3 4 5 6 7 8 9 10 11 12 13 14 15 16 17 18 19 20 21 22 23 24 25 26 27 28 29 30 31 32 33 34 35 36 37 38 public abstract class GiveGiftPerson public abstract void GiveGift ()public class ShyBoy : GiveGiftPerson public override void GiveGift ()"害羞男孩送礼物给如花~~" );public class Friend : GiveGiftPerson new ShyBoy();public override void GiveGift ()bool IsRuhuaGood = true ;if (IsRuhuaGood)
1
2
3
4
5
6
7
8
9
10
11
12
class Program static void Main (string [] argsnew Friend();
优缺点 优点
代理模式能够将调用用于真正被调用的对象隔离,在一定程度上降低了系统的耦合度。
客户端可以针对抽象主题角色进行编程,增加和更换代理类无须修改源代码,符合开闭原则,系统具有较好的灵活性和可扩展性。
缺点
由于在客户端和真实主题之间增加了代理对象,因此有些类型的代理模式可能会造成请求的处理速度变慢,例如保护代理。
实现代理模式需要额外的工作,而且有些代理模式的实现过程较为复杂,例如远程代理。
使用场景
当客户端对象需要访问远程主机中的对象时可以使用远程代理
当需要用一个消耗资源较少的对象来代表一个消耗资源较多的对象,从而降低系统开销、缩短运行时间时可以使用虚拟代理,例如一个对象需要很长时间才能完成加载时。
当需要为某一个被频繁访问的操作结果提供一个临时存储空间,以供多个客户端共享访问这些结果时可以使用缓冲代理。通过使用缓冲代理,系统无须在客户端每一次访问时都重新执行操作,只需直接从临时缓冲区获取操作结果即可。
当需要控制对一个对象的访问,为不同用户提供不同级别的访问权限时可以使用保护代理。
当需要为一个对象的访问(引用)提供一些额外的操作时可以使用智能引用代理。
其他
远程代理(Remote Proxy):为一个位于不同的地址空间的对象提供一个本地的代理对象,这个不同的地址空间可以是在同一台主机中,也可是在另一台主机中,远程代理又称为大使(Ambassador)。
虚拟代理(Virtual Proxy):如果需要创建一个资源消耗较大的对象,先创建一个消耗相对较小的对象来表示,真实对象只在需要时才会被真正创建。
保护代理(Protect Proxy):控制对一个对象的访问,可以给不同的用户提供不同级别的使用权限。
缓冲代理(Cache Proxy):为某一个目标操作的结果提供临时的存储空间,以便多个客户端可以共享这些结果。
智能引用代理(Smart Reference Proxy):当一个对象被引用时,提供一些额外的操作,例如将对象被调用的次数记录下来等。
参考资料 C#设计模式笔记之代理模式 (Proxy Pattern) - 知乎 (zhihu.com)
C#设计模式——代理模式 - 心中的天空之城 - 博客园 (cnblogs.com)
2. 设计模式-建造者模式 一句话
将一个复杂对象的构建与他的表示分离出来,使得同样的构建过程构建不同的对象。
举个栗子 拿组件电脑方案来举例
现在市面上组装机的各有不同,有不同的氪金方案。但是方案归方案,无外乎就是
部件 1 2 3 4 5 6 7 8 9 10 11 12 13 14 15 16 17 18 19 20 21 22 23 24 25 public class Product public string CPUNAME { get ; set ; }public string FANNAME { get ; set ; }public string MEMORY { get ; set ; }public string HARDDISK { get ; set ; }
步骤 那现在抽象这些个方法,意思就是如果要安装一部电脑,需要操作这些个步骤。
1 2 3 4 5 6 7 8 9 10 11 12 13 14 15 16 17 18 19 20 21 22 23 24 25 26 27 28 29 30 31 public abstract class Builder public abstract void BUILD_CPU ()public abstract void BUILD_FAN ()public abstract void BUILD_MEMORY ()public abstract void BUILD_DARDDISK ()public abstract Product GetComputer ()
上面这个只是构建电脑的步骤,但是还具体不到实操,接着整
方案 现在准备两种构建电脑的方案
1 2 3 4 5 6 7 8 9 10 11 12 13 14 15 16 17 18 19 20 21 22 23 24 25 26 27 28 29 30 31 32 public class ProductA : Builder private readonly Product _computer = new Product();public override void BUILD_CPU ()"I5" ;public override void BUILD_DARDDISK ()"金士顿" ;public override void BUILD_FAN ()"九州风神" ;public override void BUILD_MEMORY ()"海盗船" ;public override Product GetComputer ()return _computer;
1 2 3 4 5 6 7 8 9 10 11 12 13 14 15 16 17 18 19 20 21 22 23 24 25 26 27 28 29 30 31 32 public class ProductB : Builder private readonly Product _computer = new Product();public override void BUILD_CPU ()"I7" ;public override void BUILD_DARDDISK ()"闪迪" ;public override void BUILD_FAN ()"九州风神" ;public override void BUILD_MEMORY ()"海盗船" ;public override Product GetComputer ()return _computer;
ToDo 现在已知
构建电脑的部件:CPU、内存、风扇、硬盘
构建电脑的步骤:CPU、内存、风扇、硬盘、出厂
构建电脑的方案:各个部件具体的品牌
现在需要确定谁来干,那就老板来干吧,小本买卖,当然,如果人多,可以多整几个
1 2 3 4 5 6 7 8 9 10 11 12 13 14 15 16 17 18 19 20 21 22 23 24 public class Bosss public void Construct (Builder builder )
最后,演示一下整体流程
1
2
3
4
5
6
7
8
9
10
11
12
13
14
15
16
17
class Program static void Main (string [] argsnew Bosss();new ProductA());new ProductB());
3. 设计模式-桥接模式 一句话
一个类可以通过多角度来分类,每一种分类都可能变化,那么就把多角度分离出来让各个角度都能独立变化,降低各个角度间的耦合。
举个栗子
画图形,图形有图形种类和颜色两个指标组成,如果现在要画三种不同的图形并且会有三种不同的颜色,按照现有要求,会每个图形+颜色为一个类的话,会产生9个类或者方法来完成,如果要加图形或者颜色的话,类或者方法会增长的很快,所以需要桥接模式。
形状抽象 1 2 3 4 5 6 7 8 9 10 11 12 13 public abstract class Shape protected IColor color;public void SetColor (IColor color )this .color = color;public abstract void Draw ()
颜色接口 1 2 3 4 5 6 7 public interface IColor void Paint (string shape
颜色 1 2 3 4 5 6 7 8 9 10 11 12 13 14 15 16 17 18 19 20 21 22 23 24 25 26 27 28 29 30 public class Blue : IColor public void Paint (string shape$"蓝色的{shape} " );public class Yellow : IColor public void Paint (string shape$"黄色的{shape} " );public class Red : IColor public void Paint (string shape$"红色的{shape} " );
形状 1 2 3 4 5 6 7 8 9 10 11 12 13 14 15 16 17 18 19 20 21 22 23 24 25 26 27 28 29 30 public class Circle : Shape public override void Draw ()"圆形" );public class Rectangle : Shape public override void Draw ()"长方形" );public class Triangle : Shape public override void Draw ()"三角形" );
创建形状 1 2 3 4 5 6 7 8 9 10 11 12 13 14 15 16 17 static void Main (string [] argsnew Circle();new Blue();new Triangle();
4. 设计模式-适配器模式 一句话
有对象适配、有类适配。类似于插座转化器,如下栗子。
类适配模式 1 2 3 4 5 6 7 8 9 10 11 12 13 14 15 16 17 18 19 20 21 22 23 24 #region 类适配模式 public interface ITwo void Request1 ()public abstract class ThreeAdaptee public void Request2 ()"我是三个孔的插头" );public class ThreeToTwoAdapter : ThreeAdaptee , ITwo public void Request1 ()this .Request2();#endregion
类适配模式运行 1 2 3 4 5 ITwo change = new ThreeToTwoAdapter();
对象适配器 1 2 3 4 5 6 7 8 9 10 11 12 13 14 15 16 17 18 19 20 21 22 23 24 25 26 27 28 #region 对象适配模式 public class Two public virtual void Request1 ()"2个孔的插头可以使用" );public class Three public void Request2 ()"3个孔的插头可以使用" );public class TwoToThreeAdapter : Two new Three();public override void Request1 ()#endregion
对象适配器运行 1 2 3 4 5 Two two = new TwoToThreeAdapter();
优缺点
单一职责原则(优点)
开闭原则(优点)
代码复杂度增加(缺点)
适应场景
如果第三方的接口或者代码于现有的接口、代码不兼容的时候,可以添加一个中间适配器层来解决这样的问题。
5. 设计模式-外观模式 一句话
为子系统中的一组接口提供一个一致的界面,用来访问子系统中的一群接口
在家里看个电影需要干些啥。把投影仪、功放、屏幕、DVD、灯光 这五个看做五个子系统。
打开投影仪
打开功放
打开屏幕
打开DVD
打开灯光
看完了怎么关闭
关闭投影仪
关闭功放
关闭屏幕
关闭DVD
关闭灯光
具体方法 1 2 3 4 5 6 7 8 9 10 11 12 13 14 15 16 17 18 19 20 21 22 23 24 25 26 27 28 29 30 31 32 33 34 35 36 37 38 39 40 41 42 43 44 45 46 47 48 49 50 51 52 53 54 55 56 57 58 59 60 61 62 63 64 65 66 67 68 69 70 71 72 73 74 75 76 77 78 79 80 81 82 public class Projector public void OpenProjector ()"打开投影仪" );public void CloseProjector ()"关闭投影仪" );public void SetWideScreen ()"投影仪状态为宽屏模式" );public void SetStandardScreen ()"投影仪状态为标准模式" );public class Amplifier public void OpenAmplifier ()"打开功放机" );public void CloseAmplifier ()"关闭功放机" );public class Screen public void OpenScreen ()"打开屏幕" );public void CloseScreen ()"关闭屏幕" );public class DVDPlayer public void OpenDVDPlayer ()"打开 DVD 播放器" );public void CloseDVDPlayer ()"关闭 DVD 播放器" );public class Light public void OpenLight ()"打开灯光" );public void CloseLight ()"关闭灯光" );
定义一个外观 1 2 3 4 5 6 7 8 9 10 11 12 13 14 15 16 17 18 19 20 21 22 23 24 25 26 27 28 29 30 31 32 33 34 35 36 37 38 39 40 41 42 43 44 45 46 47 48 49 50 51 52 53 54 55 56 57 public class MovieFacade private Projector projector;private Amplifier amplifier;private Screen screen;private DVDPlayer dvdPlayer;private Light light;public MovieFacade ()new Projector();new Amplifier();new Screen();new DVDPlayer();new Light();public void OpenMovie ()public void CloseMovie ()
看电影 1 2 3 4 5 6 7 8 9 10 11 12 13 14 15 16 17 18 19 static void Main (string [] argsnew MovieFacade();
优缺点 优点
外观模式对客户端屏蔽了子系统组件,从而简化了接口,减少了客户处理的对象数目并使得子系统的使用更加简单。
外观模式实现了客户端和子系统之间的松耦合关系,而子系统内部的组件是紧耦合的。松耦合使得子系统的组件变化不会影响到客户端。
缺点
如果新增新的子系统可能需要修改外观类,这就不符合开闭原则,不过这也是没法避免的。
最后 外观模式也叫门面模式。属于结构型 模式。
为子系统中的一系列接口提供一个一致的界面,该模式提供了一个高层接口,这个接口使得这一子系统更加容易使用。
外观模式是通过定义一个外观类将子类包装起来,来简化客户端所调用的方法.
6. 设计模式-享元模式 FlyweightPattern
在软件开发中我们经常遇到多次使用相似或者相同对象的情况,如果每次使用这个对象都去new一个新的实例会很浪费资源。这时候很多人会想到前边介绍过的一个设计模式:
原型模式,原型模式通过拷贝现有对象来生成一个新的实例,使用拷贝来替代new。原型模式可以很好的解决创建多个相同/相似实例的问题,为什么还要用享元模式呢?
这是因为这两种模式的使用场景是不同的,原型模式侧重于”创建“,我们通过拷贝确确实实的创建了新的实例,它属于创建型设计模式;而享元模式侧重于“重用”,即如果有现有的实例就不去创建了,直接拿来用就行了。
举个栗子 抽象车类 1 2 3 4 5 public abstract class Car public abstract void Use (Driver d )
具体车类 1 2 3 4 5 6 7 8 9 10 11 12 13 14 public class RealCar : Car public string Color { get ; set ; }public RealCar (string colorthis .Color = color;public override void Use (Driver d )$"{d.Name} 开{this .Color} 的车" );
车库 1 2 3 4 5 6 7 8 9 10 11 12 13 14 15 16 17 18 19 20 21 22 23 24 public class CarFactory private Dictionary<string , Car> carPool = new Dictionary<string , Car>();public CarFactory ()"红色" , new RealCar("红色" ));"绿色" , new RealCar("蓝色" ));public Car GetCar (string keyif (!carPool.ContainsKey(key))new RealCar(key));"没有{0}的车,就买一个" , key);return carPool[key];
司机类 1 2 3 4 5 6 7 8 9 10 11 public class Driver public string Name { get ; set ; }public Driver (string namethis .Name = name;
实际应用 1 2 3 4 5 6 7 8 9 10 11 12 13 14 15 16 17 18 19 20 21 22 23 24 25 static void Main (string [] argsnew CarFactory();new Driver("小头爸爸" );"蓝色" );new Driver("扁头妈妈" );"蓝色" );if (c1.Equals(c2))"小头爸爸和扁头妈妈开的是同一辆车" );new Driver("大头儿子" );"白色" );
使用场景 当系统中大量使用某些相同或者相似的对象,这些对象要耗费大量的内存,并且这些对象剔除外部状态后可以通过一个对象来替代,这时可以考虑使用享元模式。在软件系统中享元模式大量用于各种池技术,如数据库连接对象池,字符串缓存池,HttpApplication池等。
优缺点 优点
降低了系统中对象的数量,从而降低了系统中细粒度对象给内存带来的压力。
缺点
需要分离对象的外部状态和内部状态,使用不当会引起线程安全问题,提高了系统的复杂度。
7. 设计模式-原型模式 一句话
用原型实例指定创建对象的种类,并且通过复制这些原型创建新的对象。
举个栗子 以手机来做个原型 1 2 3 4 5 6 7 8 9 10 11 12 13 14 15 16 17 18 19 20 21 22 public abstract class MobilePhonePrototype private string _brand;public string Brandget { return _brand; }public MobilePhonePrototype (string brandthis ._brand = brand;public abstract MobilePhonePrototype Clone ()
小米原型 1 2 3 4 5 6 7 8 9 10 11 12 13 14 15 public class XiaoMiPrototype : MobilePhonePrototype public XiaoMiPrototype (string brand : base (brand ) public override MobilePhonePrototype Clone ()return (MobilePhonePrototype)this .MemberwiseClone();
苹果手机原型 1 2 3 4 5 6 7 8 9 10 11 12 13 14 public class ApplePrototype : MobilePhonePrototype public ApplePrototype (string brand : base (brand ) public override MobilePhonePrototype Clone ()return (MobilePhonePrototype)this .MemberwiseClone();
最后 由于原型模式Prototype是一种创建型设计模式,它关注的是大量相同或者相似的对象创建问题。通过new一个对象后,然后通过new出来的对象进行复制,创建出相同的对象。也就是通过这种方式来创建对象。
1 2 3 4 5 6 7 XiaoMiPrototype xiaomi = new XiaoMiPrototype("小米" );new ApplePrototype("iPhone7 Plus" );
8. 设计模式-装饰器模式 一句话
当我们需要动态添加类的功能同时不改变类的结构时可以使用装饰者模式,装饰类本质是一个现有类的包装。
举个栗子 创建一个人,然后给他穿衣服。
创建一个人 1 2 3 4 5 6 7 8 9 10 11 12 public class Person : AbstractPerson public string Name { get ; set ; }public override void Show ()$"打扮的人是{this .Name} :" );
抽象这个人 1 2 3 4 5 6 7 8 public abstract class AbstractPerson public abstract void Show ()
抽象穿衣服方法 1 2 3 4 5 6 7 8 9 10 11 12 13 14 15 16 17 public abstract class Finery : AbstractPerson protected AbstractPerson person;public void SetPerson (AbstractPerson p )this .person = p;public override void Show ()if (person != null )
衣服库 1 2 3 4 5 6 7 8 9 10 11 12 13 14 15 16 17 18 19 20 21 22 23 24 25 26 27 28 29 30 31 32 33 34 35 36 37 38 39 40 41 42 43 44 45 46 public class TShirt : Finery public override void Show ()base .Show();"大t恤 " );public class Sneaker : Finery public override void Show ()base .Show();"网鞋 " );public class Suit : Finery public override void Show ()base .Show();"西装 " );public class Tie : Finery public override void Show ()base .Show();"领带 " );public class Leather : Finery public override void Show ()base .Show();"皮鞋 " );
穿衣服咯 1 2 3 4 5 6 7 8 9 10 11 12 13 14 15 16 17 18 19 20 21 22 23 24 25 26 static void Main (string [] argsnew Person() { Name = "小菜" };"第一种装饰-------------------" );new Suit();new Tie();new Leather();"第二种装饰-------------------" );new TShirt();new Sneaker();
输出 1 2 3 4 第一种装饰-------------------
优缺点 优点
一个类需要添加一些功能,而这些功能按数目、顺序组合形成的效果不一样,如果用继承会造成子类过多,装饰者模式可以很好地解决这个问题;
使用装饰者模式我们可以动态的添加/删除类的功能,灵活性好
缺点
多层装饰比较复杂,我们需要注意装饰顺序等因素。如先穿内裤再穿裤子,是正常人;而先穿裤子再穿内裤就是超人了。在开发中先过滤字符串再加密,和先加密字符串再过滤的效果是完全不同的。
9. 设计模式-组合模式 一句话
在树形结构的处理中模糊了对象和对象组的概念,使用对象和对象组采用了统一的接口,让我们可以像处理简单对象一样处理对象组。
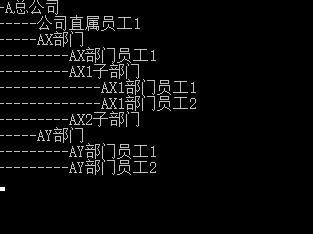
举个例子 首先得有个树结构,最先想到的就是OA系统里的组织结构。集团总公司、分公司、部门、岗位、人员等等,下面以员工和部门举栗子。
先抽个象。 1 2 3 4 5 6 7 8 9 10 11 12 13 14 15 16 17 18 19 20 21 public abstract class Component public string name;public Component (string namethis .name = name;public abstract void Add (Component c )public abstract void Remove (Component c )public abstract void Display (int dept
树叶子:员工 1 2 3 4 5 6 7 8 9 10 11 12 13 14 15 16 17 18 19 20 public class Employee : Component public Employee (string namebase (name )this .name = name;public override void Add (Component c )public override void Remove (Component c )public override void Display (int deptnew string ('-' , dept) + name);
树枝:部门 1 2 3 4 5 6 7 8 9 10 11 12 13 14 15 16 17 18 19 20 21 22 23 24 25 26 27 28 29 30 31 32 public class Depart : Component public Depart (string namebase (name )this .name = name;public List<Component> children = new List<Component>();public override void Add (Component c )public override void Remove (Component c )public override void Display (int deptnew string ('-' , dept) + name);foreach (var item in children)4 );
最后:攒 1 2 3 4 5 6 7 8 9 10 11 12 13 14 15 16 17 18 19 20 21 22 23 24 25 26 27 static void Main (string [] argsnew Depart("A总公司" );new Depart("AX部门" );new Depart("AY部门" );new Depart("AX1子部门" );new Depart("AX2子部门" );new Employee("公司直属员工1" );new Employee("AX部门员工1" );new Employee("AX1部门员工1" );new Employee("AX1部门员工2" );new Employee("AY部门员工1" );new Employee("AY部门员工2" );1 );