DotNet Core Note
Last updated on 3 months ago
Note Dot Net Core
DotNet & DotNetCore
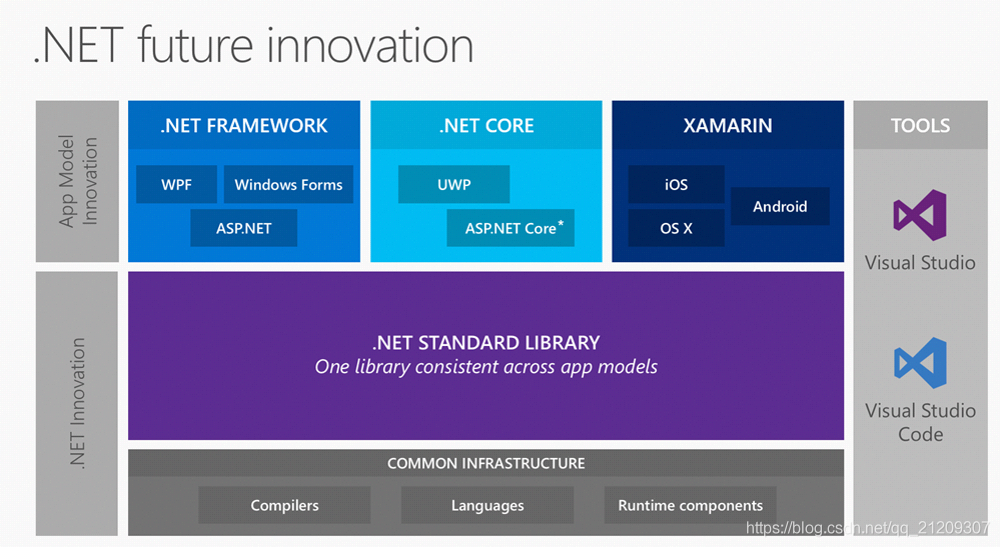
DotNet 包含 DotNet Core
DotNet 内有 DotNet Framework 、DotNet Core 、Xamarin
DotNet Framework 支持Windows和Web应用程序。今天,您可以使用Windows窗体,WPF和UWP在.NET Framework中构建Windows应用程序。ASP.NET MVC用于在.NET Framework中构建Web应用程序。
DotNet Core 是一种新的开源和跨平台框架,用于为包括Windows,Mac和Linux在内的所有操作系统构建应用程序。.NET Core仅支持UWP和ASP.NET Core。UWP用于构建Windows 10目标Windows和移动应用程序。ASP.NET Core用于构建基于浏览器的Web应用程序。
Xamarin 无庸置疑,当您想使用C#构建移动(iOS,Android和Windows Mobile)应用程序时,Xamarin是您唯一的选择。
DotNet Standard 是一套官方定义的API规范,DotNet Framework 和 DotNet Core 都实现了这套规范。
| DotNet Framework | DotNet Core | |
|---|---|---|
| 跨平台 | windows | windows、Linux、Mac |
| 微服务 | 基于对Docker的支持,不建议 | 支持,有些中间件天然支持Core |
| 容器化 | 可以,但笨重 | 轻 |
| 多版本并行 | net 4.0 支持并行了也只是和3.5 | 全版本并行 |
| 高性能可扩展 | 一般 | 天然支持 |
| 开源 | 否 | 是 |
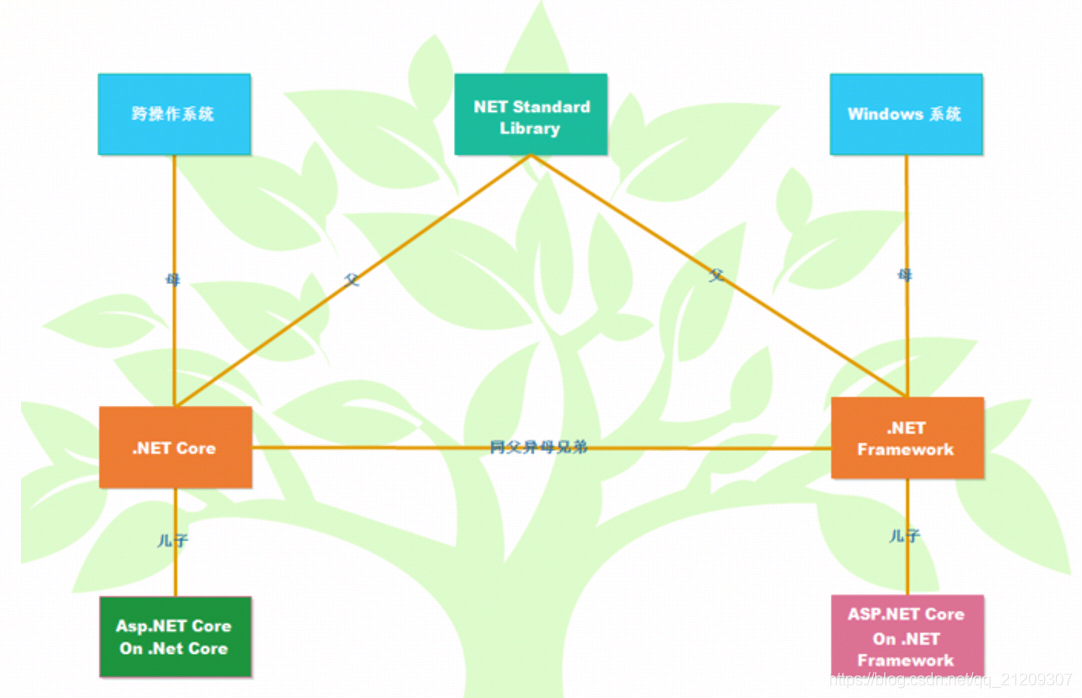
再结合下图
.NET Core和ASP.NET Core区别
.NET Core是运行时。它可以执行为其构建的应用程序。ASP.NET Core是构成一个用于构建Web应用程序的框架的库的集合。ASP.NET Core库可以在.NET Core和“完整.NET Framework”(Windows附带许多年)上使用。
使用.NET Core的 ASP.NET CORE-所有依赖项都是自包含的,可以使用大多数Nuget包,不能使用Windows特定的包,可以在Windows,Linux,Mac上执行
使用.NET Framework的 ASP.NET CORE-大多数依赖项都是自包含的,仅在Windows上执行,将有权访问Windows特定的Nuget软件包,需要在计算机上安装有针对性的.NET Framework版本
ASP.NET Core (.NET Core) and ASP.NET Core (.NET Framework)区别
ASP.NET Core (.NET Core)
使用.Net Core运行时的ASP.NET Core可以支持跨平台(Windows, Mac, and Linux (包括Docker)),服务器不需要安装.Net Core,它的依赖与应用程序捆绑在一起。而且它是高性能的开源的框架。它能够在您自己的进程中托管IIS,Nginx,Apache,Docker或自托管。ASP.NET Core完全作为NuGet包发布。这允许您优化您的应用程序,使其仅包含必要的NuGet包。实际上,面向.NET Core的ASP.NET Core 2.x应用程序只需要一个NuGet包。应用程序表面积较小的好处,可以有更严格的安全性,更少的服务和更高的性能。可以使用 Kestrel web server。可以使用Visual Studio Code写代码。它现在还不支持Aspx, WPF, WCF and WebServices。它内置依赖注入的支持。可以使用coreclr,它是带有.net core的asp.net核心的运行时。
ASP.NET Core (.NET Framework)
使用.NET Framework运行时的ASP.NET Core可以支持桌面应用,也可以说是完整版。但这些应用程序只能在Windows上运行,但有关ASP.NET Core的其他所有内容的行为方式都相同。另一方面,.Net框架在2005年之前就开始了,它不断添加新功能,使其成为一个复杂的框架和更重的框架。它不是跨平台的。它支持Aspx,WPF,WCF和WebServices。
参考资料
- ASP.NET Core (.NET Core) and ASP.NET Core (.NET Framework)区别-CJavaPy
- .NET Framework, .NET Core 和.NET Standard的区别和联系_Will Wang0715的博客-CSDN博客
发布
环境用的是Dot Net 5 SDK
问题1
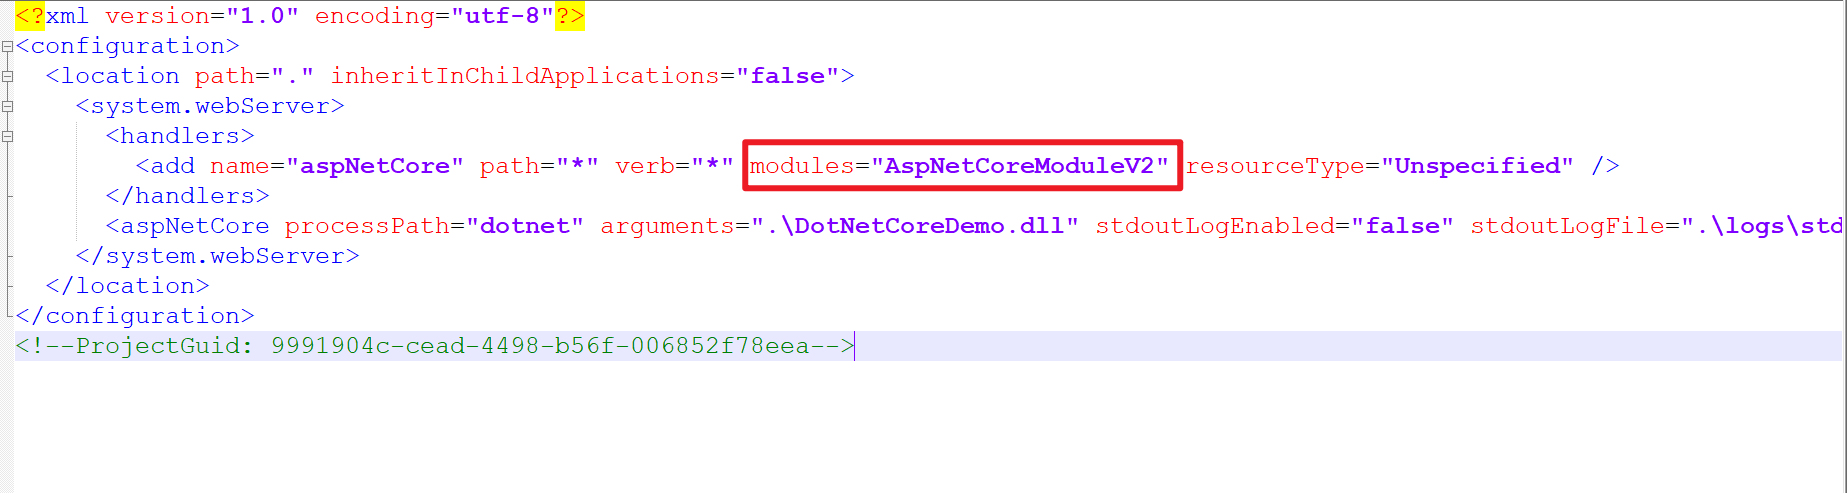
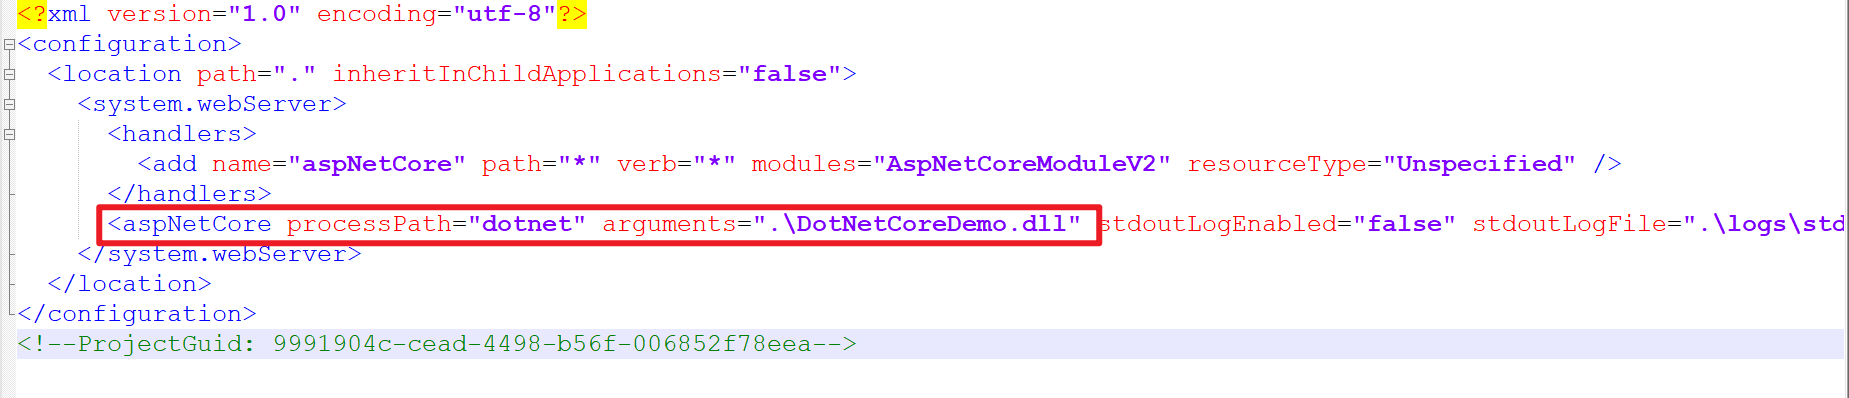
每次运行生成到 \bin\Debug\net5.0 下的文件 对比 发布之后的文件,多的一个 web.config
生成文件

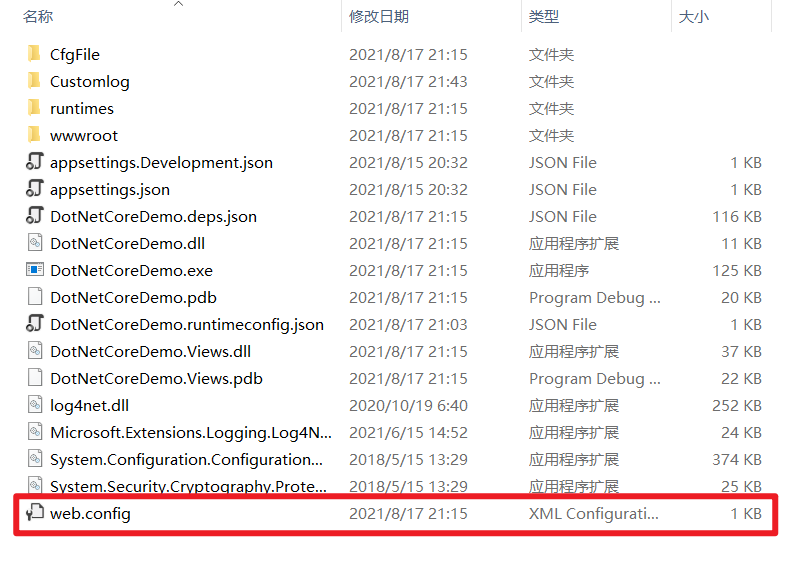
如果把web.config文件复制到生成文件夹中,照样可以通过IIS发布
问题2
当IIS 安装完毕之后,该设置的都设置了,但是访问直接
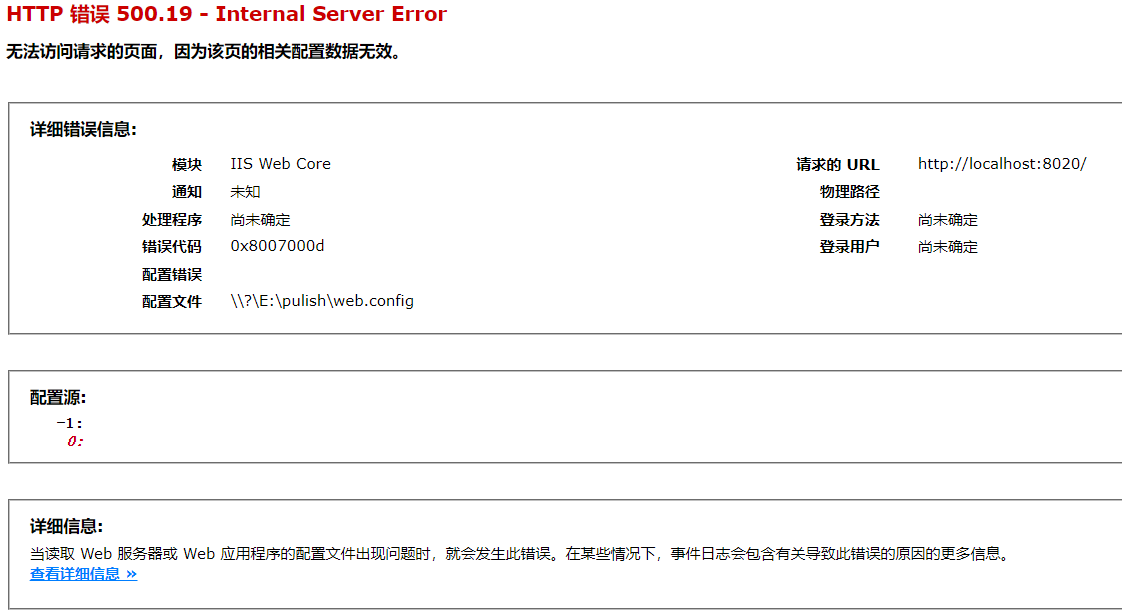
如果之前玩过IIS的话,就会有点懵圈,我之前玩就是这么玩的,为毛现在不行了,答案是,这样真不行。
首先,需要访问 .NET Downloads (Linux, macOS, and Windows) (microsoft.com)
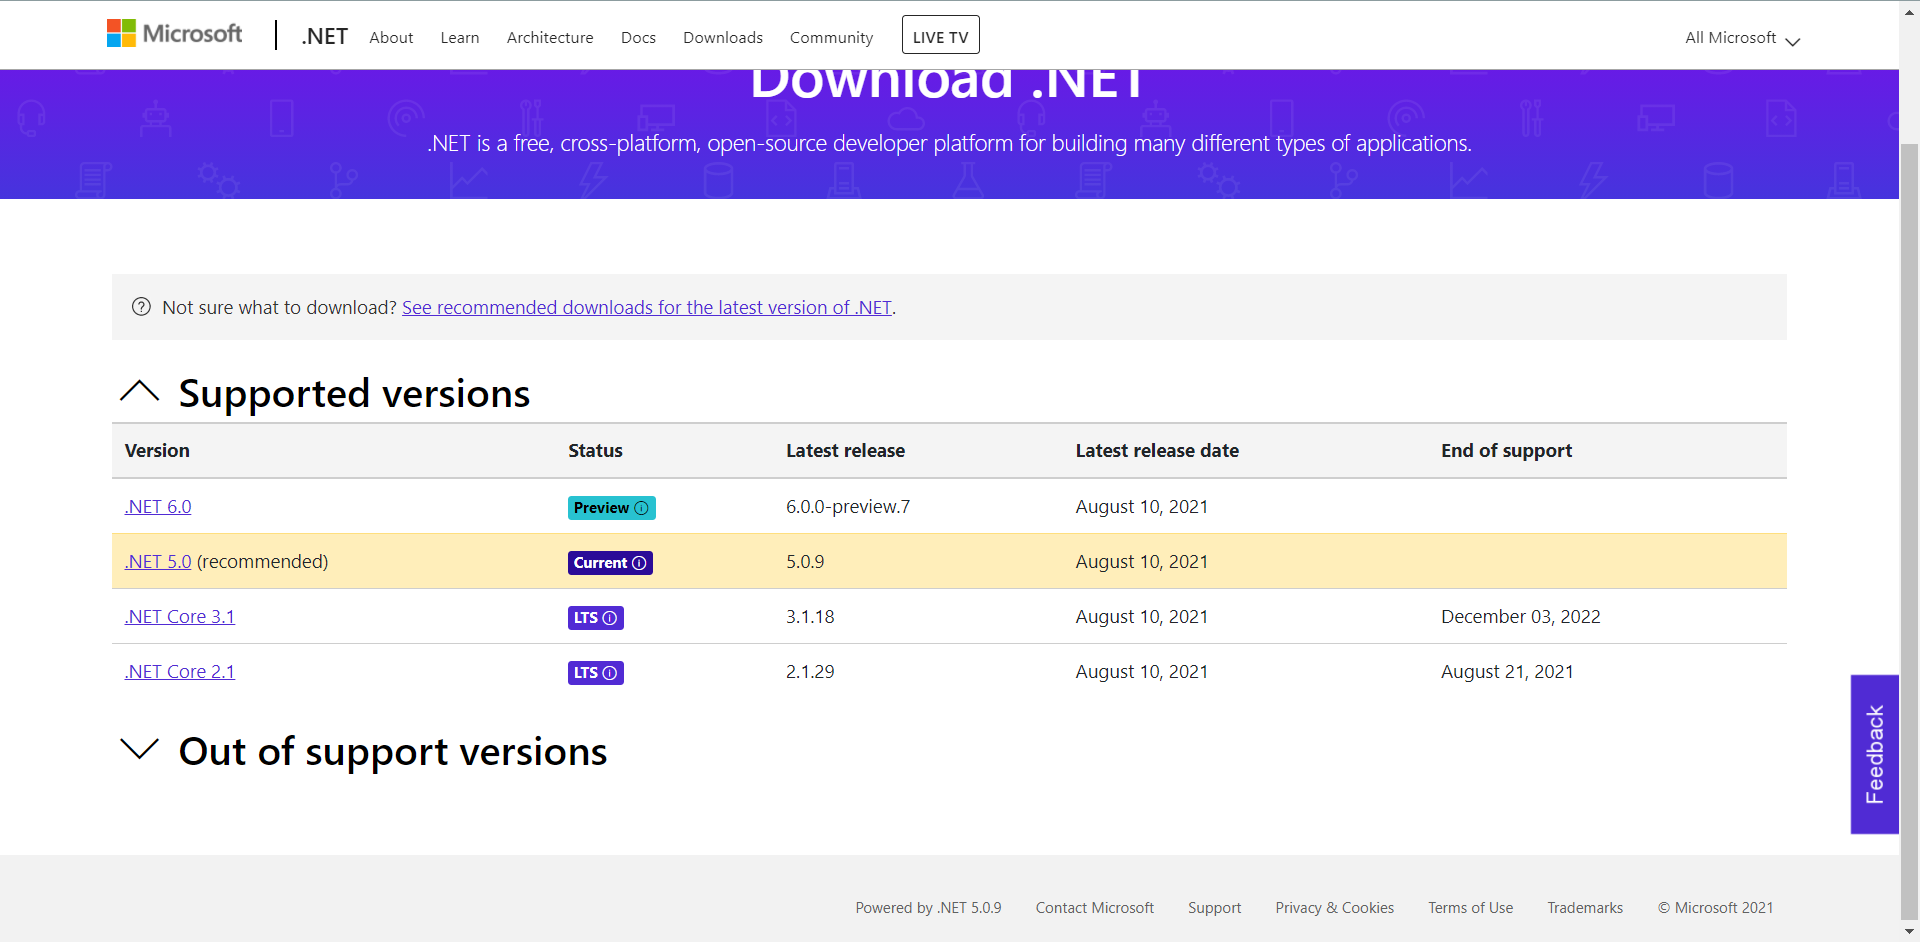
根据自己的环境下载对应的Host 和 SDK
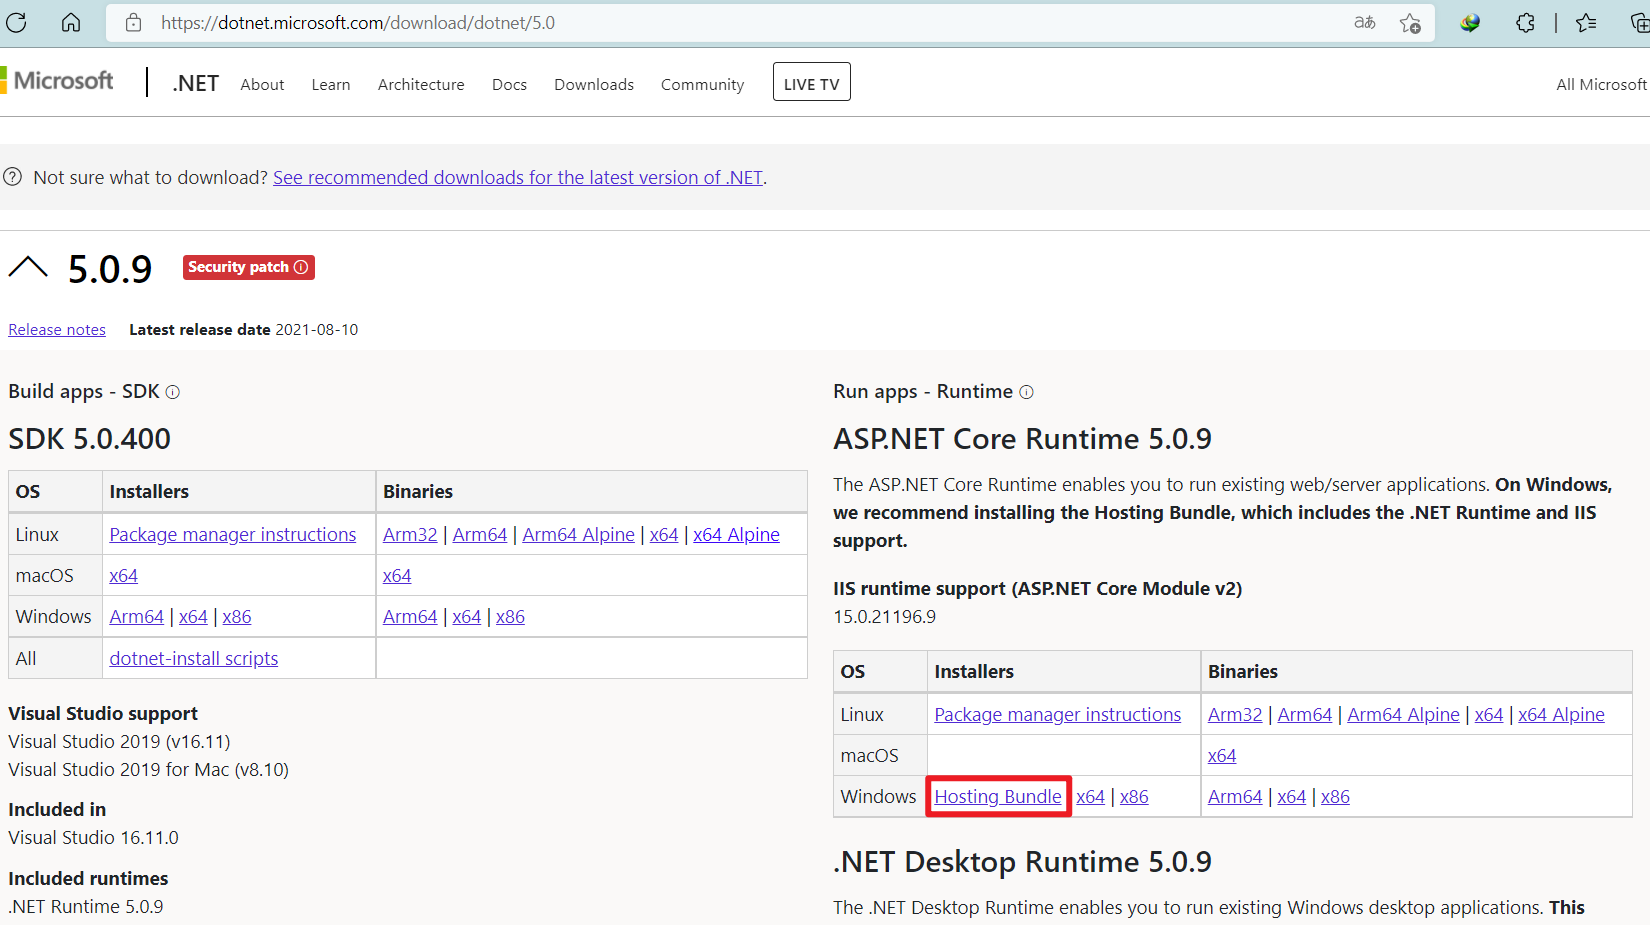
上面这安装完毕后,重启IIS服务
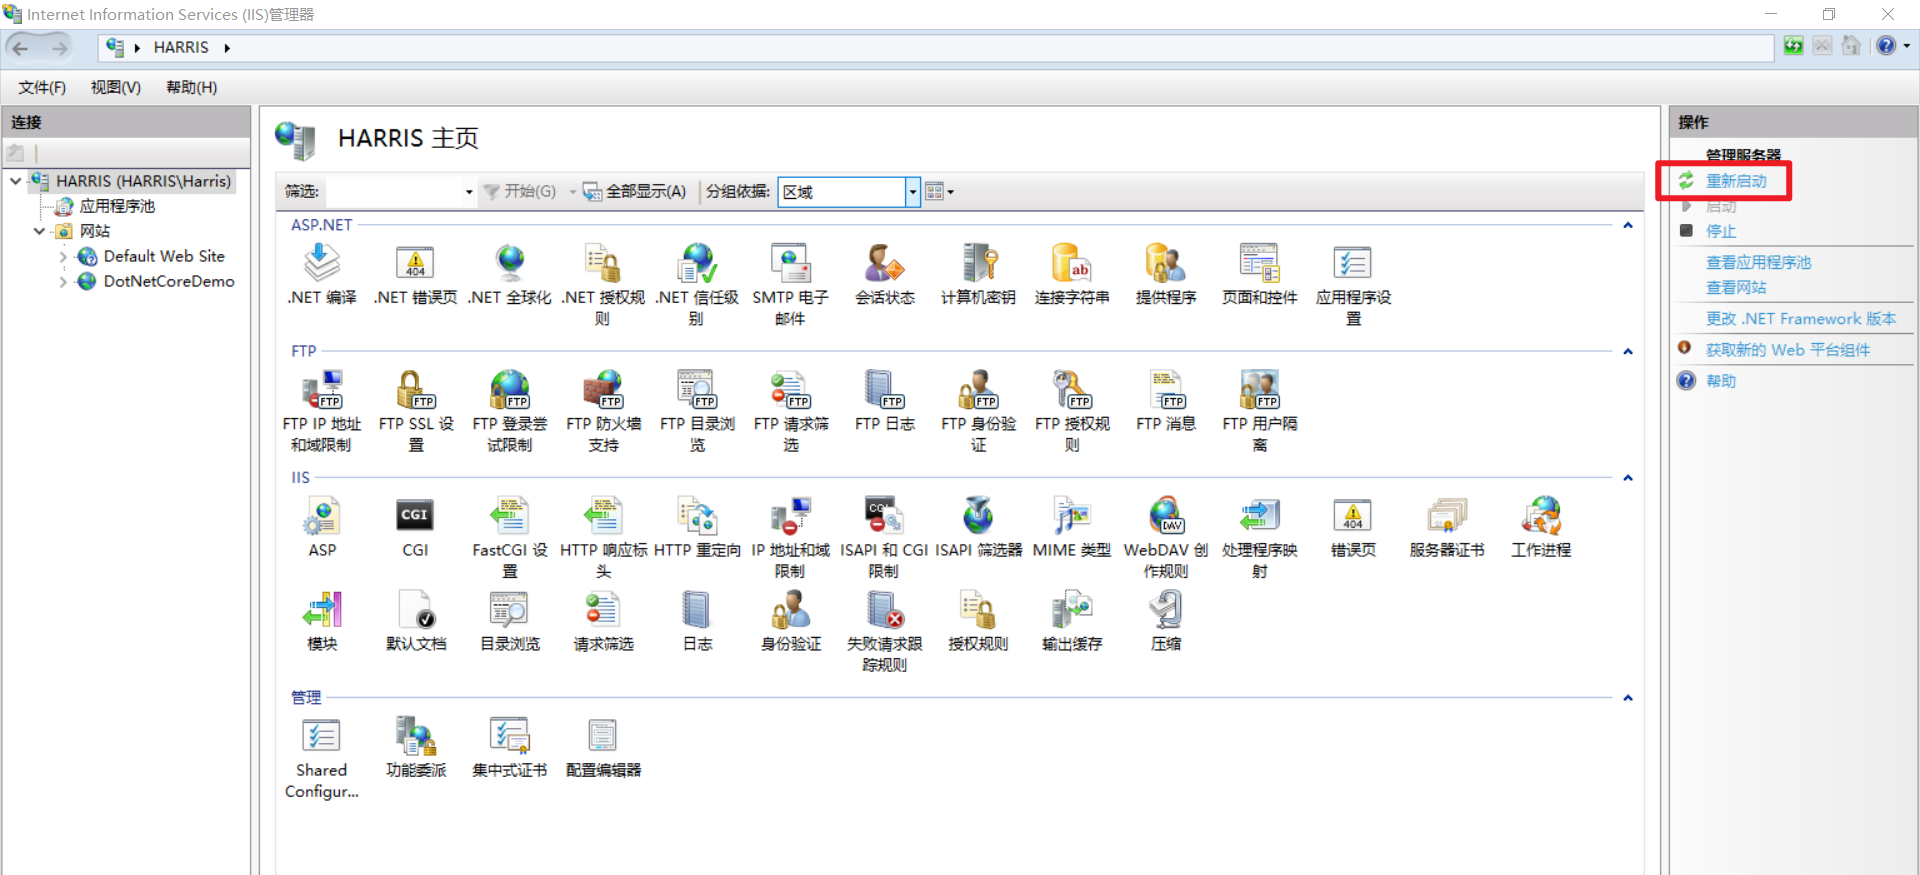
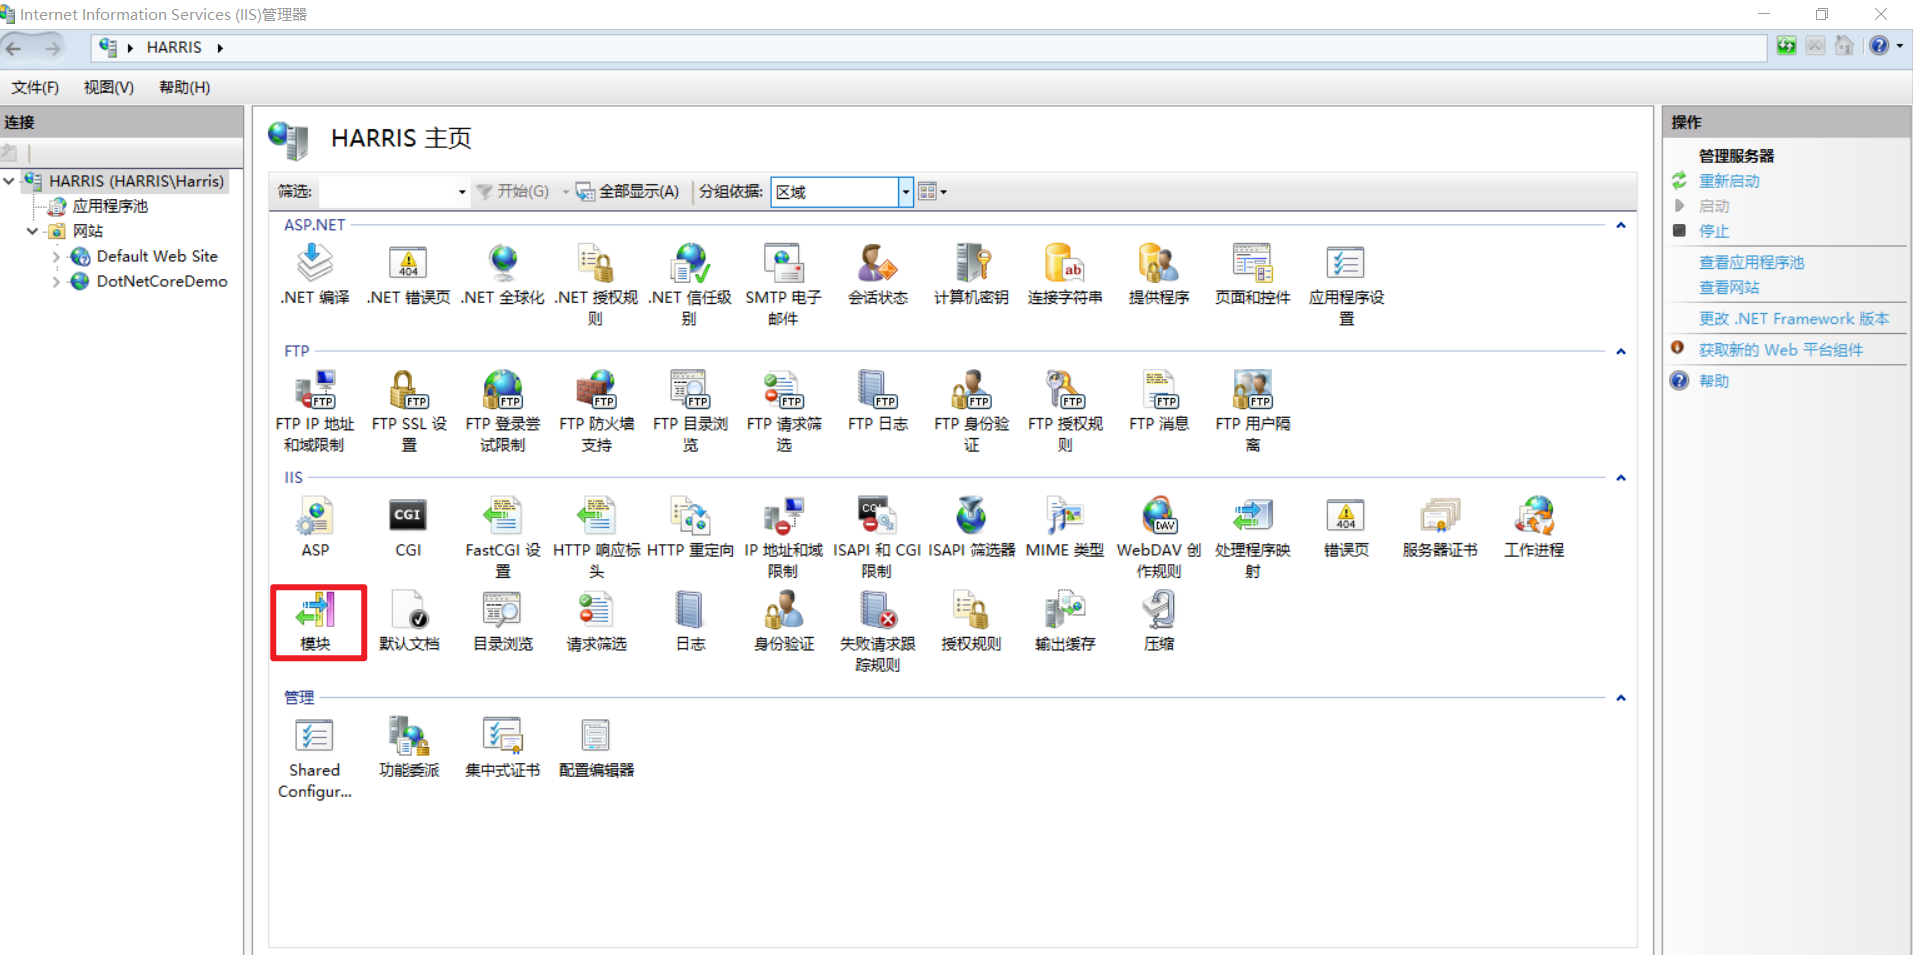
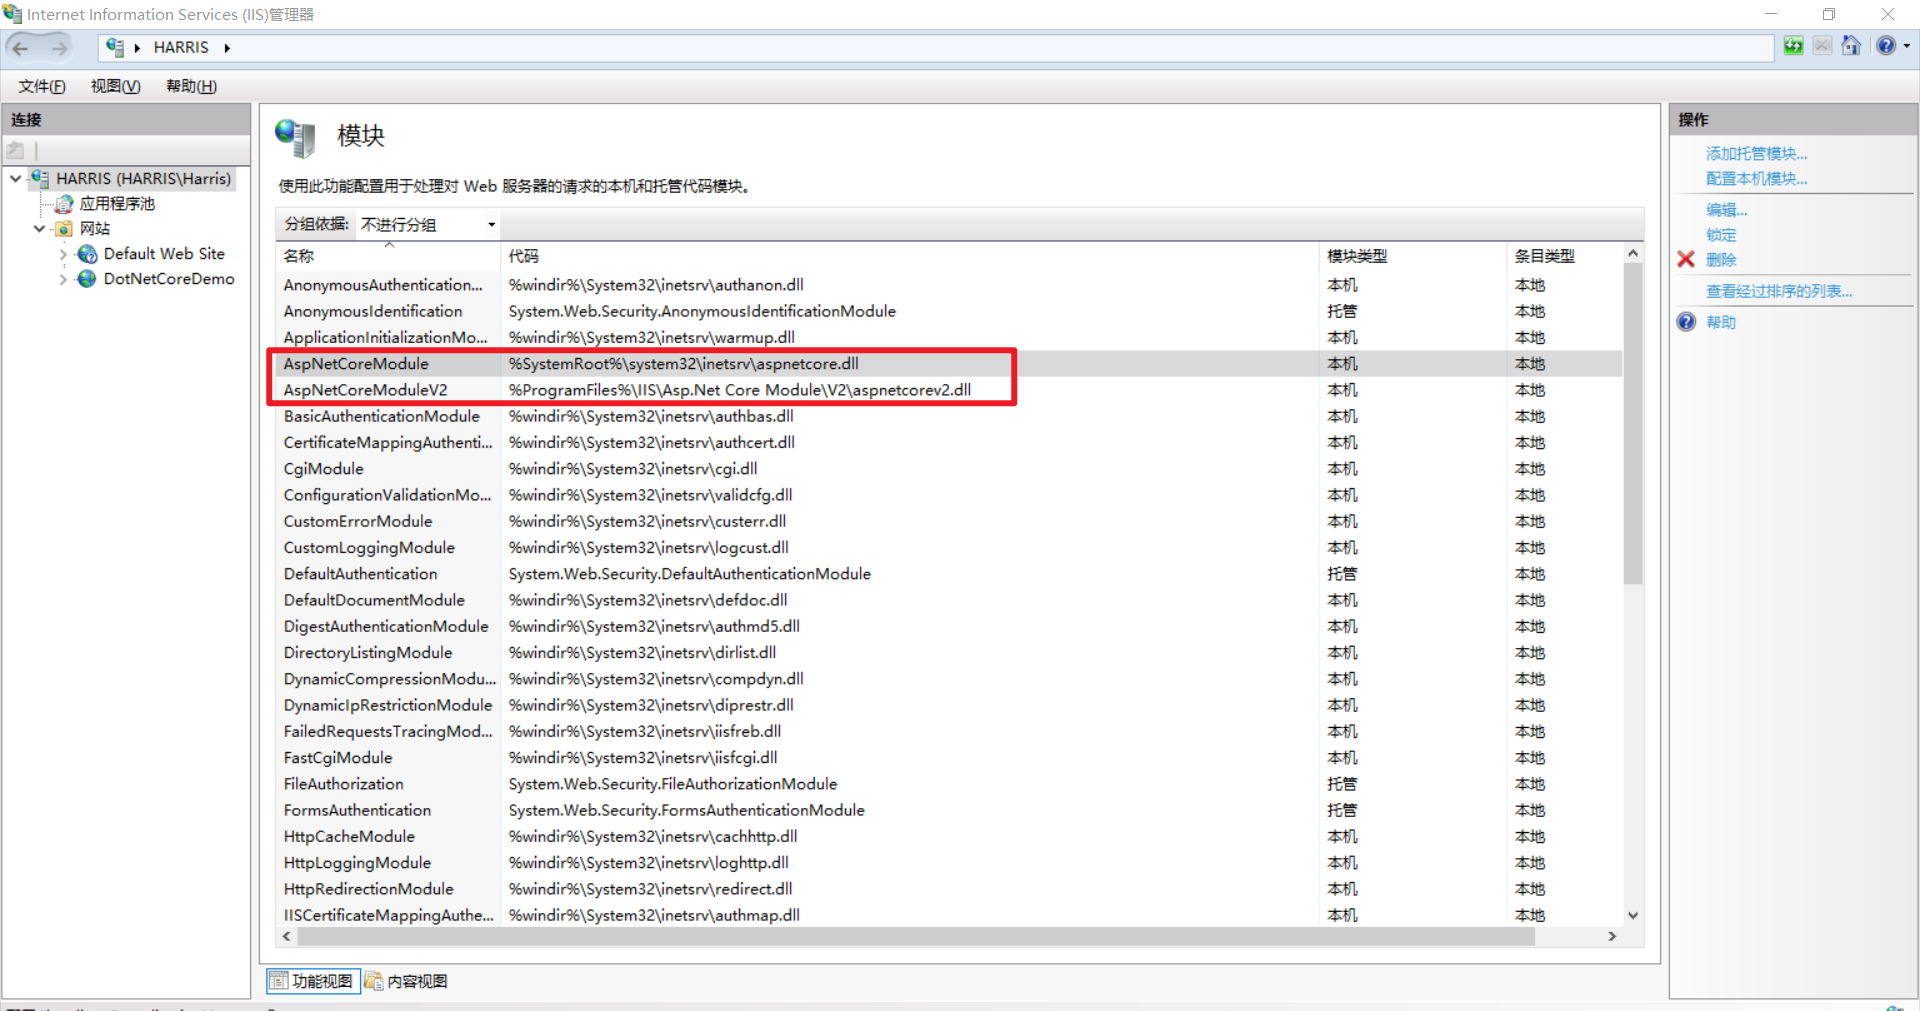
在模块中多俩这玩意,没有这俩玩意的,再找资源下载,都在刚才那个网址里,然 就没有那个500的毛病了。
其实最主要的是依赖 AspNetCoreModuleV2,具体可以看问题1里说的那个web.config中。
你悟了吗?
CMD启动
通过CMD 去启动 cd 到发布目录 执行
1
dotnet DotNetCoreDemo.dll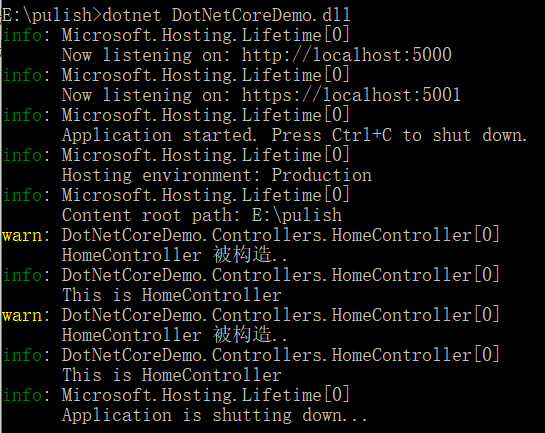
1
dotnet DotNetCoreDemo.dll --urls "http://*:8888"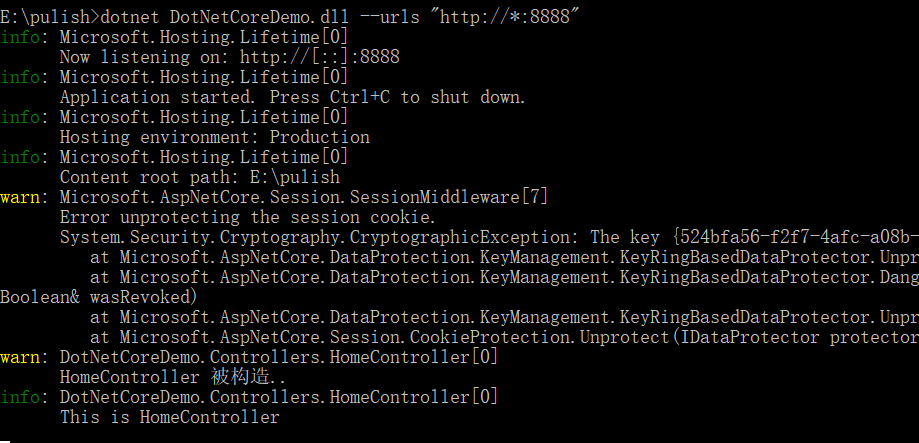
由于DotNetCore 有跨平台的优势,一般生产环境基本是不用IIS
执行的命令在web.config中可以看到,仔细观察
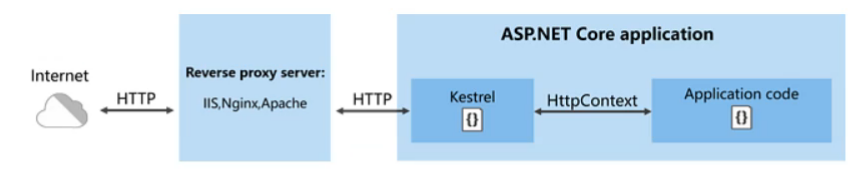
在 DotNetCore 中,IIS 其实充当的角色是转发请求,与之前的发布网站的用法不一样了,有点怀念之前webform的青涩。
读取静态文件+配置中间件
引入命名空间
1
2
using Microsoft.Extensions.FileProviders;
using System.IO;配置读取静态文件中间件
1
2
3
4
5
6
7
8
//获取相对路径
string path = Path.Combine(Directory.GetCurrentDirectory(), "wwwroot");
app.UseStaticFiles(new StaticFileOptions()
{
//从物理路径指向wwwroot
FileProvider = new PhysicalFileProvider(path)
});
CMD 参数
cmd 执行
1
dotnet DotNetCoreDemo.dll --urls "http://*:8080" -- Parame="Harris"格式 – [参数名称] = [参数]
控制器注入
1
using Microsoft.Extensions.Configuration;1
private readonly IConfiguration _iconfiguration;1
2
3
4
5
6
7public HomeController(ILogger<HomeController> logger, IConfiguration configuration)
{
_logger = logger;
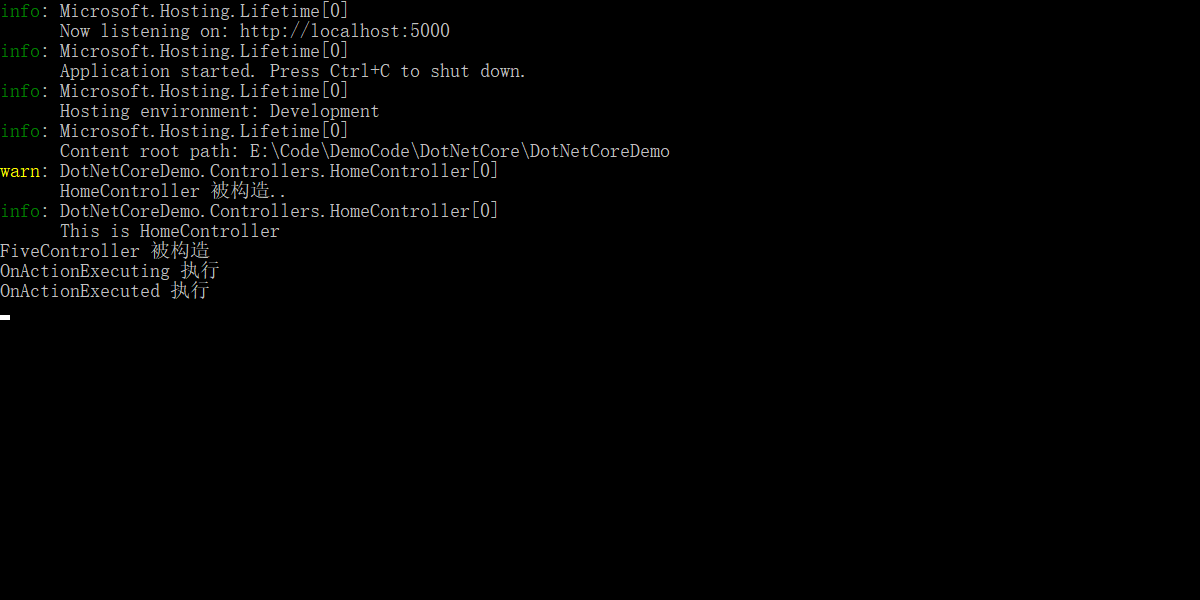
_logger.LogWarning("HomeController 被构造..");
_iconfiguration = configuration; //注入
}1
2
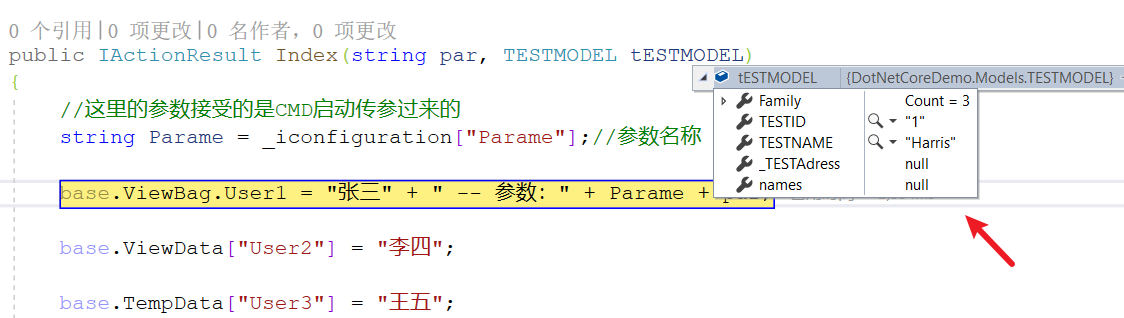
3string Parame = _iconfiguration["Parame"];//参数名称
base.ViewBag.User1 = "张三" + " -- 参数:" + Parame; //使用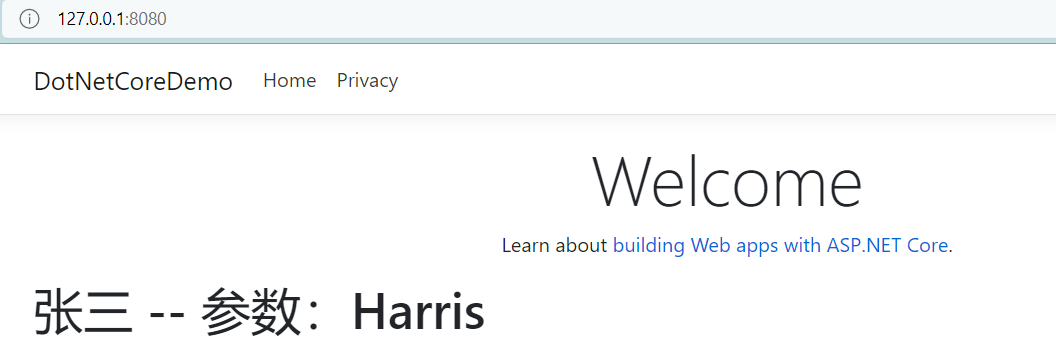
控制器读取配置
方式1
1 | |
同样需要注入:

应用:
1 | |
1 | |

方式2
先修改一下appsetting.json
1 | |
实例化一个实体
1 | |
让实体与需要的json节点相互对应。
然后 Startup.cs
1 | |
接着控制器注入
1 | |
应用:
1 | |

Razor 混编
index.cshtml
1 | |
Startup
1 | |
Interface 层
1 | |
Service 层
1 | |
Nuget 包
Microsoft.AspNetCore.Mvc.Razor.RuntimeCompilation
Razor 布局
开始
- 在
_ViewStart.cshtml中设置母版页;
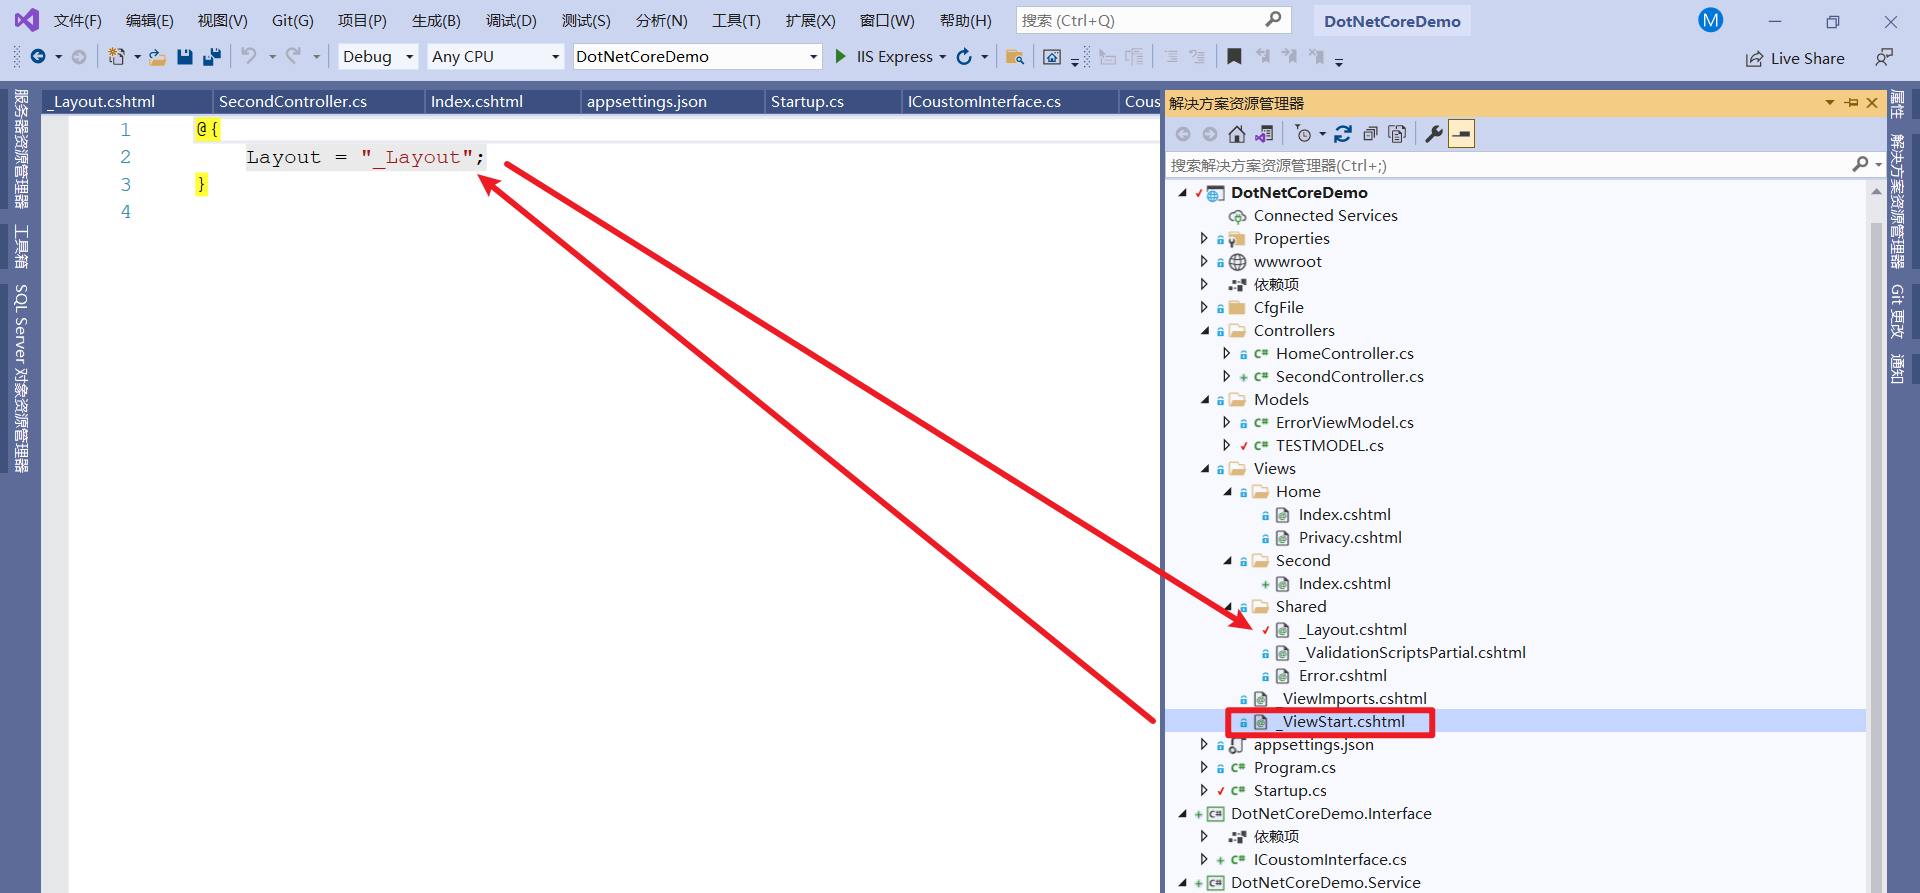
如果不想要模板页,想单页面展示也可以,可以在
_ViewStart.cshtml中 注释 layout = “_Layout”; 或者 修改 layout = null;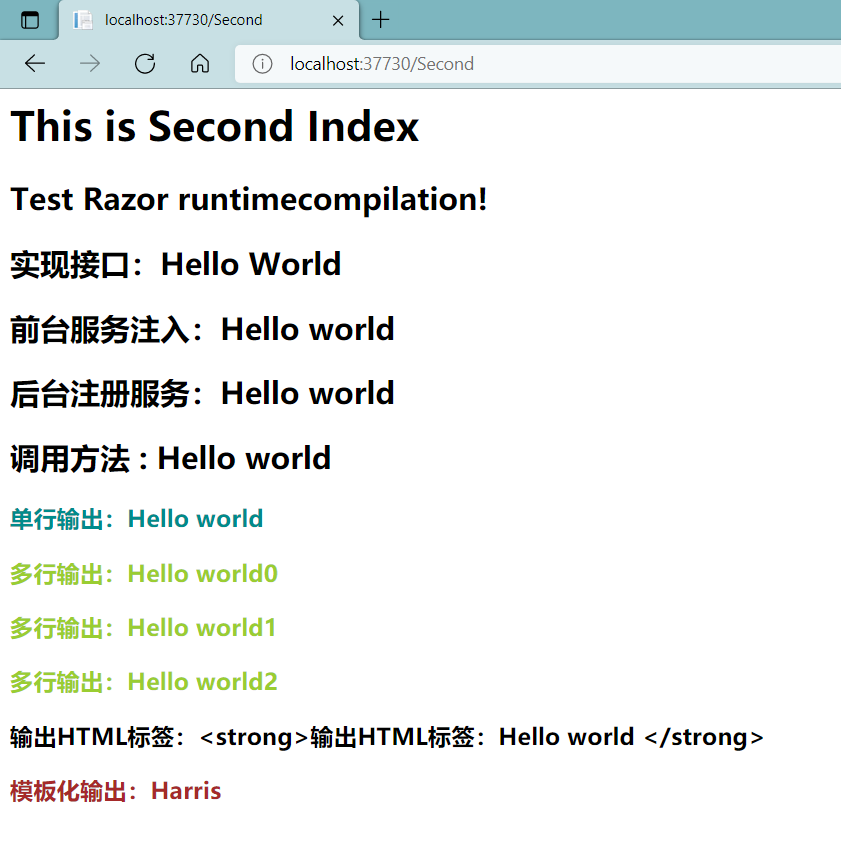
母版页
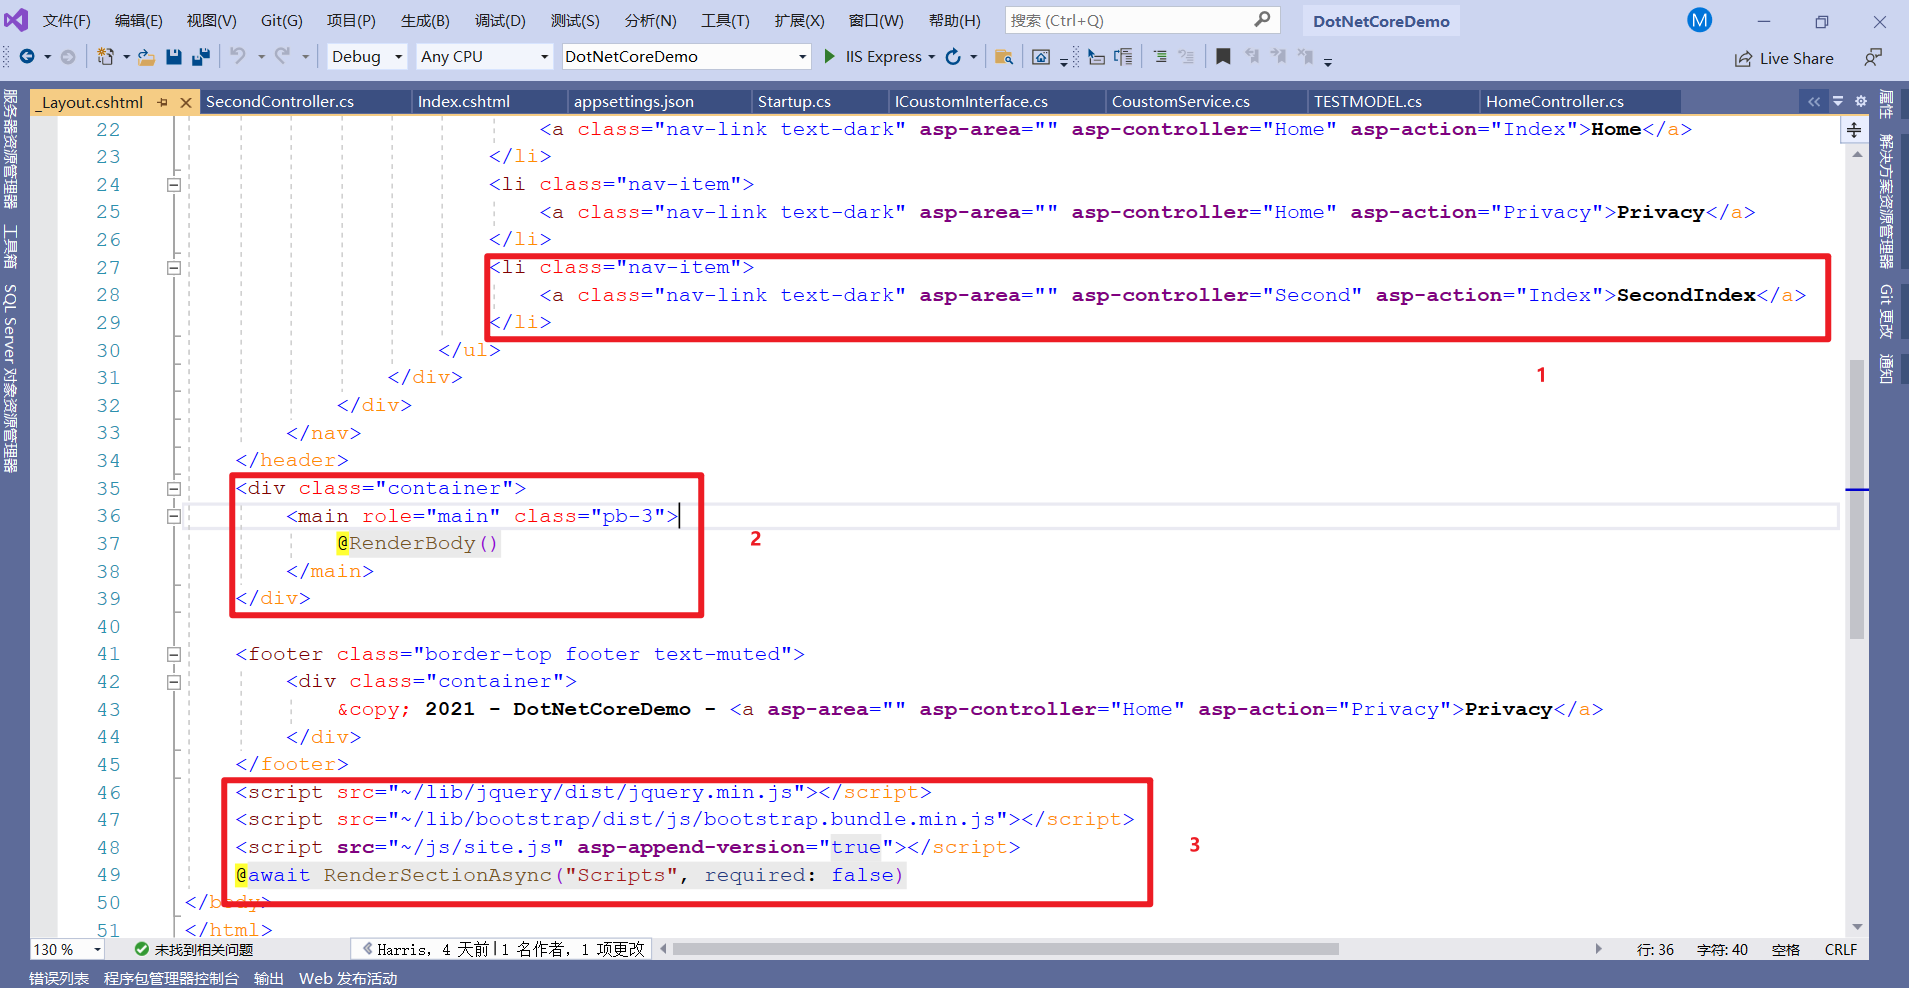
可以设置一些测试的菜单。
@RenderBody()相当于一个占位符,菜单中路由的界面都会在这里进行替换。@await RenderSectionAsync("Scripts",required:false)应用场景:当子页面不手动引用
Scripts类库的时候,可以和上述这行代码配套使用。
1
2
3
4
5
6
7
8
9
10
11
12
13
14
15
16
17
18
19
20
21
22//这个是不行的,除非手动引入js文件
<script type="text/javascript">
$(document).ready(function () {
console.log("Hello Harris");
alert("Hello Harris");
});
</script>
//这个可以,他使用的是模板页中的js文件,相当于把下述js脚本拿到模板页中,然后执行
@section Scripts{
<script type="text/javascript">
$(document).ready(function () {
console.log("Hello Harris");
alert("Hello Harris");
});
</script>
}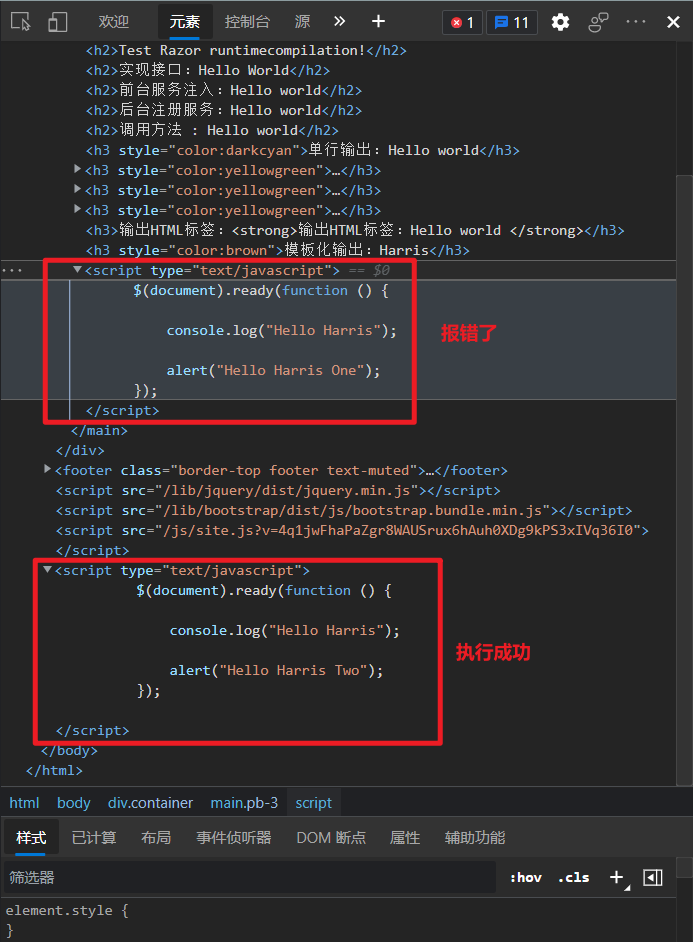
结合上一点说的,如果不使用母版页,如果注释掉或者等于null的话,使用母版页js库的代码就废了。
Razor 扩展
扩展控件(1)
@html.ActionLink 问题。
1
2
3
4
5
6
7
8
9
10
11
12
13
14
15
16
17
18
19
20
21
22
23
24
25
26
27
28
29
@{
ViewData["Title"] = "RazorControl Page";
}
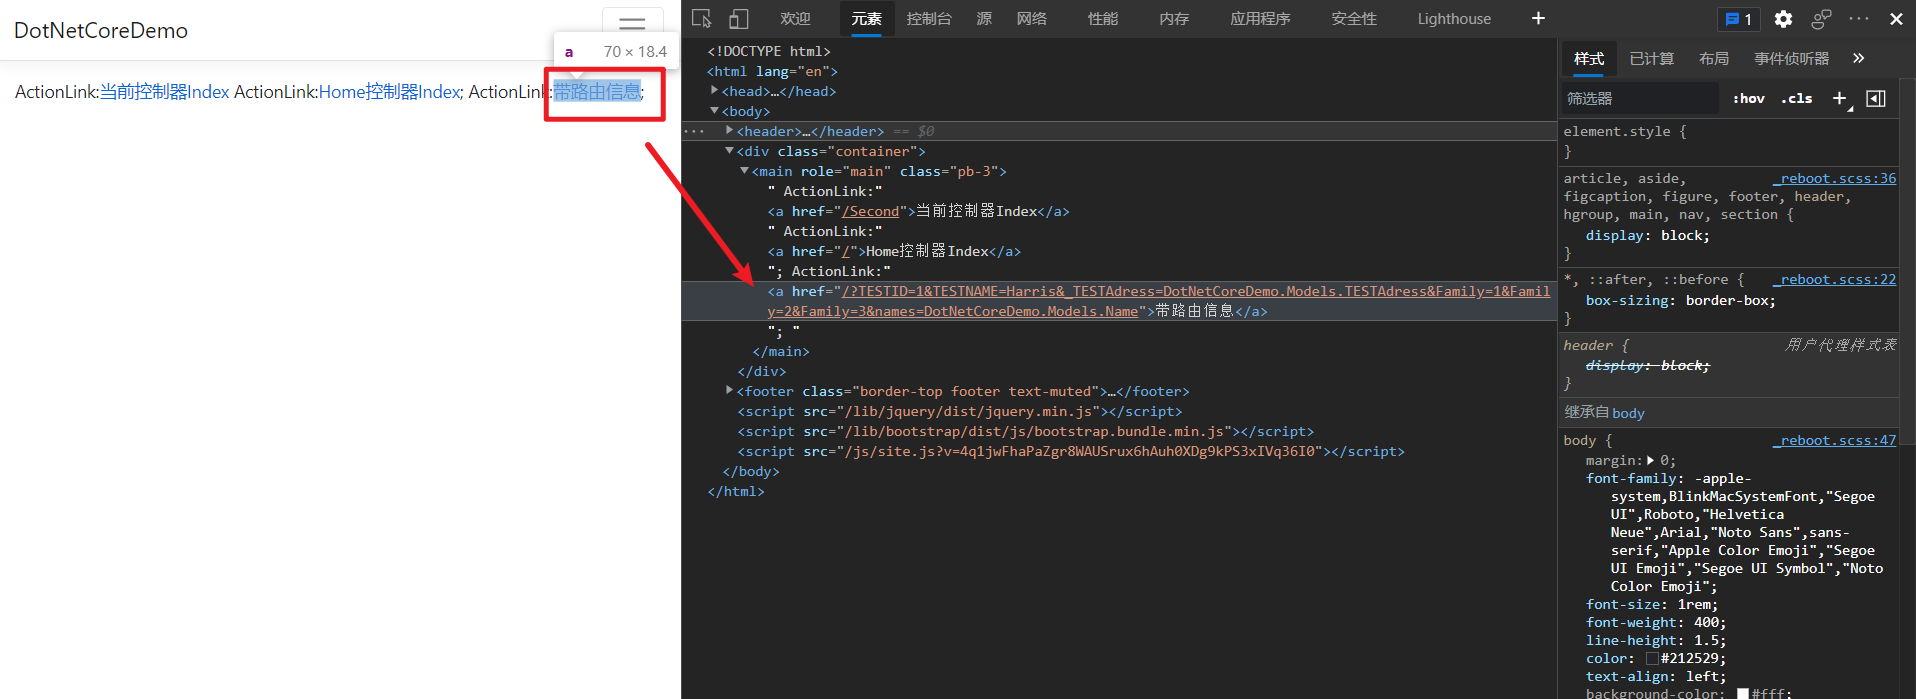
ActionLink:@Html.ActionLink("当前控制器Index", "index")
ActionLink:@Html.ActionLink("Home控制器Index", "index", "Home");
@{
TESTAdress testaddress_ = new TESTAdress();
testaddress_.Sheng = "a";
testaddress_.Shi = "b";
TESTMODEL tESTMODEL = new TESTMODEL
{
TESTID = "1",
TESTNAME = "Harris",
_TESTAdress = testaddress_,
Family = new List<string> { "1", "2", "3" },
names = new Name { Xing = "a",Ming = "b"}
};
}
ActionLink:@Html.ActionLink("带路由信息", "index", "Home", tESTMODEL);上述方法中有个错误的地方:就是最后一行,传的实体相对复杂,导致浏览器解析不了
1
<a href="/?TESTID=1&TESTNAME=Harris&_TESTAdress=DotNetCoreDemo.Models.TESTAdress&Family=1&Family=2&Family=3&names=DotNetCoreDemo.Models.Name">带路由信息</a>再结合下图:
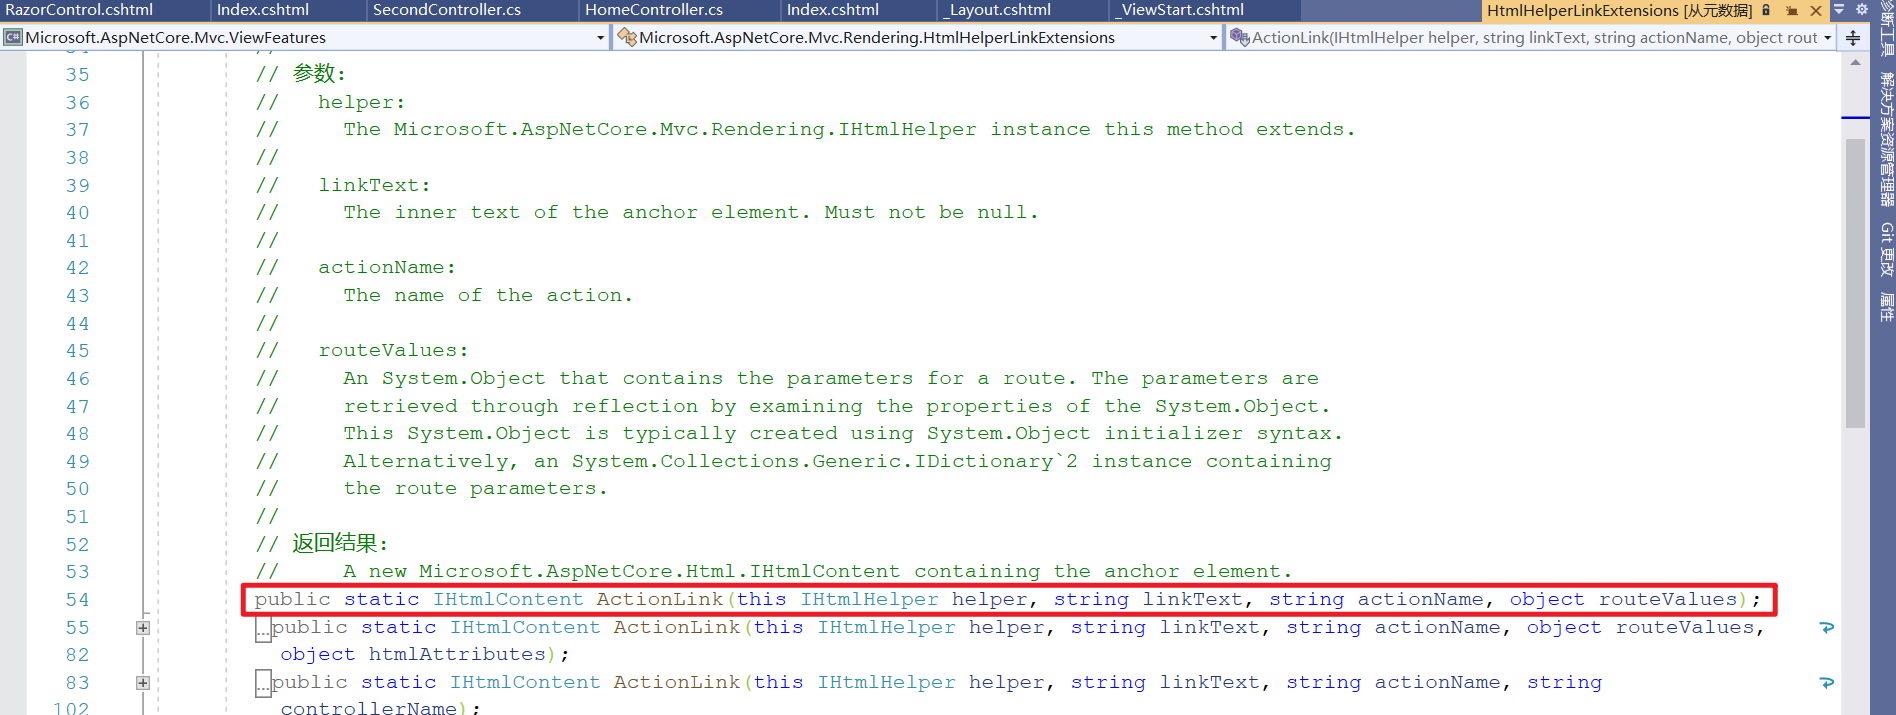
routeValues这个才是为了给浏览器解析作为页面参数传递的,所以这里不支持复杂实体应该是这个原因。新建一个静态方法
1
2
3
4
5
6
7
8
9
10
11
12
13
14
15
16
17
18using Microsoft.AspNetCore.Html;
using Microsoft.AspNetCore.Mvc.Rendering;
using System;
using System.Collections.Generic;
using System.Linq;
using System.Threading.Tasks;
namespace DotNetCoreDemo.Utility
{
public static class HtmlHelperLinkExtensions
{
public static IHtmlContent ActionImage(this IHtmlHelper helper,string src)
{
return new HtmlString($"<IMG src='{src}' alt='扩展控件IMAGE' style='width:100px;height:20px'/>");
}
}
}视图
1
2@*扩展控件*@
@Html.ActionImage("http://mmmp3.com/skin/default/images/logo.png")
扩展控件(2)
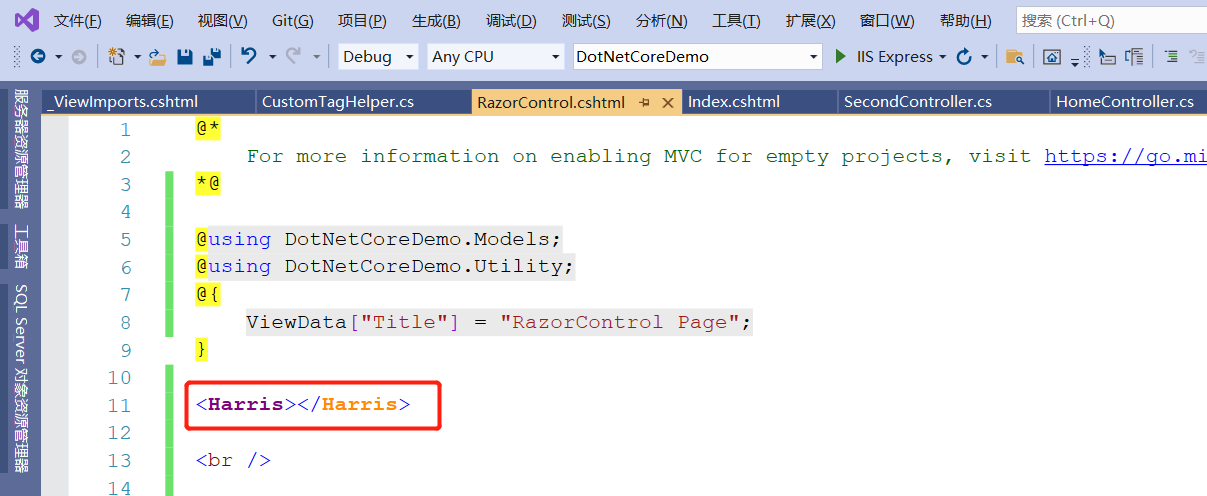
此扩展方法旨在扩展html体系中不存在得html 标签。
新建一个类 CustomTagHelper
1
2
3
4
5
6
7
8
9
10
11
12
13
14
15
16
17
18
19
20
21
22using Microsoft.AspNetCore.Razor.TagHelpers;
using System;
using System.Collections.Generic;
using System.Linq;
using System.Threading.Tasks;
namespace DotNetCoreDemo.Utility
{
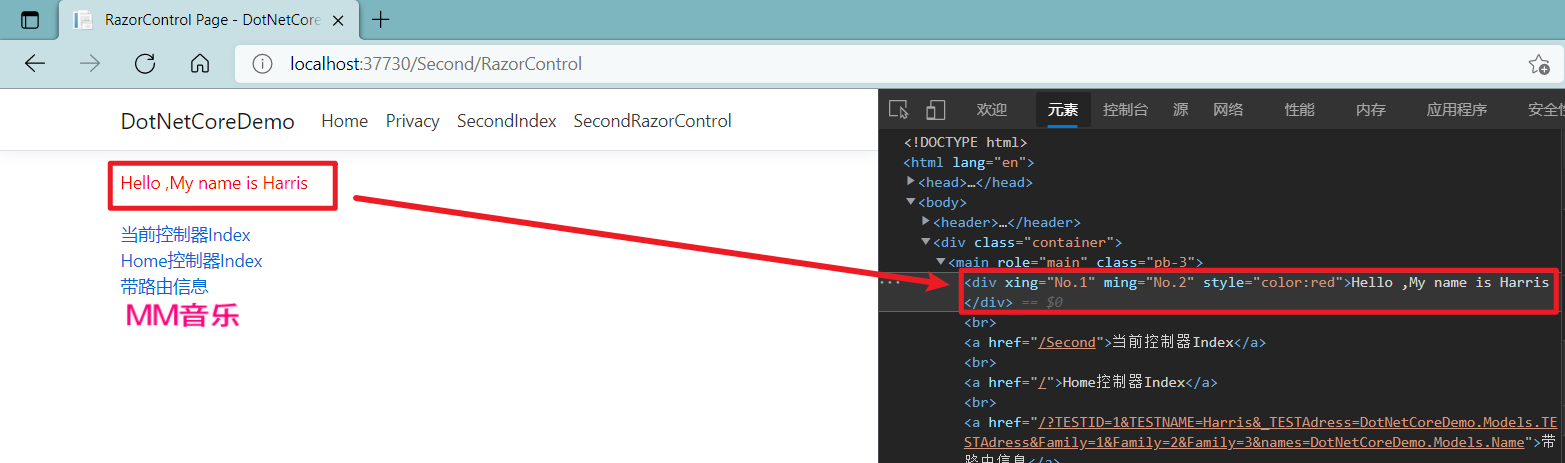
[HtmlTargetElement("Harris")]
public class CustomTagHelper : TagHelper //,ITagHelper
{
public override void Process(TagHelperContext context, TagHelperOutput output)
{
output.TagName = "div";
output.Attributes.Add("xing", "No.1");
output.Attributes.Add("ming", "No.2");
output.PreContent.SetContent("Hello ,My name is Harris");
output.Attributes.Add("style", "color:red");
}
}
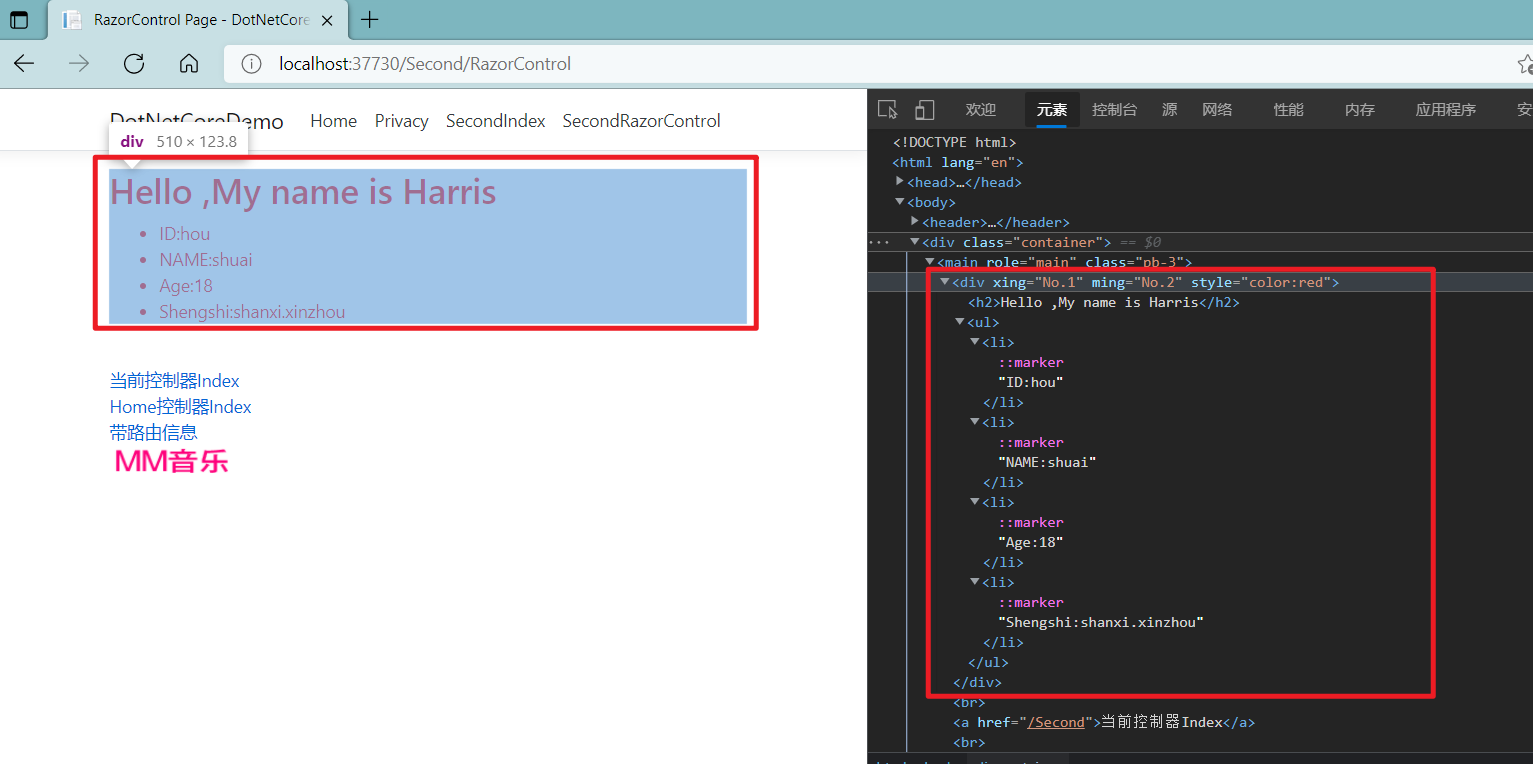
}- 标记
HtmlTargeElement()特性 - 继承
Taghelper或者实现ITaghelper接口 - 重写
Process方法 - 定义标签
- 指定属性、内容
- 标记
声明 在
_ViewImports.cshtml1
2
3
4@using DotNetCoreDemo
@using DotNetCoreDemo.Models
@addTagHelper *, Microsoft.AspNetCore.Mvc.TagHelpers
@addTagHelper *,DotNetCoreDemo //* 代表当前命名空间下都可使用应用
传参
设置好对象
1
2
3
4
5
6
7
8
9
10
11
12
13
14
15
16
17
18
19
20
21
22
23
24
25
26
27
28
29
30
31
32
33
34
35
36
37
38
39
40
41
42
43
44
45
46
47
48using Microsoft.AspNetCore.Razor.TagHelpers;
using System;
using System.Collections.Generic;
using System.Linq;
using System.Threading.Tasks;
namespace DotNetCoreDemo.Utility
{
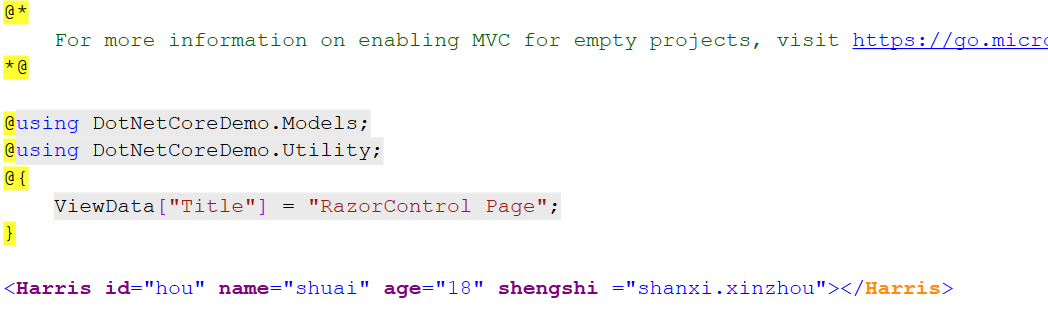
[HtmlTargetElement("Harris")]
public class CustomTagHelper : TagHelper //,ITagHelper
{
public string Id { get; set; }
public string Name { get; set; }
public string Age { get; set; }
public string Shengshi { get; set; }
public CustomTagHelper()
{
}
public override void Process(TagHelperContext context, TagHelperOutput output)
{
//接收参数
string _id = this.Id;
string _name = this.Name;
string _age = this.Age;
string _shengshi = this.Shengshi;
output.TagName = "div";
output.Attributes.Add("xing", "No.1");
output.Attributes.Add("ming", "No.2");
//output.PreContent.SetContent("Hello ,My name is Harris");
//使用参数
output.PreContent.SetHtmlContent("<h2>Hello ,My name is Harris</h2><ul><li>ID:" + _id + "</li><li>NAME:" + _name + "</li><li>Age:" + _age + "</li><li>Shengshi:" + _shengshi + "</li></ul>");
output.Attributes.Add("style", "color:red");
}
}
}标签属性传值
效果
局部视图
添加局部视图,其实就是在对应的view层添加一个cshtml文件
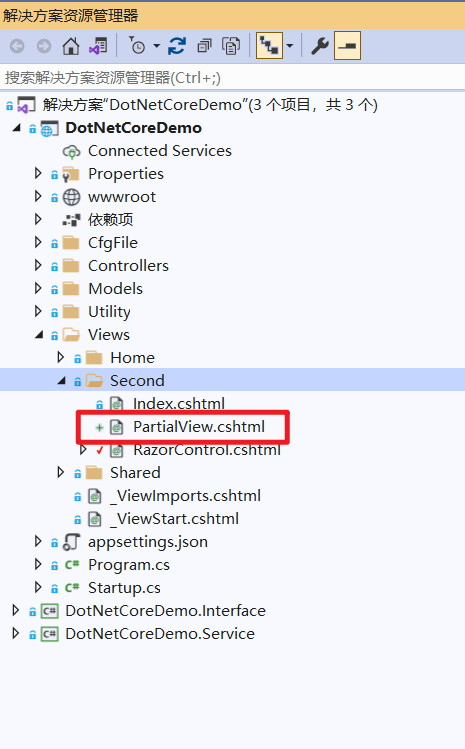
编辑 PartialView.cshtml ,相当于定义好局部视图,就长这个样子,Harris标签应用与上一节扩展控件内容。
1
2
3
4
5
6
7@model string
<Harris id="@Model" name="@Model" age="@Model"></Harris>
<Harris id="@Model" name="@Model" age="@Model"></Harris>
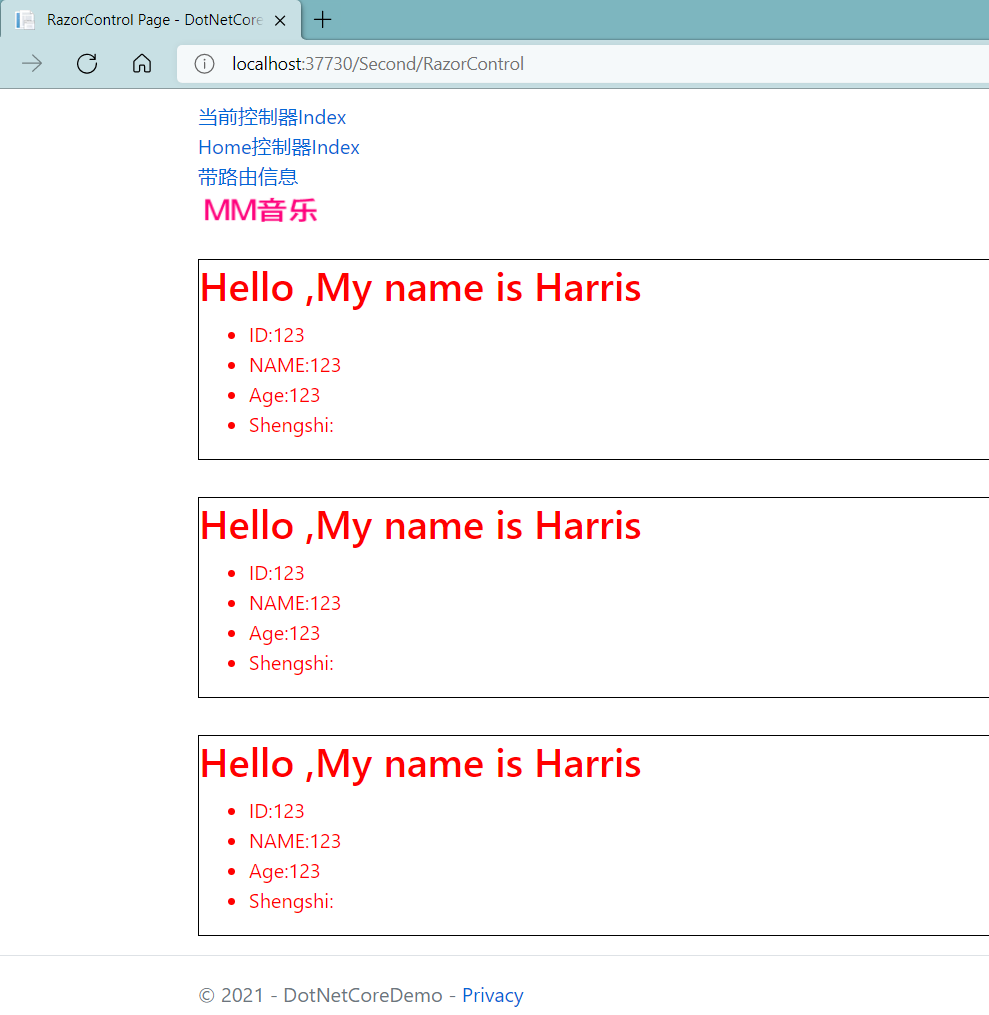
<Harris id="@Model" name="@Model" age="@Model"></Harris>应用
@Html.Partial1
2@*局部视图*@
@Html.Partial("PartialView", "123")// 123 是参数,也就是说,在调用局部视图得时候,其实可以间接设置其内容呈现
视图组件
新建视图组件扩展类
1
2
3
4
5
6
7
8
9
10
11
12
13
14
15
16
17
18
19
20
21
22
23
24
25
26
27
28
29
30
31
32
33
34
35
36
37
38
39
40
41
42
43
44
45
46using Microsoft.AspNetCore.Mvc;
using System;
using System.Collections.Generic;
using System.Linq;
using System.Threading.Tasks;
namespace DotNetCoreDemo.Utility
{
[ViewComponent(Name = "CustomList")]
public class ListViewComponent : ViewComponent
{
public async Task<IViewComponentResult> InvokeAsync(string SeachVal)
{
var list = await GetStudents(SeachVal);
ViewBag.User = "Harris";//可以用这个,等等...
//return View(list);// 默认找得是~/Views/Shared/CustomList/Default.cshtml
//这里可以指定视图组件的路径
return View("~/Views/Shared/Components/Test/DefaultTest.cshtml", list);
}
public Task<List<Student>> GetStudents(string SeachVal)
{
return Task.Run(() =>
{
return new List<Student>()
{
new Student { ID=1,NAME = "Harris"},
new Student { ID=2,NAME = "Make"},
new Student { ID=3,NAME = "Ped"},
new Student { ID=4,NAME = "Henry"}
};
});
}
}
public class Student
{
public int ID { get; set; }
public string NAME { get; set; }
}
}主要是继承
ViewComponent新建视图组件视图
1
2
3
4
5
6
7
8
9
10@using DotNetCoreDemo.Utility
@model List<Student>
<ul>
@foreach (var item in Model)
{
<li>@item.NAME</li>
}
</ul>应用
1
2
3
4
5
6
7
8
9
10
11
12@*视图组件*@
<h2>视图组件</h2>
<table>
<tr>
<td>@await Component.InvokeAsync("CustomList", new { SeachVal = "123456" })</td>
<td>@await Component.InvokeAsync("CustomList", new { SeachVal = "321321" })</td>
<td>@await Component.InvokeAsync("CustomList", new { SeachVal = "321321" })</td>
<td>@await Component.InvokeAsync("CustomList", new { SeachVal = "321321" })</td>
<td>@await Component.InvokeAsync("CustomList", new { SeachVal = "321321" })</td>
</tr>
</table>项目列表
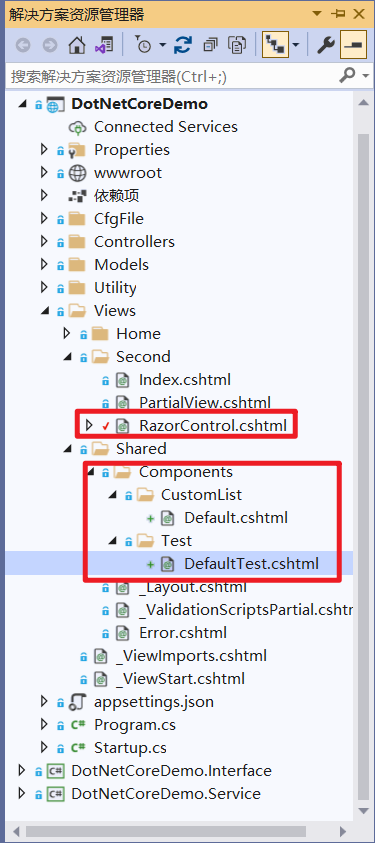
Components/CustomList/Default.cshtml与Components/Test/DefaultTest.cshtml中间的区别就是上面第一点中所说的,在返回View()的时候,要不要传具体路径的区别。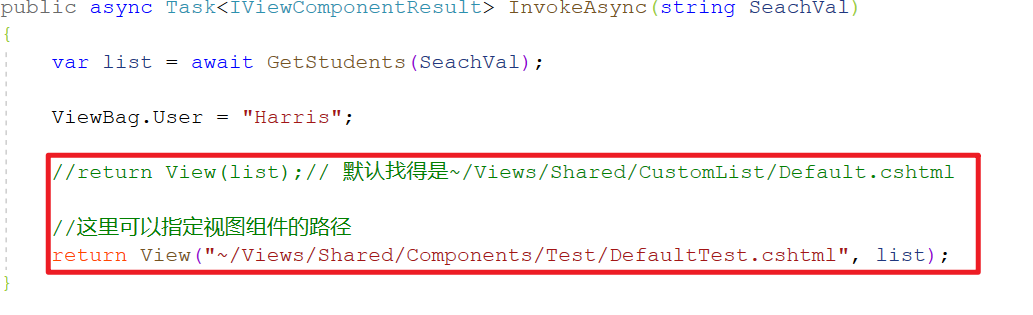
还得关心一下这个类里的异步结构。
结果
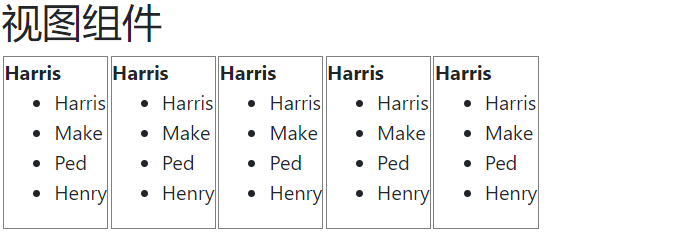
- 这地方主要是用的DefaultTest.cshtml,Harris 就是从 ViewBag.User 传过来滴。
IOC
IOC出现的背景
我们知道,软件开发领域有句著名的论断:不要重复发明轮子!因为软件开发讲求复用,所以,对于应用频繁的需求,总是有人设计各种通用框架和类库以减轻人们的开发负担。例如,数据持久化是非常频繁的需求,于是各种ORM框架应运而生;再如,对MVC的需求催生了Struts等一批用来实现MVC的框架。
随着面向对象分析与设计的发展和成熟,OOA&D被越来越广泛应用于各种项目中,然而,我们知道,用OO就不可能不用多态性,用多态性就不可能不用依赖注入,所以,依赖注入变成了非常频繁的需求,而如果全部手工完成,不但负担太重,而且还容易出错。再加上反射机制的发明,于是,自然有人开始设计开发各种用于依赖注入的专用框架。这些专门用于实现依赖注入功能的组件或框架,就是IoC Container。从这点看,IoC Container的出现有其历史必然性。目前,最著名的IoC也许就是Java平台上的Spring框架的IoC组件,而.NET平台上也有Spring.NET和Unity等。
IOC是什么
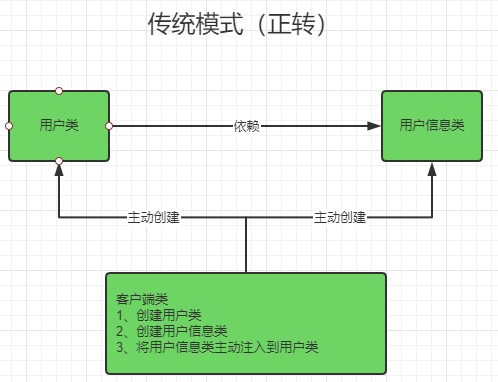
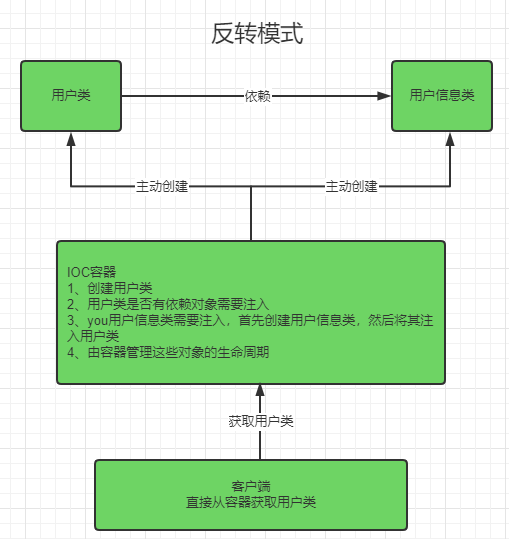
IOC(Inversion of Control),即“控制反转”,不是什么技术,而是一种设计思想。在Java开发中,IOC意味着将你设计好的对象交给容器控制,而不是传统的在你的对象内部直接控制。如何理解好Ioc呢?理解好Ioc的关键是要明确“谁控制谁,控制什么,为何是反转(有反转就应该有正转了),哪些方面反转了”,那我们来深入分析一下:
- 谁控制谁,控制什么:传统Java SE程序设计,我们直接在对象内部通过new进行创建对象,是程序主动去创建依赖对象;而IOC是有专门一个容器来创建这些对象,即由IOC容器来控制对象的创建;谁控制谁?当然是IOC容器控制了对象;控制什么?那就是主要控制了外部资源获取
- 为何是反转,哪些方面反转了:有反转就有正转,传统应用程序是由我们自己在对象中主动控制去直接获取依赖对象,也就是正转;而反转则是由容器来帮忙创建及注入依赖对象;为何是反转?因为由容器帮我们查找及注入依赖对象,对象只是被动的接受依赖对象,所以是反转;哪些方面反转了?依赖对象的获取被反转了。
IOC能做什么
IoC不是一种技术,只是一种思想,一个重要的面向对象编程的法则,它能指导我们如何设计出松耦合、更优良的程序。传统应用程序都是由我们在类内部主动创建依赖对象,从而导致类与类之间高耦合,难于测试;有了IoC容器后,把创建和查找依赖对象的控制权交给了容器,由容器进行注入组合对象,所以对象与对象之间是松散耦合,这样也方便测试,利于功能复用,更重要的是使得程序的整个体系结构变得非常灵活。
其实IoC对编程带来的最大改变不是从代码上,而是从思想上,发生了“主从换位”的变化。应用程序原本是老大,要获取什么资源都是主动出击,但是在IoC/DI思想中,应用程序就变成被动的了,被动的等待IoC容器来创建并注入它所需要的资源了。
IoC很好的体现了面向对象设计法则之一—— 好莱坞法则:“别找我们,我们找你”;即由IoC容器帮对象找相应的依赖对象并注入,而不是由对象主动去找。
IOC和DI
DI—Dependency Injection,即“依赖注入”:是组件之间依赖关系由容器在运行期决定,形象的说,即由容器动态的将某个依赖关系注入到组件之中。依赖注入的目的并非为软件系统带来更多功能,而是为了提升组件重用的频率,并为系统搭建一个灵活、可扩展的平台。通过依赖注入机制,我们只需要通过简单的配置,而无需任何代码就可指定目标需要的资源,完成自身的业务逻辑,而不需要关心具体的资源来自何处,由谁实现。
理解DI的关键是:“谁依赖谁,为什么需要依赖,谁注入谁,注入了什么”,那我们来深入分析一下:
- 谁依赖于谁:当然是应用程序依赖于IoC容器
- 为什么需要依赖:应用程序需要IoC容器来提供对象需要的外部资源
- 谁注入谁:很明显是IoC容器注入应用程序某个对象,应用程序依赖的对象
- 注入了什么:就是注入某个对象所需要的外部资源(包括对象、资源、常量数据)
IOC和DI有什么关系呢?其实它们是同一个概念的不同角度描述,由于控制反转概念比较含糊(可能只是理解为容器控制对象这一个层面,很难让人想到谁来维护对象关系),所以2004年大师级人物Martin Fowler又给出了一个新的名字:“依赖注入”,相对IoC 而言,“依赖注入”明确描述了“被注入对象依赖IoC容器配置依赖对象”。
Dl 注入方式
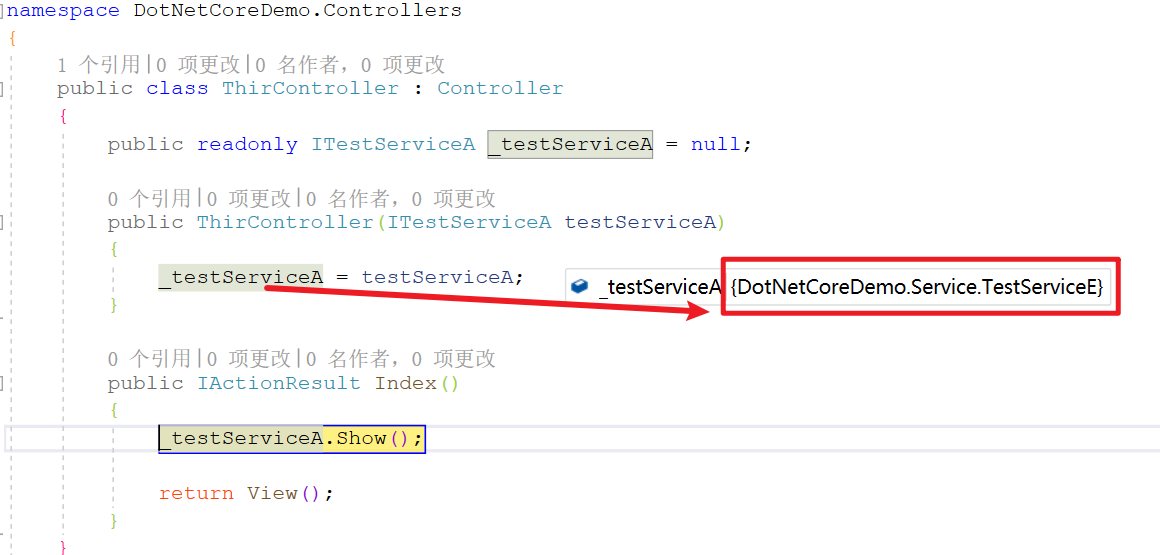
交代一下服务和接口
1 | |
第一种
在
Startup中的ConfigureServices中注册。1
services.AddTransient<ITestServiceA, TestServiceA>();在控制器中先实例化一个私有只读的
ITestServiceA对象,然后新建构造函数,构造函数的入参也是ITestServiceA对象。在构造函数中,将入参的ITestServiceA对象赋值给实例化好的ITestServiceA对象,然后就可以在方法中使用。1
2
3
4
5
6
7
8
9
10
11
12
13
14
15
16
17
18
19
20
21
22
23
24
25
26
27
28
29
30
31
32
33
34
35
36
37
38
39
40
41
42
43
44
45
46
47
48
49
50
51
52
53
54
55
56
57
58
59
60
61
62
63
64
65
66
67
68
69
70
71using DotNetCoreDemo.Interface;
using Microsoft.AspNetCore.Mvc;
using System;
using System.Collections.Generic;
using System.Linq;
using System.Threading.Tasks;
namespace DotNetCoreDemo.Controllers
{
public class IOCController : Controller
{
//实例化一个私有只读的`ITestServiceA` 对象
private readonly ITestServiceA _ItestServiceA = null;//
//构造函数
public IOCController(ITestServiceA itestserviceA)
{
_ItestServiceA = itestserviceA;
}
public IActionResult Index()
{
//应用
_ItestServiceA.Show();
return View();
}
}
}
2. 第二种
1. 同第一种一样,同样也得先在Startup中注册。
2. 在控制器中先实例化一个私有只读的`IServiceProvider` 对象,然后新建构造函数,构造函数的入参也是`IServiceProvider` 对象。在构造函数中,将入参的`IServiceProvider`对象赋值给实例化好的`IServiceProvider` 对象。但是在使用的时候有差异。
``` CSharp
using DotNetCoreDemo.Interface;
using Microsoft.AspNetCore.Mvc;
using System;
using System.Collections.Generic;
using System.Linq;
using System.Threading.Tasks;
namespace DotNetCoreDemo.Controllers
{
public class IOCController : Controller
{
private readonly ITestServiceA _ItestServiceA = null;
private readonly IServiceProvider _serviceProvider = null;
public IOCController(ITestServiceA itestserviceA, IServiceProvider serviceProvider)
{
_ItestServiceA = itestserviceA;
_serviceProvider = serviceProvider;
}
public IActionResult Index()
{
_ItestServiceA.Show();
ITestServiceA testServiceA = (ITestServiceA)_serviceProvider.GetService(typeof(ITestServiceA));
testServiceA.Show();
return View();
}
}
}
第三种
在视图中注册
1
2
3
4
5@inject DotNetCoreDemo.Interface.ITestServiceA testServiceA
@{
testServiceA.Show();
}
Dl 依赖注入
如果对象B依赖与对象A,就可以先构造A传递给B,然后得到对应得B得对象实力。
依赖注入可以无限层级的注入,前提是先注入服务。
ServiceA 层
1 | |
InterfaceA 层
1 | |
ServiceB层
1 | |
InterfaceB层
1 | |
Startup 注入
1 | |
上述,呈现出的,就是ServiceB 依赖 ServiceA ,在 ServiceB 的构造方法中,传入 ServiceA ,然后再 ServiceB 中,调用 ServiceA 的方法,构成了ServiceB ReturnStr 方法结果的呈现。应该能诠释 依赖注入的概念了,以此类推,可以衍生出 各种依赖。不怕注册的多服务,尽管上。
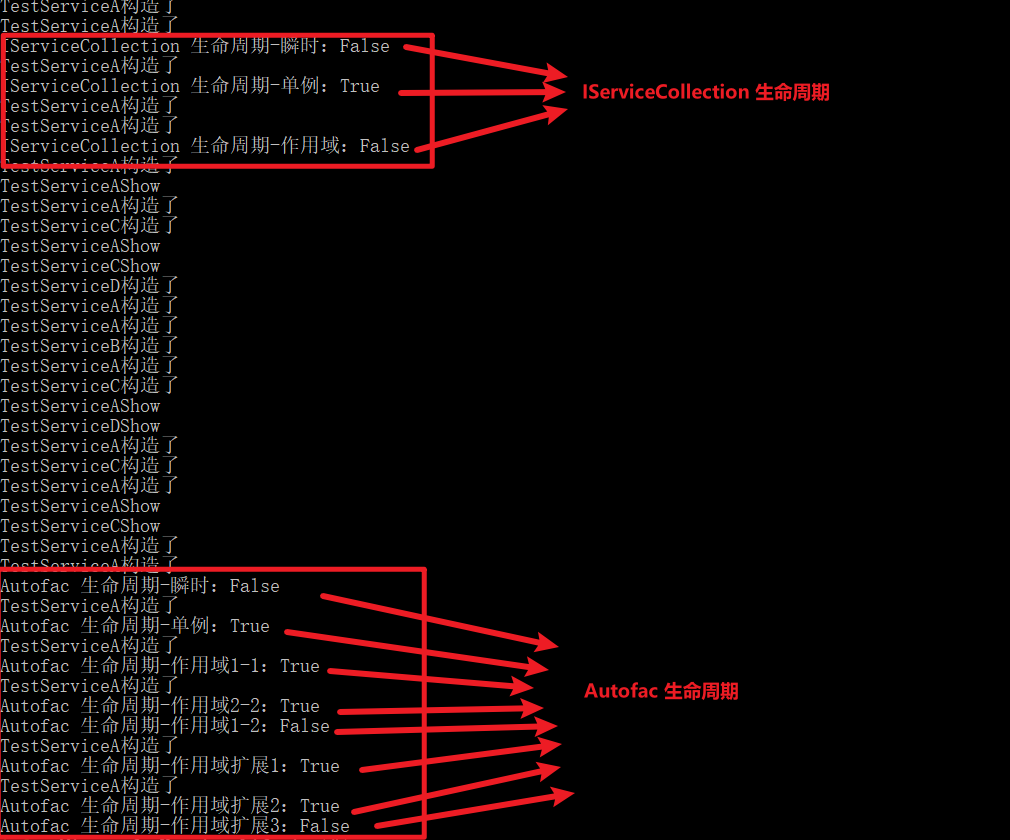
IServiceCollection 生命周期
瞬时生命周期 Addtransient 注册的生命周期:每次都实例化一个新的。正常瞬时生命周期使用的多,每次一个对象
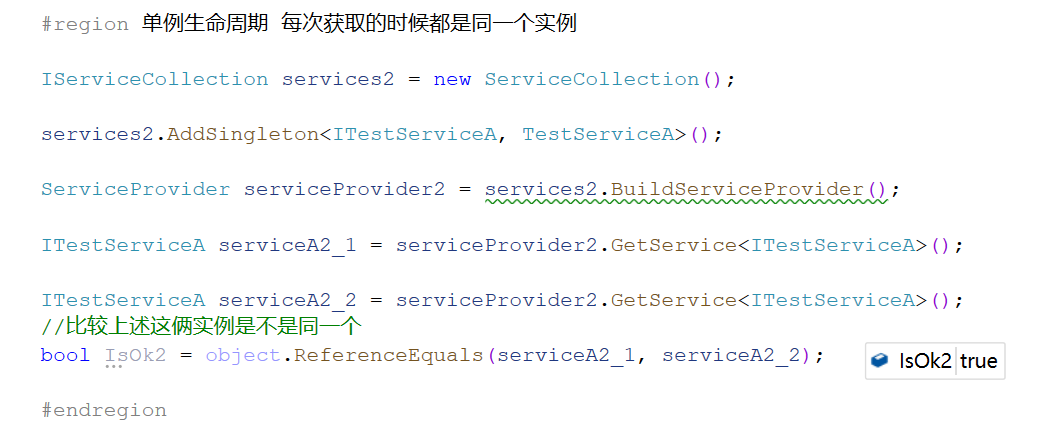
单例生命周期:AddSingleton 注册的生命周期:serviceA2_1 走过一遍后,serviceA2_2 直接就过去了,所以这玩意注册,一直玩的就一个。
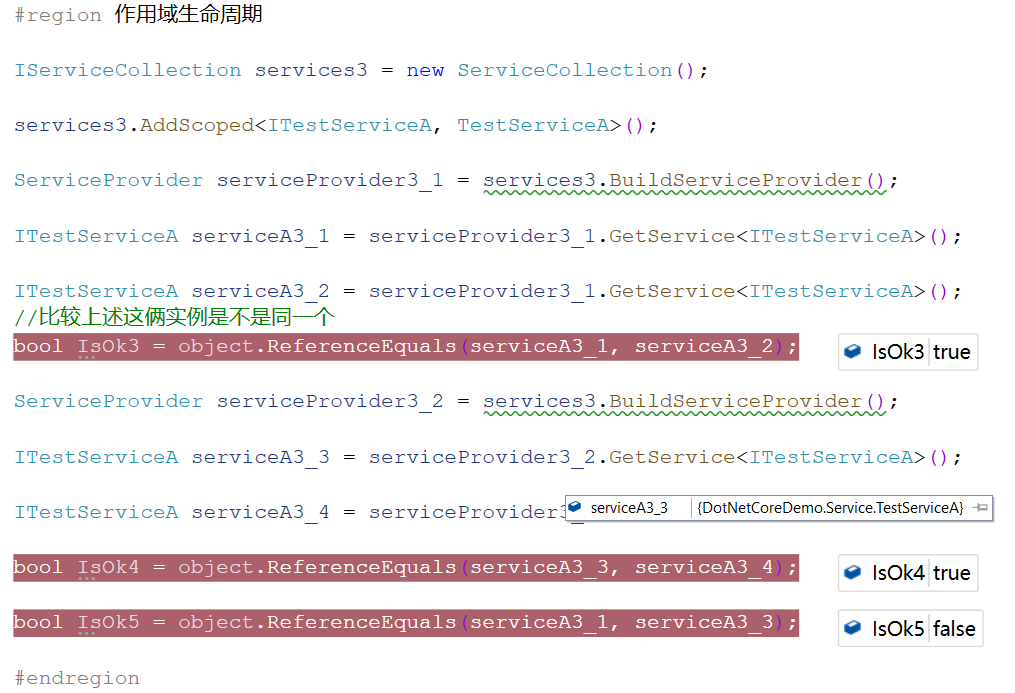
作用域生命周期
同一个IServiceCollection ,不同的ServiceProvider 实例化出来的对象,在每个ServiceProvider 内实例化的对象相当于单例,但是不同的 ServiceProvider 之间 是不一样的。
Code
1
2
3
4
5
6
7
8
9
10
11
12
13
14
15
16
17
18
19
20
21
22
23
24
25
26
27
28
29
30
31
32
33
34
35
36
37
38
39
40
41
42
43
44
45
46
47
48
49
50
51
52
53
54
55
56
57
58
59
60
61
62
63
64
65
66
67
68
69
70
71
72
73
74
75
76
77
78
79
80
81
82
83
84
85
86public void ConfigureServices(IServiceCollection services)
{
#region IOC注册服务
services.AddTransient<ITestServiceA, TestServiceA>();
services.AddTransient<ITestServiceB, TestServiceB>();
#endregion
#region 服务控制器 生命周期
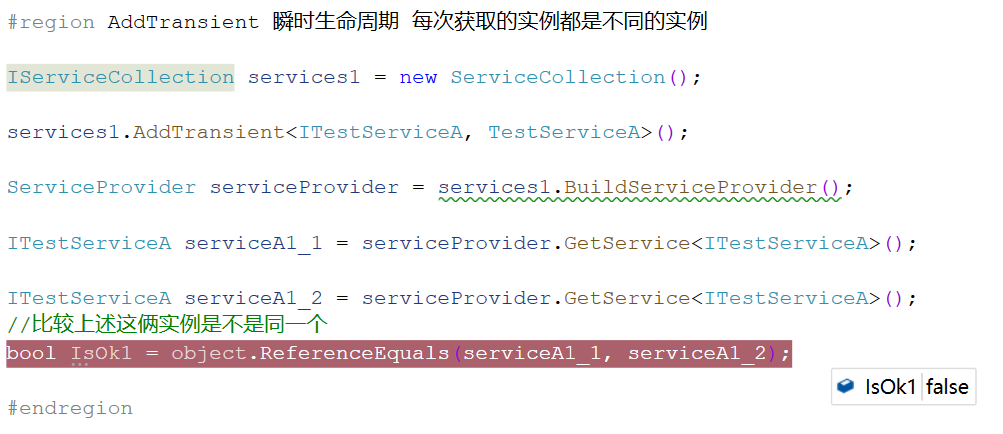
#region 瞬时生命周期 每次获取的实例都是不同的实例
IServiceCollection services1 = new ServiceCollection();
services1.AddTransient<ITestServiceA, TestServiceA>();
ServiceProvider serviceProvider = services1.BuildServiceProvider();
ITestServiceA serviceA1_1 = serviceProvider.GetService<ITestServiceA>();
ITestServiceA serviceA1_2 = serviceProvider.GetService<ITestServiceA>();
//比较上述这俩实例是不是同一个
bool IsOk1 = object.ReferenceEquals(serviceA1_1, serviceA1_2);
#endregion
#region 单例生命周期 每次获取的时候都是同一个实例
IServiceCollection services2 = new ServiceCollection();
services2.AddSingleton<ITestServiceA, TestServiceA>();
ServiceProvider serviceProvider2 = services2.BuildServiceProvider();
ITestServiceA serviceA2_1 = serviceProvider2.GetService<ITestServiceA>();
ITestServiceA serviceA2_2 = serviceProvider2.GetService<ITestServiceA>();
//比较上述这俩实例是不是同一个
bool IsOk2 = object.ReferenceEquals(serviceA2_1, serviceA2_2);
#endregion
#region 作用域生命周期
IServiceCollection services3 = new ServiceCollection();
services3.AddScoped<ITestServiceA, TestServiceA>();
ServiceProvider serviceProvider3_1 = services3.BuildServiceProvider();
ITestServiceA serviceA3_1 = serviceProvider3_1.GetService<ITestServiceA>();
ITestServiceA serviceA3_2 = serviceProvider3_1.GetService<ITestServiceA>();
//比较上述这俩实例是不是同一个
bool IsOk3 = object.ReferenceEquals(serviceA3_1, serviceA3_2);
ServiceProvider serviceProvider3_2 = services3.BuildServiceProvider();
ITestServiceA serviceA3_3 = serviceProvider3_2.GetService<ITestServiceA>();
ITestServiceA serviceA3_4 = serviceProvider3_2.GetService<ITestServiceA>();
bool IsOk4 = object.ReferenceEquals(serviceA3_3, serviceA3_4);
bool IsOk5 = object.ReferenceEquals(serviceA3_1, serviceA3_3);
#endregion
#endregion
services.AddControllersWithViews();
services.AddSession();
//加入中间件,方便实时调试HTML
services.AddRazorPages().AddRazorRuntimeCompilation();
//注入服务
services.AddTransient<ICoustomInterface, CoustomService>();
//取配置文件中的TEST节点,映射到 TESTMODEL 实体
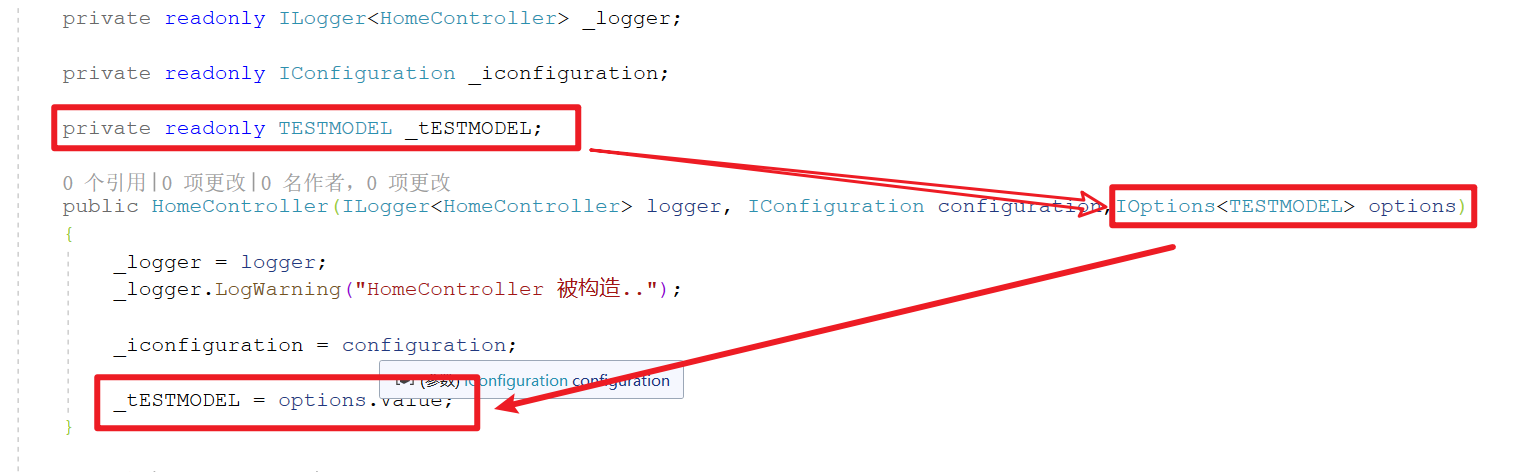
services.Configure<TESTMODEL>(Configuration.GetSection("TEST"));
}
Autofac 应用
初识 Autofac
Autofac 是一款第三方,很流行的 IOC容器,应用方法如下:
- Nuget 获取 Autofac 组件。
- 创建一个ContainerBuilder 对象
- 注册抽象和实现方法 格式:builder.RegisterType<实现方法>().As<抽象接口>();
- Build 得到 container 容器
- 管 container 容器 要 ITestServiceA 服务
- 应用 要到的 ITestServiceA 服务
1 | |
Autofac 多种注册方式
第一种:构造函数注入
1 | |
这没啥说的,基本操作。
第二种:属性注入
1 | |
关注一下TestServiceD 里,还有 PropertiesAutowired()
1 | |
第三种:方法注入
1 | |
这个地方需要关注两点:
方法注入种
TestServiceC的注入方式与AB注入方式的差异OnActivated上述不同的注册方式是需要结合下面的代码使用,注意
SetService方法1
2
3
4
5
6
7
8
9
10
11
12
13
14
15
16
17
18
19
20
21
22
23
24
25
26
27
28
29
30
31
32
33using DotNetCoreDemo.Interface;
using System;
using System.Collections.Generic;
using System.Linq;
using System.Text;
using System.Threading.Tasks;
namespace DotNetCoreDemo.Service
{
public class TestServiceC : ITestServiceC
{
private ITestServiceA _testServiceA = null;
public void SetService(ITestServiceA testServiceA)
{
_testServiceA = testServiceA;
}
public TestServiceC(ITestServiceA serviceA)
{
_testServiceA = serviceA;
Console.WriteLine(this.GetType().Name + "构造了");
}
public void Show()
{
_testServiceA.Show();
Console.WriteLine(this.GetType().Name + "Show");
}
}
}
Autofac 生命周期
第一种:瞬时生命周期(InstancePerDependency)
1 | |
第二种:单例生命周期(SingleInstance)
1 | |
第三种:作用域生命周期(InstancePerLifetimeScope)
1 | |
第三种扩展:加参数标记
1 | |
Autofac 读取配置文件注册
Nuget 获取
- Autofac.Extensions.DependencyInjection
- Autofac.Configuration
准备配置文件
1
2
3
4
5
6
7
8
9
10
11
12
13
14
15
16
17
18
19
20
21
22
23
24
25
26
27
28
29
30
31
32
33
34
35
36
37
38
39
40
41
42
43
44{
"components": [
{
"type": "DotNetCoreDemo.Service.TestServiceA,DotNetCoreDemo.Service",
"services": [
{
"type": "DotNetCoreDemo.Interface.ITestServiceA,DotNetCoreDemo.Interface"
}
],
"instanceScope": "single-instance", //生命周期
"injectProperties": true // 是否支持属性注入
},
{
"type": "DotNetCoreDemo.Service.TestServiceB,DotNetCoreDemo.Service",
"services": [
{
"type": "DotNetCoreDemo.Interface.ITestServiceB,DotNetCoreDemo.Interface"
}
],
"instanceScope": "single-instance", //生命周期
"injectProperties": true // 是否支持属性注入
},
{
"type": "DotNetCoreDemo.Service.TestServiceC,DotNetCoreDemo.Service",
"services": [
{
"type": "DotNetCoreDemo.Interface.ITestServiceC,DotNetCoreDemo.Interface"
}
],
"instanceScope": "single-instance", //生命周期
"injectProperties": true // 是否支持属性注入
},
{
"type": "DotNetCoreDemo.Service.TestServiceD,DotNetCoreDemo.Service",
"services": [
{
"type": "DotNetCoreDemo.Interface.ITestServiceD,DotNetCoreDemo.Interface"
}
],
"instanceScope": "single-instance", //生命周期
"injectProperties": true // 是否支持属性注入
}
]
}读取配置文件,通过Autofac 配置文件实现注册抽象服务和具体方法。
1
2
3
4
5
6
7
8
9
10
11
12
13
14
15
16
17
18
19
20
21
22
23
24
25
26
27
28
29
30
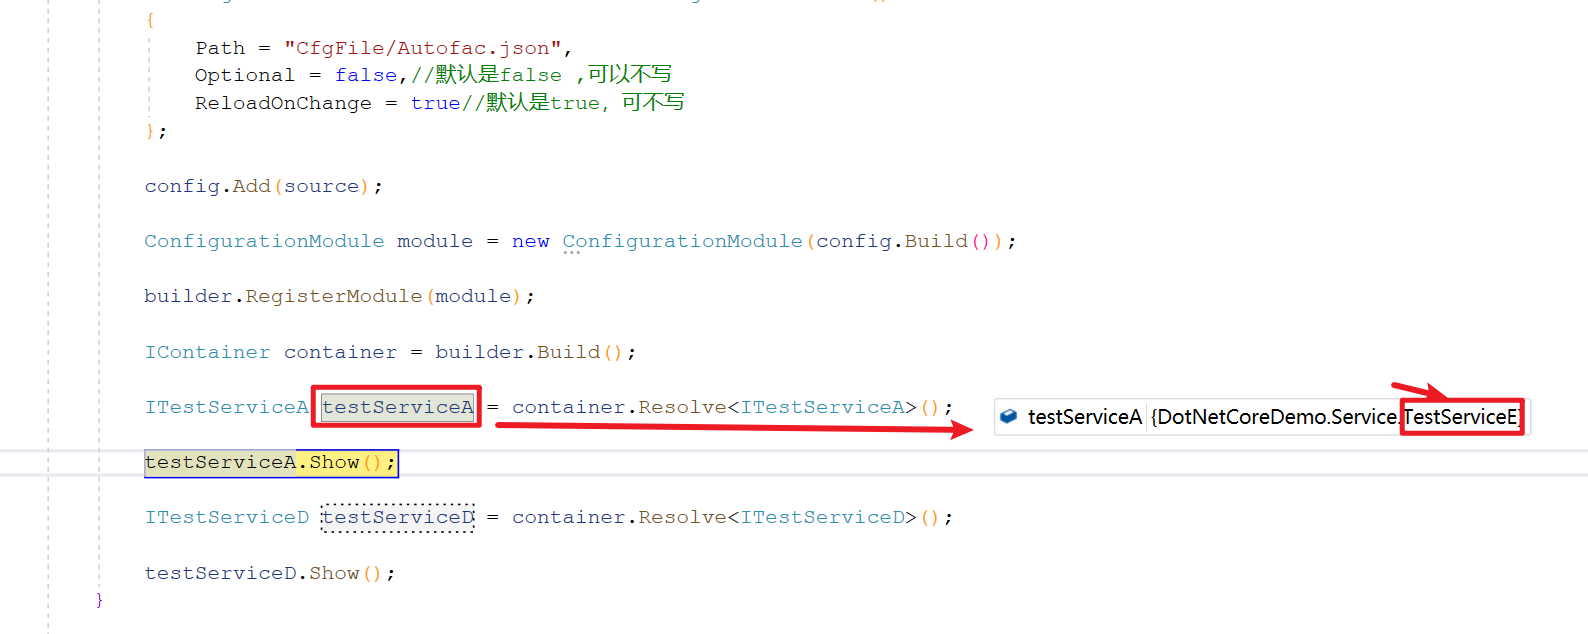
31#region Autofac 读取配置文件注册服务
{
ContainerBuilder builder = new ContainerBuilder();
IConfigurationBuilder config = new ConfigurationBuilder();
IConfigurationSource source = new JsonConfigurationSource()
{
Path = "CfgFile/Autofac.json",
Optional = false,//默认是false ,可以不写
ReloadOnChange = true//默认是true,可不写
};
config.Add(source);
ConfigurationModule module = new ConfigurationModule(config.Build());
builder.RegisterModule(module);
IContainer container = builder.Build();
ITestServiceA testServiceA = container.Resolve<ITestServiceA>();
testServiceA.Show();
ITestServiceD testServiceD = container.Resolve<ITestServiceD>();
testServiceD.Show();
}
#endregion有了Autofac 配置文件就可以灵活的调整服务(interface)与服务本身(Service)中的关系。
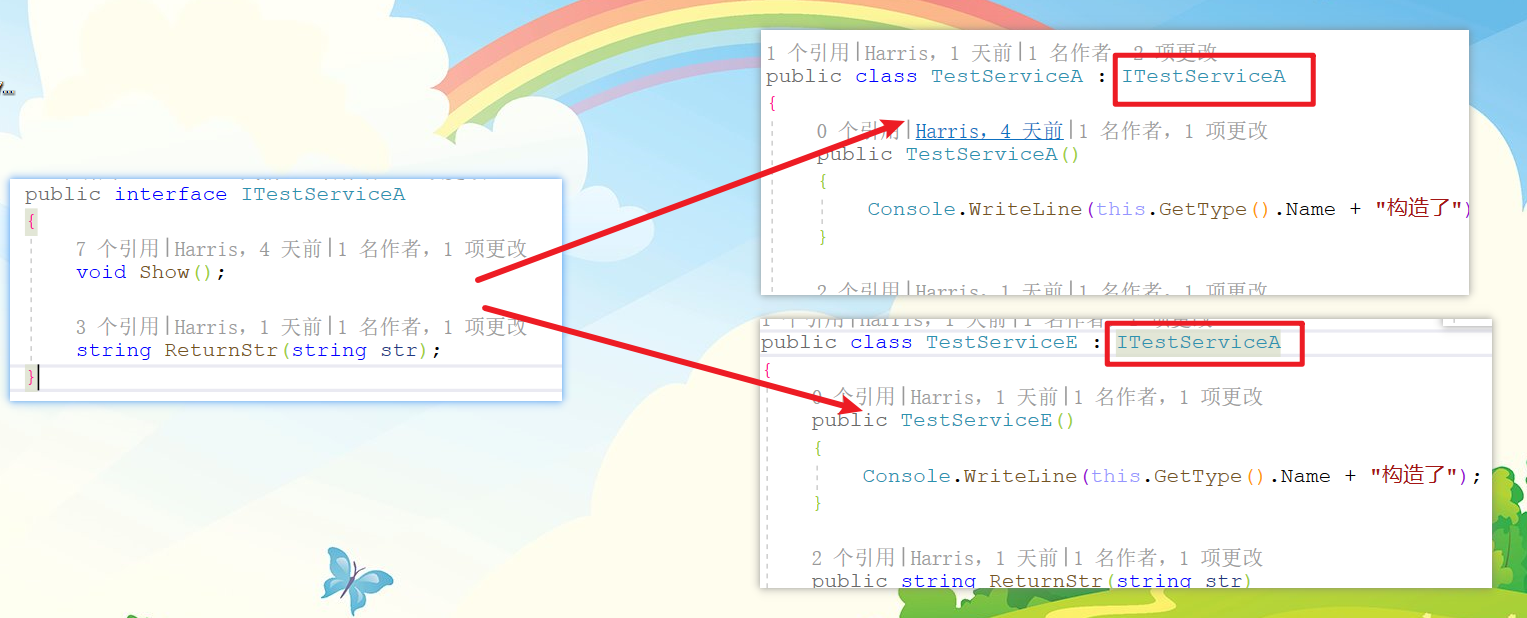
举个例子:如果现在有个
TestServiceE,依赖于ItestServiceA1
2
3
4
5
6
7
8
9
10
11
12
13
14
15
16
17
18
19
20
21
22
23
24
25
26
27using DotNetCoreDemo.Interface;
using System;
using System.Collections.Generic;
using System.Linq;
using System.Text;
using System.Threading.Tasks;
namespace DotNetCoreDemo.Service
{
public class TestServiceE : ITestServiceA
{
public TestServiceE()
{
Console.WriteLine(this.GetType().Name + "构造了");
}
public string ReturnStr(string str)
{
return str + GetType().Name.ToString();
}
public void Show()
{
Console.WriteLine(GetType().Name + "Show");
}
}
}然后刚才实现读取配置的代码中,ItestServiceA 想用的是 TestServiceE 的实现方法。只需要修改配置文件即可。
修改前:
1
2
3
4
5
6
7
8
9
10{
"type": "DotNetCoreDemo.Service.TestServiceA,DotNetCoreDemo.Service",
"services": [
{
"type": "DotNetCoreDemo.Interface.ITestServiceA,DotNetCoreDemo.Interface"
}
],
"instanceScope": "single-instance", //生命周期
"injectProperties": true // 是否支持属性注入
},修改后:
1
2
3
4
5
6
7
8
9
10{
"type": "DotNetCoreDemo.Service.TestServiceE,DotNetCoreDemo.Service",
"services": [
{
"type": "DotNetCoreDemo.Interface.ITestServiceA,DotNetCoreDemo.Interface"
}
],
"instanceScope": "single-instance", //生命周期
"injectProperties": true // 是否支持属性注入
},
Autofac 整合到MVC
Autofac 是一个第三方容器,需要在Program 中告诉框架,要是使用哪个IOC工厂。(AutofacServiceProviderFactory)
1
2
3
4
5
6
7
public static IHostBuilder CreateHostBuilder(string[] args) =>
Host.CreateDefaultBuilder(args)
.ConfigureWebHostDefaults(webBuilder =>
{
webBuilder.UseStartup<Startup>();
})
.UseServiceProviderFactory(new AutofacServiceProviderFactory());Startup 文件中新增方法,这个方法被 Autofac 承包了,是个默认执行的方法
1
2
3
4
5
6
7
8
9
10
11
12
13
14
15
16
17/// <summary>
/// Autofac 此方法会在加载的时候默认执行
///
/// 有了此方法,不意味着原生的注册方法不灵了,原生的注册方法照样好使
///
/// 注意:在Autofac注册的时候,会将原生的注册方法都接管过来。
/// </summary>
/// <param name="container"></param>
public void ConfigureContainer(ContainerBuilder container)
{
//前三个注册服务交给原生注册方法
//container.RegisterType<TestServiceA>().As<ITestServiceA>();
//container.RegisterType<TestServiceB>().As<ITestServiceB>();
//container.RegisterType<TestServiceC>().As<ITestServiceC>();
//这个给Autofac注册,关注AutofaCollection 知否正常执行
container.RegisterType<TestServiceD>().As<ITestServiceD>().PropertiesAutowired();
}需要注意:
- ConfigureContainer() 方法是默认执行的;
- 有了此方法,不意味着原生的注册方法不灵了,原生的注册方法照样好使;
- 在Autofac注册的时候,会将原生的注册方法都接管过来,这样在使用时候就连贯了。
Autofac 支持控制器属性注入
指定控制器的实例让容器来创建 – Startup ConfigureServices()
1
2
3
4
5#region 指定控制器的实例让容器来创建,告诉框架,要使用Autofac容器来创建控制器的实例。
services.Replace(ServiceDescriptor.Transient<IControllerActivator, ServiceBasedControllerActivator>());
#endregion注册所有控制器的关系+控制器实例化所需要的所有组件 – Startup ConfigureContainer()
1
2
3
4
5
6
7#region 注册所有控制器的关系+控制器实例化所需要的所有组件
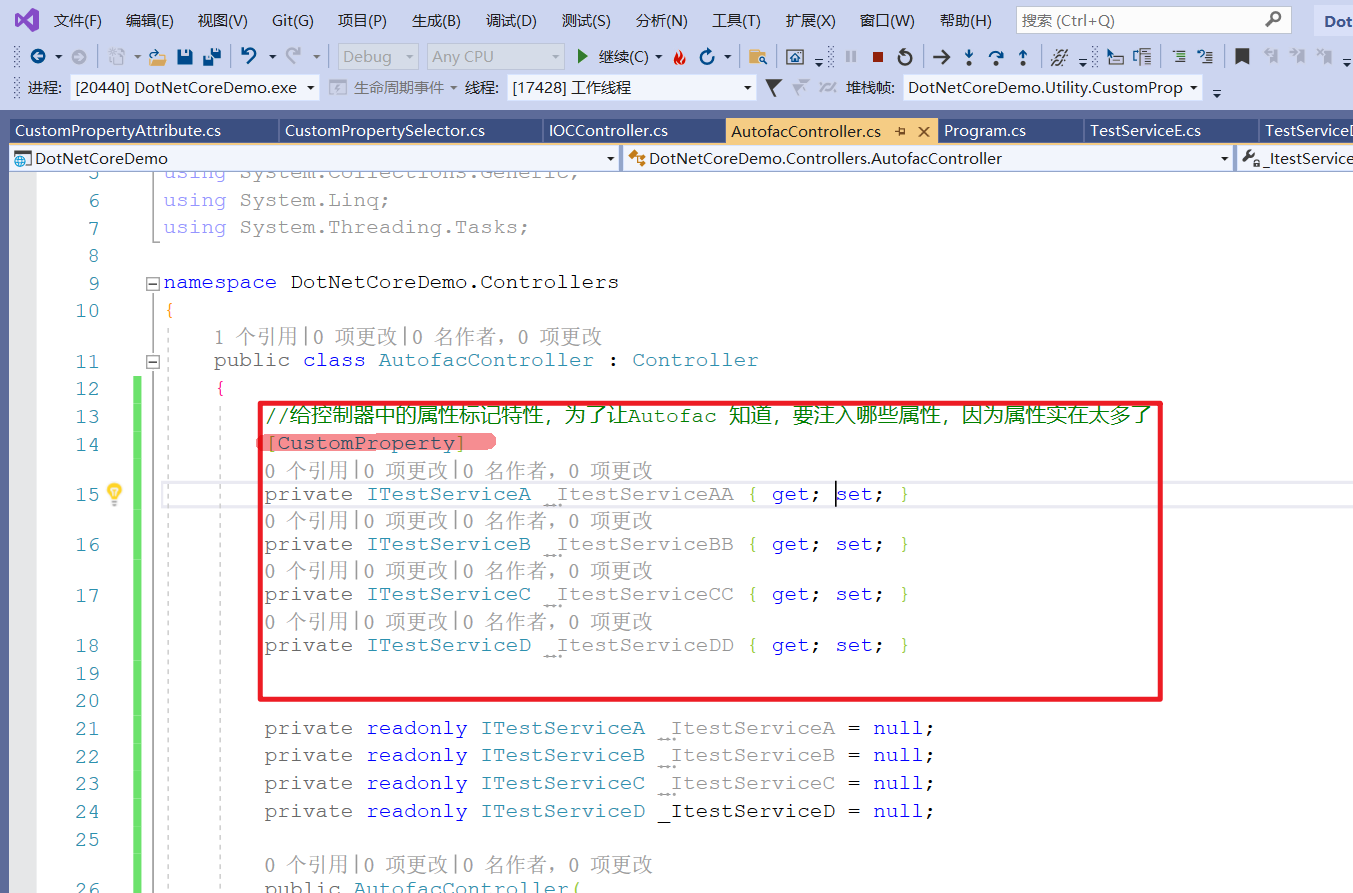
Type[] controllerTypesInAssmbly = typeof(Startup).Assembly.GetExportedTypes().Where(type => typeof(ControllerBase).IsAssignableFrom(type)).ToArray();
//注册属性,具体注册哪些属性,交给 CustomPropertySelector()
//CustomPropertySelector()方法会通过CustomPropertyAttribute这个特性去查找、返回
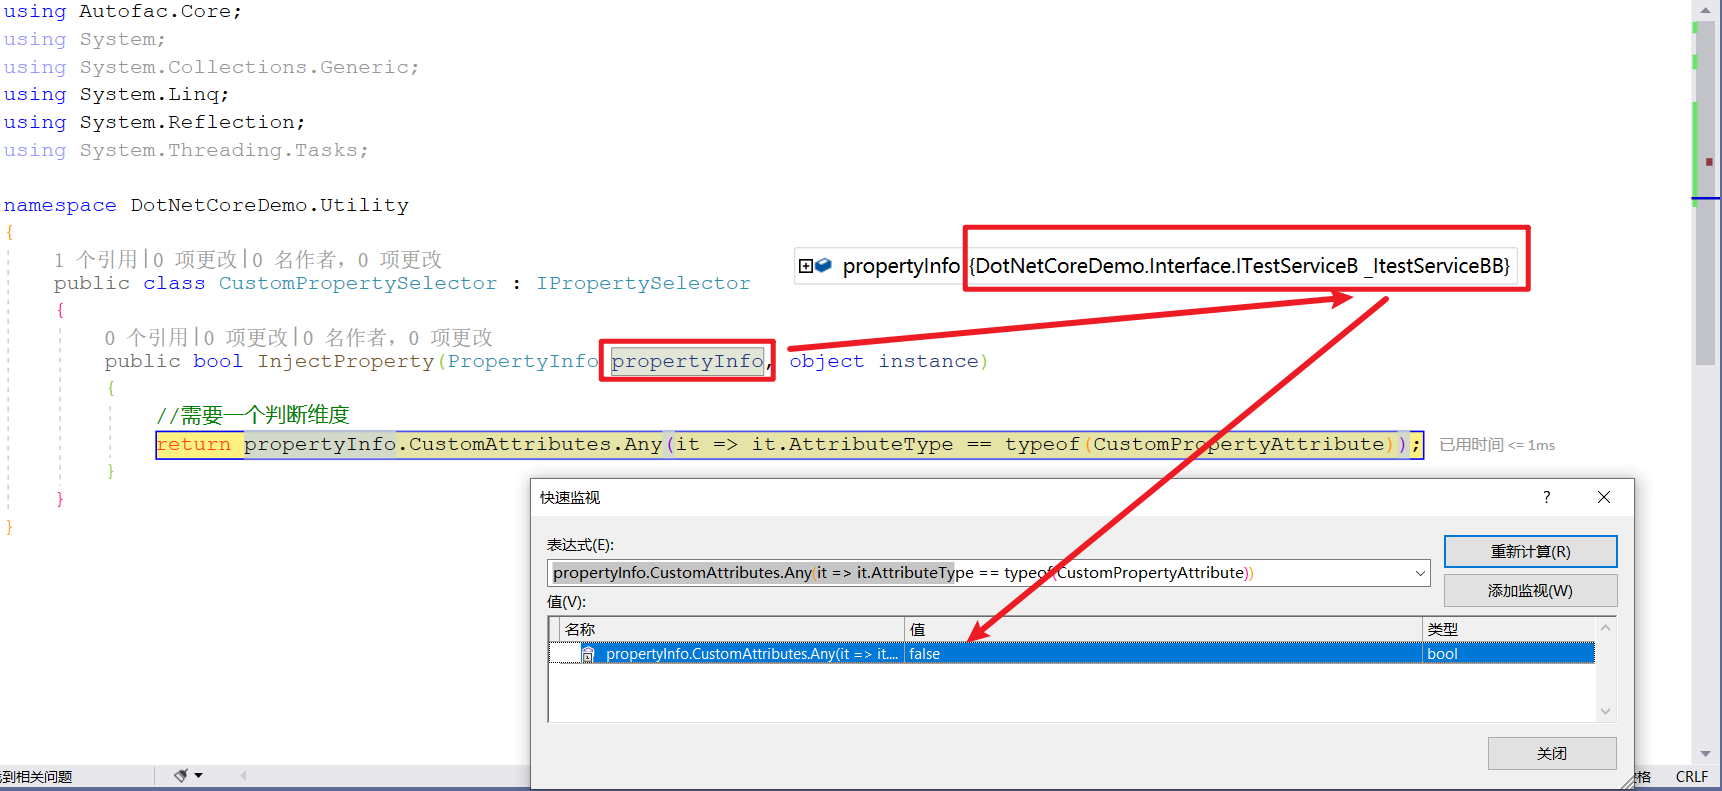
container.RegisterTypes(controllerTypesInAssmbly).PropertiesAutowired(new CustomPropertySelector());CustomPropertySelector帮助框架去查找符合条件的属性1
2
3
4
5
6
7
8
9
10
11
12
13
14
15
16
17
18using Autofac.Core;
using System;
using System.Collections.Generic;
using System.Linq;
using System.Reflection;
using System.Threading.Tasks;
namespace DotNetCoreDemo.Utility
{
public class CustomPropertySelector : IPropertySelector
{
public bool InjectProperty(PropertyInfo propertyInfo, object instance)
{
//需要一个判断维度,只有满足属性是CustomPropertyAttribute的才能返回 true
return propertyInfo.CustomAttributes.Any(it => it.AttributeType == typeof(CustomPropertyAttribute));
}
}
}CustomPropertyAttribute自定义特性1
2
3
4
5
6
7
8
9
10
11
12
13
14using System;
using System.Collections.Generic;
using System.Linq;
using System.Threading.Tasks;
namespace DotNetCoreDemo.Utility
{
//添加特性类,并且标注这个是专门用在属性上的
[AttributeUsage(AttributeTargets.Property)]
public class CustomPropertyAttribute : Attribute
{
}
}监控判断属性

判断 _ItestServiceAA 结果为 true ,因为它标注属性了
反之 _ItestServiceBB 返回 false
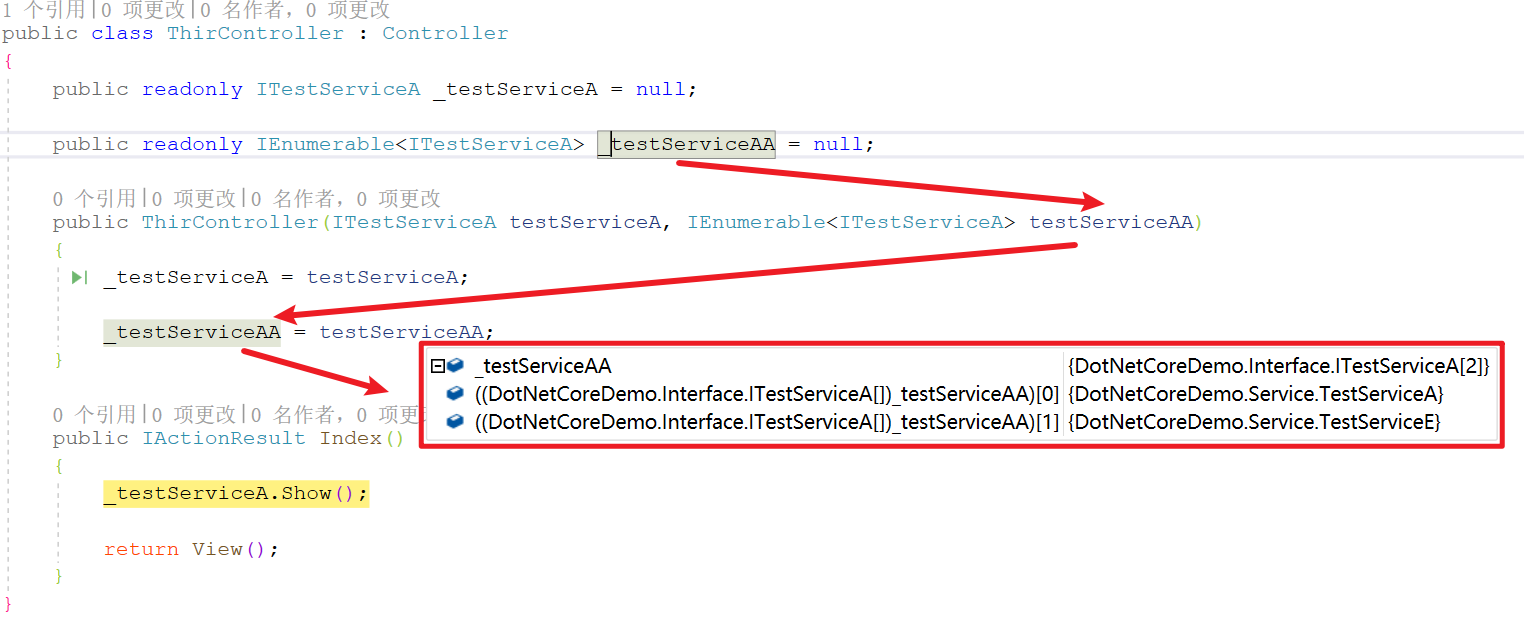
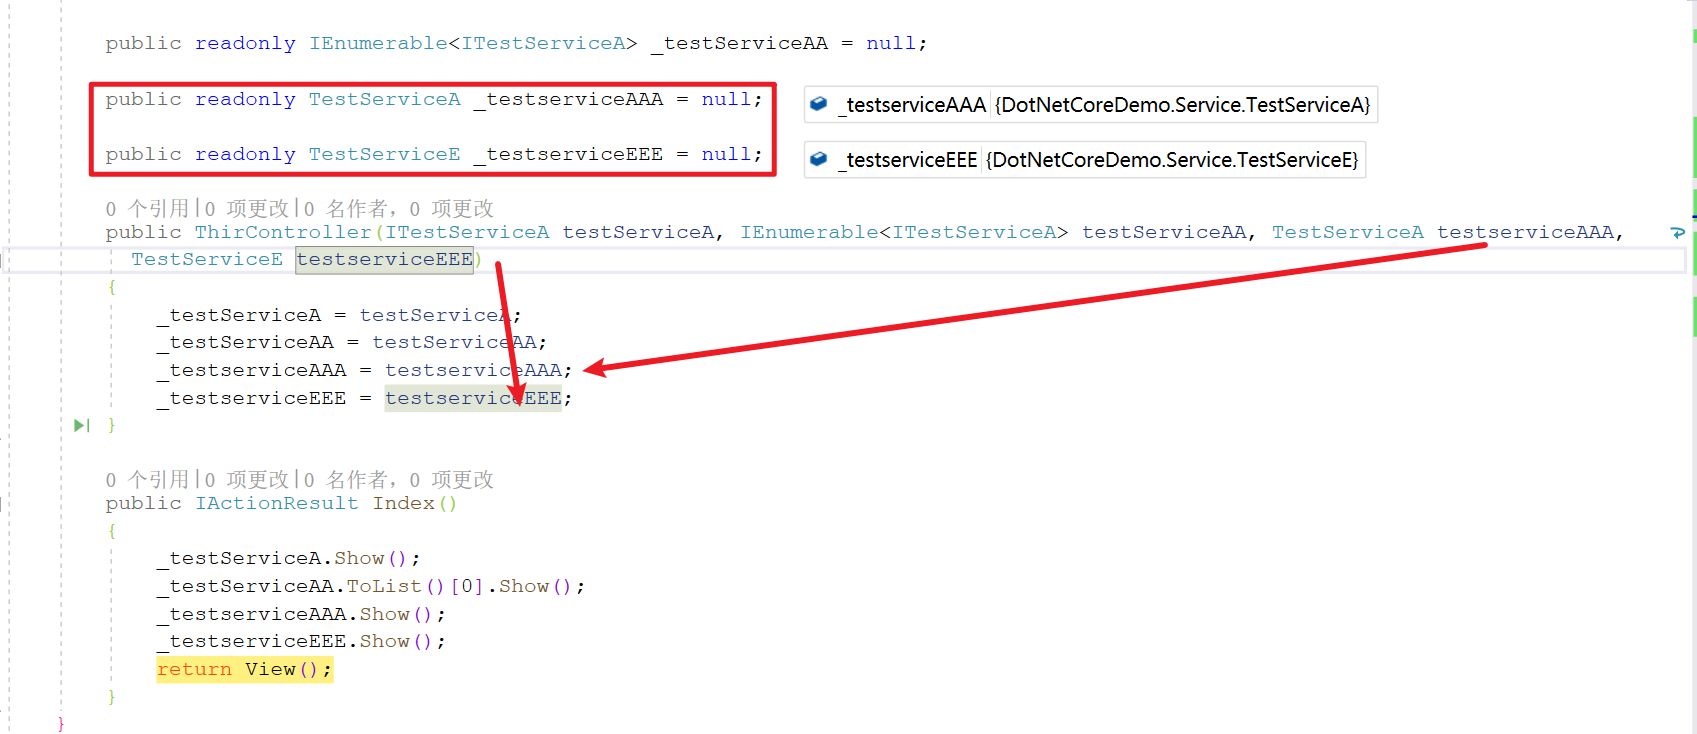
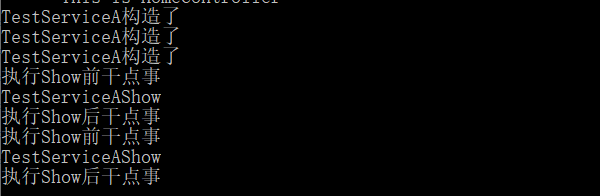
Autofac 抽象多实现的问题1
例如:一个Interface 多个服务实现 ,一对多。
遇到这种情况,在注册的时候就会有问题,尤其是在注册完应用的时候。
第一种:
1 | |
结果就是
结论就是:
在同一个接口下多个对象的时候,最后注册的那个对象才会生效。
第二种:
使用 IEnumerable<ITestServiceA> 方式,返回多个。
第三种:
Startup 中注册所有与ItestServiceA相关的对象
1 | |
然后如下图:直接实例化对象(不是Interface),然后通过构造函数接下来使用。
扩展一下:
新建 AutofacModule.cs
1 | |
然后修改 Startup container.RegisterModule(new AutofacModule());
1 | |
这样的好处,就是可以分模块注册服务。
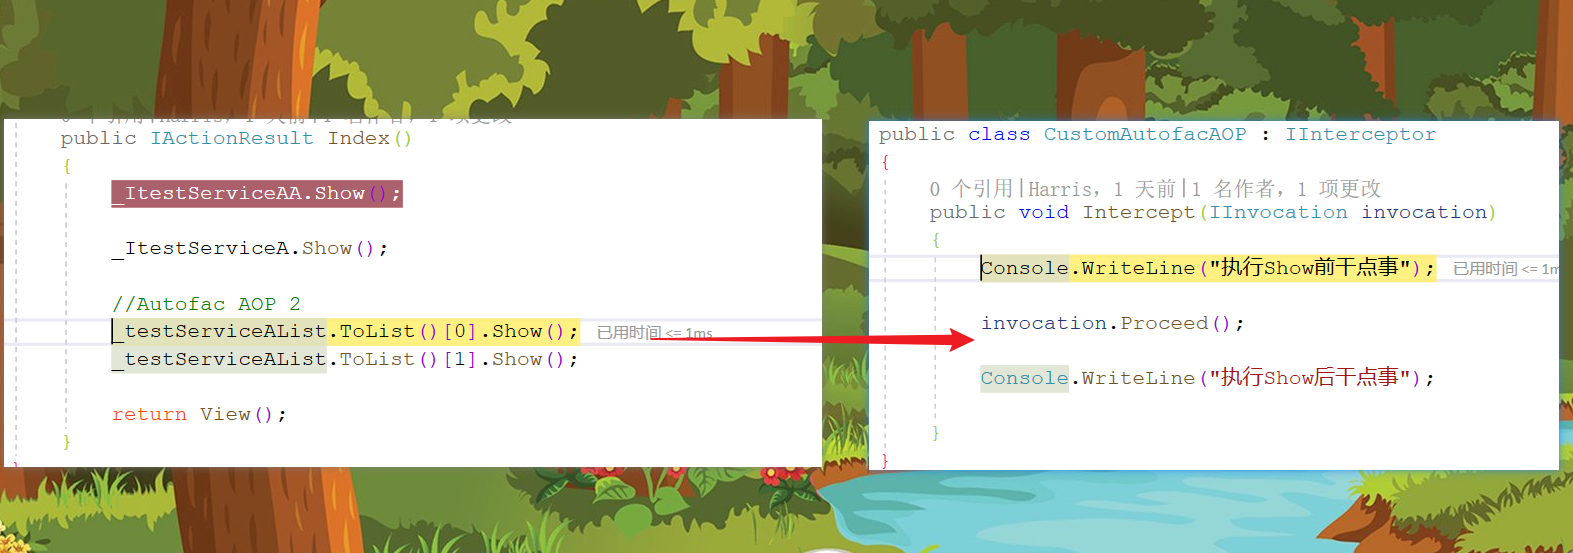
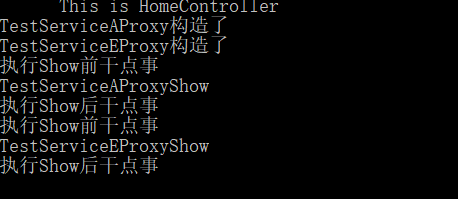
Autofac 支持 AOP
AOP 面向切片编程:在不修改原来代码逻辑的基础上,可以动态的在某个动作之前或者之后执行某些方法。
主程序 Nugget 引入
Castle.CoreandCastle.DynamicProxy新建AutoAop 扩展类,建议这个类不要新建在主程序中,可能会引起服务互相依赖的后果。
1
2
3
4
5
6
7
8
9
10
11
12
13
14
15
16
17
18
19
20
21
22using Castle.DynamicProxy;
using System;
using System.Collections.Generic;
using System.Linq;
using System.Text;
using System.Threading.Tasks;
namespace DotNetCoreDemo.Common.AutofacExtension
{
public class CustomAutofacAOP : IInterceptor
{
public void Intercept(IInvocation invocation)
{
Console.WriteLine("执行Show前干点事");
invocation.Proceed();
Console.WriteLine("执行Show后干点事");
}
}
}在Interface 层想管的类上添加特性
[Intercept(typeof(CustomAutofacAOP))],为了AOP能在当前接口生效。也得引入 Castle.DynamicProxy1
2
3
4
5
6
7
8
9
10
11
12
13
14
15
16
17
18using Autofac.Extras.DynamicProxy;
using DotNetCoreDemo.Common.AutofacExtension;
using System;
using System.Collections.Generic;
using System.Linq;
using System.Text;
using System.Threading.Tasks;
namespace DotNetCoreDemo.Interface
{
[Intercept(typeof(CustomAutofacAOP))]//为了AOP能在当前接口生效
public interface ITestServiceA
{
void Show();
string ReturnStr(string str);
}
}需要在 Startup.cs 中注册
container.RegisterType(typeof(CustomAutofacAOP));1
2
3
4
5#region Autofac 支持 AOP
container.RegisterType(typeof(CustomAutofacAOP));//注册
//EnableInterfaceInterceptors() 告诉框架这个要支持AOP
container.RegisterType<TestServiceA>().As<ITestServiceA>().EnableInterfaceInterceptors();//接口式支持AOP
#endregion应用
1
2
3
4
5
6
7
8
9
10
11
12
13
14
15
16
17
18
19
20
21
22
23
24
25
26
27
28
29
30
31
32
33
34using DotNetCoreDemo.Interface;
using DotNetCoreDemo.Utility;
using Microsoft.AspNetCore.Mvc;
using System;
using System.Collections.Generic;
using System.Linq;
using System.Threading.Tasks;
namespace DotNetCoreDemo.Controllers
{
public class FourController : Controller
{
[CustomProperty]
private ITestServiceA _ItestServiceAA { get; set; }
private readonly ITestServiceA _ItestServiceA = null;
public FourController(ITestServiceA ItestServiceA, ITestServiceA testServiceA)
{
_ItestServiceAA = testServiceA;
_ItestServiceA = ItestServiceA;
}
public IActionResult Index()
{
_ItestServiceAA.Show();
_ItestServiceA.Show();
return View();
}
}
}结果
Autofac 支持 AOP2
EnableInterfaceInterceptors 支持 Interface中标记[Intercept(typeof(CustomAutofacAOP))],只要实现这个就可以实现AOP
EnableClassInterceptors 支持 Service 中标记 [Intercept(typeof(CustomAutofacAOP))] ,只有标记这个特性,才能支持AOP。
EnableClassInterceptors 还需要 设置 虚方法 virtual
注意:如果同时使用EnableInterfaceInterceptors 就会重复执行AOP.
1 | |
Autofac 抽象多个实现构造函数注入
先上一波传统手艺
1
2
3
4
5
6
7
8
9
10
11
12
13
14
15//在 方法 :ConfigureServices 中
#region 一抽象多个实现问题
{
ContainerBuilder builder = new ContainerBuilder();
builder.RegisterType<TestServiceA>().Named<ITestServiceA>("TestServiceA");
builder.RegisterType<TestServiceE>().Named<ITestServiceA>("TestServiceE");
IContainer container = builder.Build();
ITestServiceA testServiceA1 = container.ResolveKeyed<ITestServiceA>("TestServiceA");
ITestServiceA testServiceA2 = container.ResolveKeyed<ITestServiceA>("TestServiceE");
Console.WriteLine("一抽象多个实现问题:" + object.ReferenceEquals(testServiceA1, testServiceA2));
}注意
Named和ResolveKeyed搭配使用更丝滑。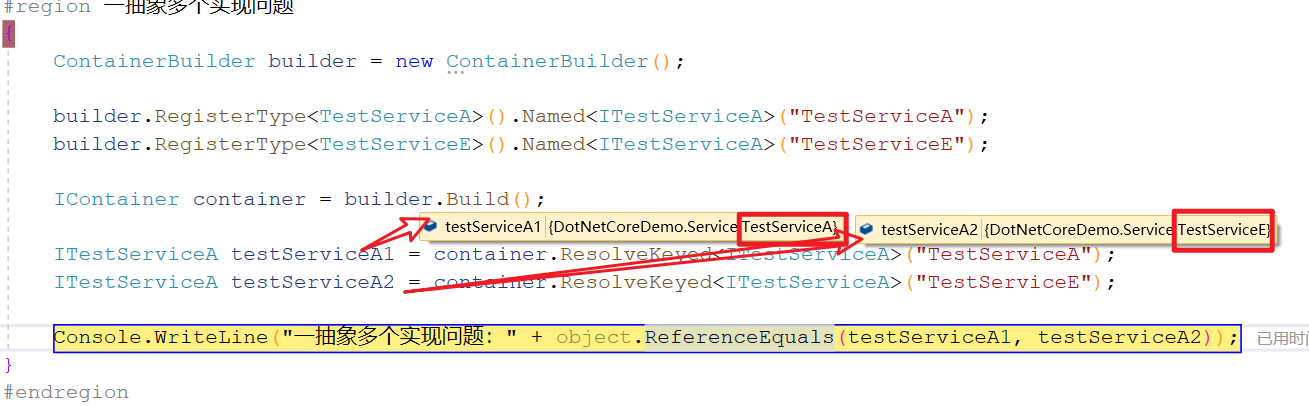
在通过AutofacIOC 实现一波
Startup.cs - ConfigureContainer 注册 ,注意
Named,同时实现AOP1
2
3
4
5#region 一抽象多实现问题2
{
container.RegisterType<TestServiceA>().Named<ITestServiceA>("TestServiceA").EnableClassInterceptors();
container.RegisterType<TestServiceE>().Named<ITestServiceA>("TestServiceE").EnableClassInterceptors();
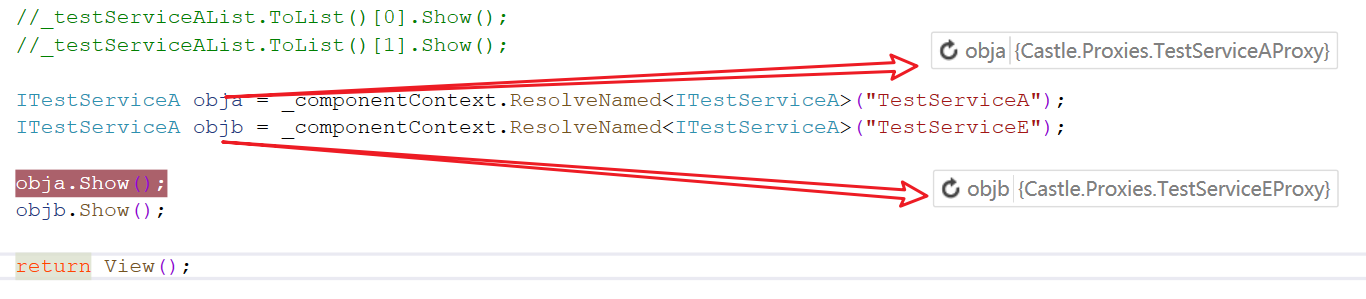
}应用:
1
2ITestServiceA obja = _componentContext.ResolveNamed<ITestServiceA>("TestServiceA");
ITestServiceA objb = _componentContext.ResolveNamed<ITestServiceA>("TestServiceE");全文:需要注意注册 Autofac 上下文
1
2
3
4
5
6
7
8
9
10
11
12
13
14
15
16
17
18
19
20
21
22
23
24
25
26
27
28
29
30
31
32
33
34
35
36
37
38
39
40
41
42
43
44using Autofac;
using DotNetCoreDemo.Interface;
using DotNetCoreDemo.Utility;
using Microsoft.AspNetCore.Mvc;
using System;
using System.Collections.Generic;
using System.Linq;
using System.Threading.Tasks;
namespace DotNetCoreDemo.Controllers
{
public class FourController : Controller
{
[CustomProperty]
private ITestServiceA _ItestServiceAA { get; set; }
/// <summary>
/// Autofac 上下文
/// </summary>
private IComponentContext _componentContext = null;
public FourController(IComponentContext componentContext)
{
_componentContext = componentContext;
}
public IActionResult Index()
{
if (_ItestServiceAA != null)
{
_ItestServiceAA.Show();
}
ITestServiceA obja = _componentContext.ResolveNamed<ITestServiceA>("TestServiceA");
ITestServiceA objb = _componentContext.ResolveNamed<ITestServiceA>("TestServiceE");
obja.Show();
objb.Show();
return View();
}
}
}
Autofac 抽象多个实现属性注入
其他与一个抽象多个实现构造函数注入一样
1 | |
全文:
1 | |
Filter
AOP :可以在不修改之前的代码的情况下动态增加新的功能。
Filter : 过滤器 ActionFilter 即动作过滤器
ActionFilter+AOP
新建 CustomActionFilterAttrubute.cs 特性,并且继承 IActionFilter 接口 和实现 IActionFilter 接口
1
2
3
4
5
6
7
8
9
10
11
12
13
14
15
16
17
18
19
20
21
22
23using Microsoft.AspNetCore.Mvc.Filters;
using System;
using System.Collections.Generic;
using System.Linq;
using System.Threading.Tasks;
namespace DotNetCoreDemo.Utility
{
public class CustomActionFilterAttribute : Attribute, IActionFilter
{
public void OnActionExecuting(ActionExecutingContext context)
{
Console.WriteLine("OnActionExecuting 执行");
}
public void OnActionExecuted(ActionExecutedContext context)
{
Console.WriteLine("OnActionExecuted 执行");
}
}
}控制器类 需要在对应的Action 方法上标记
[CustomActionFilterAttribute]特性1
2
3
4
5
6
7
8
9
10
11
12
13
14
15
16
17
18
19
20
21
22
23using DotNetCoreDemo.Utility;
using Microsoft.AspNetCore.Mvc;
using System;
using System.Collections.Generic;
using System.Linq;
using System.Threading.Tasks;
namespace DotNetCoreDemo.Controllers
{
public class FiveController : Controller
{
public FiveController()
{
Console.WriteLine("FiveController 被构造");
}
[CustomActionFilterAttribute]
public IActionResult Index()
{
return View();
}
}
}如下图,执行顺序为:
- CustomActionFilterAttribute - OnActionExecuting
- Action
- CustomActionFilterAttribute - OnActionExecuted
ActionFilter 多种实现
- 通过继承
IActionFilter实现接口来实现具体前后的功能。 - 通过继承
ActionFilterAttribute通过override 重写方法。(系统框架提供) - 通过继承
IAnsyncActionFilter实现接口实现,此为异步版本。
1 | |
ActionFilter 做日志
先上结果。
- 先写构造方法
- 执行Action-Index 之前执行操作
- 执行Action-Index
- 执行Action-Index 之后执行操作
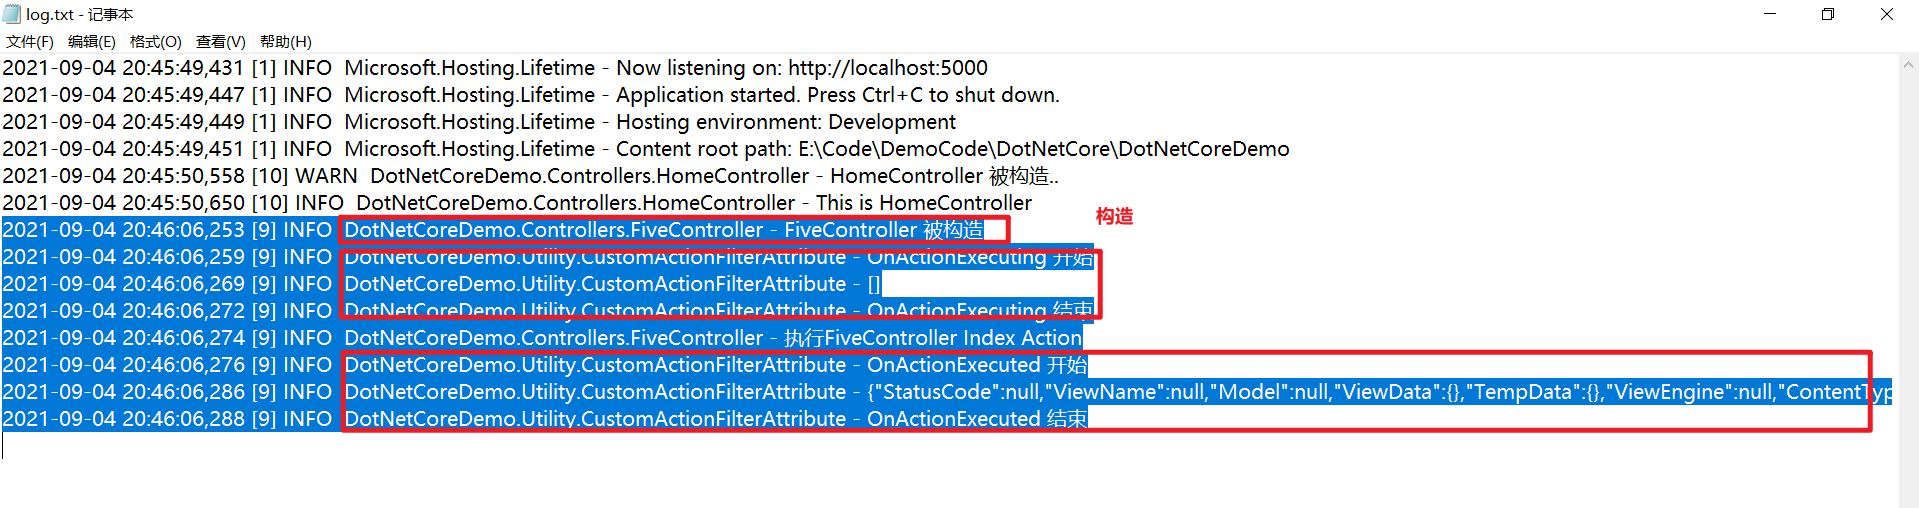
自定义版本中写的,需要注意Ilogger 的注册,还有就是context的各种扩展功能。
1
2
3
4
5
6
7
8
9
10
11
12
13
14
15
16
17
18
19
20
21
22
23
24
25
26
27
28
29
30
31
32/// <summary>
/// 自定义版本
/// </summary>
public class CustomActionFilterAttribute : Attribute, IActionFilter
{
public readonly ILogger<CustomActionFilterAttribute> _logger = null;
public CustomActionFilterAttribute(ILogger<CustomActionFilterAttribute> logger)
{
Console.WriteLine("CustomActionFilterAttribute 构造");
_logger = logger;
}
public void OnActionExecuting(ActionExecutingContext context)
{
_logger.LogInformation("OnActionExecuting 开始");
_logger.LogInformation(Newtonsoft.Json.JsonConvert.SerializeObject(context.HttpContext.Request.Query));
_logger.LogInformation("OnActionExecuting 结束");
}
public void OnActionExecuted(ActionExecutedContext context)
{
_logger.LogInformation("OnActionExecuted 开始");
_logger.LogInformation(Newtonsoft.Json.JsonConvert.SerializeObject(context.Result));
_logger.LogInformation("OnActionExecuted 结束");
}
}控制器代码
这里需要注意的是,由于修改了上述的代码,导致给Action特性
[CustomActionFilterAttribute]会报错,所以将Action特性修改为[TypeFilter(typeof(CustomActionFilterAttribute))]为的是让CustomActionFilterAttribute可以支持依赖注入。1
2
3
4
5
6
7
8
9
10
11
12
13
14
15
16
17
18
19
20
21
22
23
24
25
26
27
28
29
30
31
32
33using DotNetCoreDemo.Utility;
using Microsoft.AspNetCore.Mvc;
using Microsoft.Extensions.Logging;
using System;
using System.Collections.Generic;
using System.Linq;
using System.Threading.Tasks;
namespace DotNetCoreDemo.Controllers
{
public class FiveController : Controller
{
private ILogger<FiveController> _ilogger = null;
public FiveController(ILogger<FiveController> logger)
{
_ilogger = logger;
_ilogger.LogInformation("FiveController 被构造");
}
//[CustomActionFilterAttribute]
//[CustomActionFilterChildeAttribute]
[TypeFilter(typeof(CustomActionFilterAttribute))]
public IActionResult Index()
{
_ilogger.LogInformation("执行FiveController Index Action");
return View();
}
}
}
Filter 多种注册
CustomActionFilterAttribute] 必须是无参构造函数才行,可以结合上一节内容
[TypeFilter(typeof(CustomActionFilterAttribute))] 可以无参构造函数,可以支持依赖注入
[ServiceFilter(typeof(CustomActionFilterAttribute))] 可以无参构造函数,可以支持依赖注入,但是必须注册服务
Startup.cs
1
2//注册自定义Filter扩展,且支持属性注入(PropertiesAutowired)
container.RegisterType(typeof(CustomActionFilterAttribute)).PropertiesAutowired();CustomActionFilterAttribute
1
2
3
4
5//属性
public ILogger<CustomActionFilterAttribute> loggerProp { get; set; }
//应用,别写在构造函数里
loggerProp.LogInformation("CustomActionFilterAttribute 支持属性注入");
FilterFactory 扩展
本节相当于是对 Filter 多种注册中 TypeFilter 与 ServiceFilter 为什么可以支持依赖注册的递进理解,因为一定是IOC在后面站台。
把 TypeFilter 与 ServiceFilter 后面的大哥 IFilterFactory 提溜出来盘盘。
首先先创建一个自定义的类
CustomActionFilterFactory, 继承Attribute实现IFilterFactory接口1
2
3
4
5
6
7
8
9
10
11
12
13
14
15
16
17
18
19
20
21
22
23
24
25
26
27using Microsoft.AspNetCore.Mvc.Filters;
using System;
using System.Collections.Generic;
using System.Linq;
using System.Threading.Tasks;
namespace DotNetCoreDemo.Utility.Filter
{
public class CustomActionFilterFactory : Attribute, IFilterFactory
{
public readonly Type _type = null;
public CustomActionFilterFactory(Type type)
{
_type = type;
}
public bool IsReusable => true;
public IFilterMetadata CreateInstance(IServiceProvider serviceProvider)
{
object oInstance = serviceProvider.GetService(_type);
return (IFilterMetadata)oInstance;
}
}
}然后,替换 TypeFilter 和 ServiceFilter 的地位,将
CustomActionFilterFactory特性用上。1
2
3
4
5
6
7
8
9
10
11
12
13
14
15
16
17
18
19
20
21
22
23
24
25
26
27
28
29
30
31
32
33
34
35
36using DotNetCoreDemo.Utility;
using DotNetCoreDemo.Utility.Filter;
using Microsoft.AspNetCore.Mvc;
using Microsoft.Extensions.Logging;
using System;
using System.Collections.Generic;
using System.Linq;
using System.Threading.Tasks;
namespace DotNetCoreDemo.Controllers
{
public class FiveController : Controller
{
private ILogger<FiveController> _ilogger = null;
public FiveController(ILogger<FiveController> logger)
{
_ilogger = logger;
_ilogger.LogInformation("FiveController 被构造");
}
//[CustomActionFilterAttribute]
//[CustomActionFilterChildeAttribute]
//[TypeFilter(typeof(CustomActionFilterAttribute))]
//[ServiceFilter(typeof(CustomActionFilterAttribute))]
[CustomActionFilterFactory(typeof(CustomActionFilterAttribute))]
public IActionResult Index()
{
_ilogger.LogInformation("执行FiveController Index Action");
return View();
}
}
}结果完美,复盘一下就是CustomActionFilterFactory 实现了 IFilterFactory 接口的功。
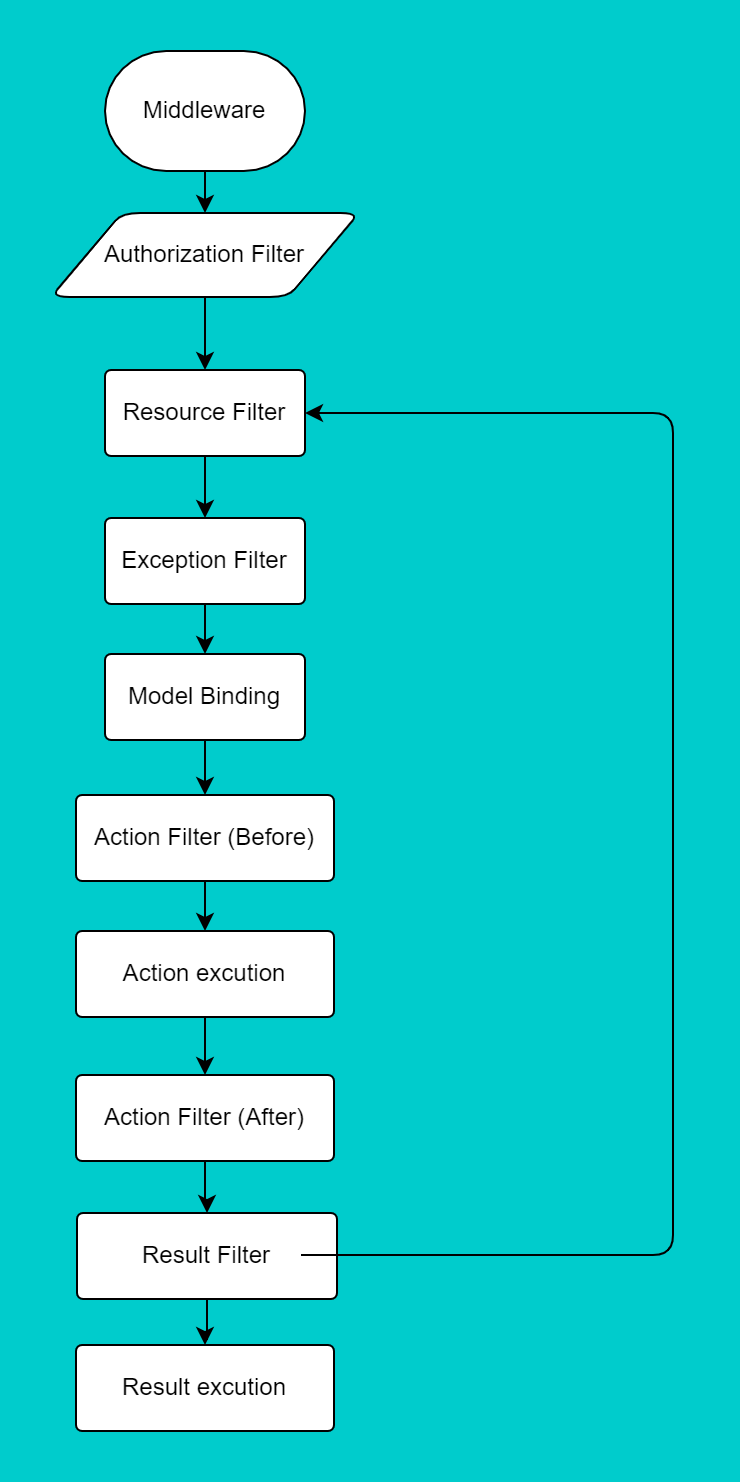
Filter 生效范围与执行顺序
`[CustomActionFilterFactory(typeof(CustomActionFilterAttribute))]`
标记在Action 上只对当前 Action 生效
标记在Controller 上,对 当前Controller 中所有Action 生效
全局注册,对当前整个项目所有 Action生效。
1
2
3
4
5
6
7
8
9// Startup.cs - ConfigureServices
#region 全局注册 Filter
services.AddMvc(option =>
{
option.Filters.Add<CustomActionFilterAttribute>();
});
#endregion如果有三个Filter注册在全局、标记在Controller、标记在 Action 上,执行顺序
如果按照默认(不注入Order的前提)
- 全局 OnActionExecuting
- 控制器 OnActionExecuting
- Action OnActionExecuting
- 正方法
- Action OnActionExecuted
- 控制器 OnActionExecuted
- 全局 OnActionExecuted
1
2
3
4
5
6
7
8
9
10
11
12
13
14
15
16
17
18
19
20
21
22
23
24
25
26
27
28
29
30
31
32
33
34
35
36
37
38
39
40
41
42
43
44
45
46
47
48
49
50
51
52
53
54
55
56using Microsoft.AspNetCore.Mvc.Filters;
using System;
using System.Collections.Generic;
using System.Linq;
using System.Threading.Tasks;
namespace DotNetCoreDemo.Utility.Filter
{
/// <summary>
/// 用来注册全局的
/// </summary>
public class TestGlobalActionFilterAttribute : ActionFilterAttribute
{
public override void OnActionExecuting(ActionExecutingContext context)
{
Console.WriteLine("TestGlobalActionFilterAttribute OnActionExecuting");
}
public override void OnActionExecuted(ActionExecutedContext context)
{
Console.WriteLine("TestGlobalActionFilterAttribute OnActionExecuted");
}
}
/// <summary>
/// 用来标记控制器的
/// </summary>
public class TestControllerActionFilterAttribute : ActionFilterAttribute
{
public override void OnActionExecuting(ActionExecutingContext context)
{
Console.WriteLine("TestControllerActionFilterAttribute OnActionExecuting");
}
public override void OnActionExecuted(ActionExecutedContext context)
{
Console.WriteLine("TestControllerActionFilterAttribute OnActionExecuted");
}
}
/// <summary>
/// 用来标记Action的
/// </summary>
public class TestAction_ActionFilterAttribute : ActionFilterAttribute
{
public override void OnActionExecuting(ActionExecutingContext context)
{
Console.WriteLine("TestAction_ActionFilterAttribute OnActionExecuting");
}
public override void OnActionExecuted(ActionExecutedContext context)
{
Console.WriteLine("TestAction_ActionFilterAttribute OnActionExecuted");
}
}
}如果想修改执行顺序
1
2
3
4
5
6
7
8
9
10
11
12
13
14
15
16
17
18
19
20
21
22
23
24
25
26
27
28
29
30
31
32
33
34
35
36
37
38
39
40using DotNetCoreDemo.Utility;
using DotNetCoreDemo.Utility.Filter;
using Microsoft.AspNetCore.Mvc;
using Microsoft.Extensions.Logging;
using System;
using System.Collections.Generic;
using System.Linq;
using System.Threading.Tasks;
namespace DotNetCoreDemo.Controllers
{
//标记测试Filter
[TestControllerActionFilterAttribute(Order =-1)]
public class FiveController : Controller
{
private ILogger<FiveController> _ilogger = null;
public FiveController(ILogger<FiveController> logger)
{
_ilogger = logger;
_ilogger.LogInformation("FiveController 被构造");
}
//[CustomActionFilterAttribute]
//[CustomActionFilterChildeAttribute]
//[TypeFilter(typeof(CustomActionFilterAttribute))]
//[ServiceFilter(typeof(CustomActionFilterAttribute))]
//[CustomActionFilterFactory(typeof(CustomActionFilterAttribute))]
//标记测试Filter
[TestAction_ActionFilterAttribute(Order =-2)]
public IActionResult Index()
{
_ilogger.LogInformation("执行FiveController Index Action");
return View();
}
}
}上述代码得出的执行顺序就是
- Action OnActionExecuting
- 控制器 OnActionExecuting
- 全局 OnActionExecuting
- 正方法
- 全局 OnActionExecuted
- 控制器 OnActionExecuted
- Action OnActionExecuted
ResourceFilter 扩展定制-支持缓存
新建自定义ResourceFilter 扩展类
1 | |
控制器应用
1 | |
IndexTestResource.cshtml
1 | |
上述主要功能是:新建ResourceFilter扩展特性类,并且在控制器FiveController 中 IndexTestResource Action 标记应用。应用扩展标记的作用是为了建立缓存。相比较ActionFilter ,ResourceFilter 更适合做缓存,参考下图
Filter 匿名
结合 Filter 生效范围与执行顺序来看,如果全局注册 Filter 的话,那么所有Action都会生效,如果这个时候,不想某个Action被生效,那么匿名的作用就来咯。
现在全局注册: TestGlobalActionFilterAttribute
1 | |
现在需要跳过的Action上标注特性:[AllowAnonymousAttribute]
然后再去 TestGlobalActionFilterAttribute 添加判断就OK了,不走这玩意TestGlobalActionFilterAttribute了。
1 | |
上面这这个 AllowAnonymousAttribute 也可以自定写个特性,到时候在Action和判断中替换一下特性名称即可。
通过查询资料,这个匿名一般用于授权AuthorizeAttribute。
ExceptionFilter
这个过滤器就是为了处理异常。
- 首先创建
CustomExceptionFilterAttribute特性,实现IExceptionFilter接口 - 实现方法中需要判断执行到这的异常有没有被处理
- 如果没有被处理,那么需要判断异常的源头,如果是
ajax请求的异常,返回 Jsonresult,否则,跳转到Error页面显示异常信息。 - 上述如果没有毛病的话,那就进行全局注册
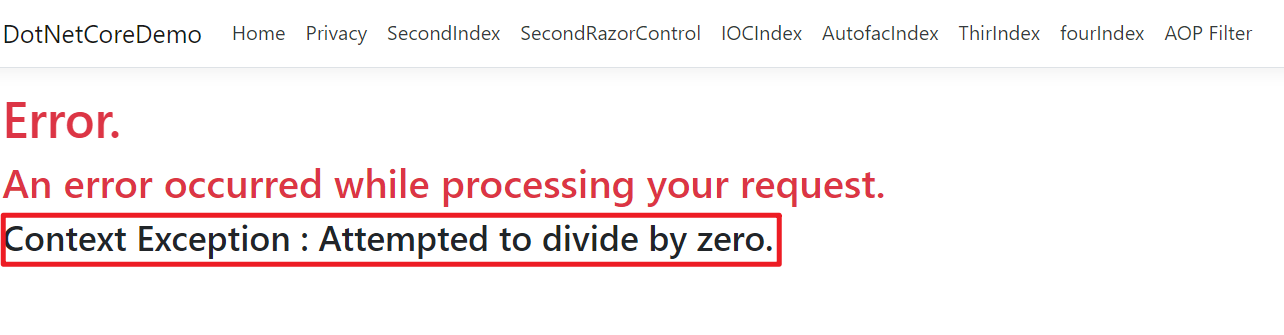
1 | |
Controller
1 | |
Error.cshtml
1 | |
上述是在Action上标记CustomExceptionFilterAttribute ,最后,再加上全局注册。
ExceptionFilter 能捕捉到的异常
| 异常分类 | 可否捕捉 |
|---|---|
| 控制器实例化异常 | true |
| 异常发生在Try Cache中 | false(TryCache默认是已经处理过的异常) |
| 在视图中发生异常 | false(会直接体现在页面上) |
| Service层发生异常 | true |
| 在Action 中发生异常 | true |
| 请求路径错误异常 | true (需要中间件来完成) |
主要阐述下 如果请求路径错误异常需要如何处理
Startup.cs 中的 Configure 方法中添加中间件,记得放前面点,放最后不管用。
1
2
3
4
5
6
7
8
9
10
11
12
13
14
15
16
17
18
19
20
21
22
23
24
25
26
27
28
29#region 捕捉异常补充
app.UseStatusCodePagesWithReExecute("/Home/Error/{0}");//只要不是状态200的请求,都能进来
app.UseExceptionHandler(errorapp =>
{
errorapp.Run(async context =>
{
context.Response.StatusCode = 200;
context.Response.ContentType = "text/html";
await context.Response.WriteAsync("<html lang=\"en\"><body>\r\n");
await context.Response.WriteAsync("Error! <br><br>\r\n");
var exceptionHandlePathFeature = context.Features.Get<IExceptionHandlerPathFeature>();
Console.WriteLine("**********************************************");
Console.WriteLine($"{ exceptionHandlePathFeature?.Error.Message}");
Console.WriteLine("**********************************************");
if (exceptionHandlePathFeature?.Error is FileNotFoundException)
{
await context.Response.WriteAsync("File Error throw! <br><br>\r\n");
}
await context.Response.WriteAsync("<a href =\"Home/Index\">Home</a><br><br>\r\n");
await context.Response.WriteAsync("</body></html><br><br>\r\n");
await context.Response.WriteAsync(new string(' ', 512));
});
});
#endregion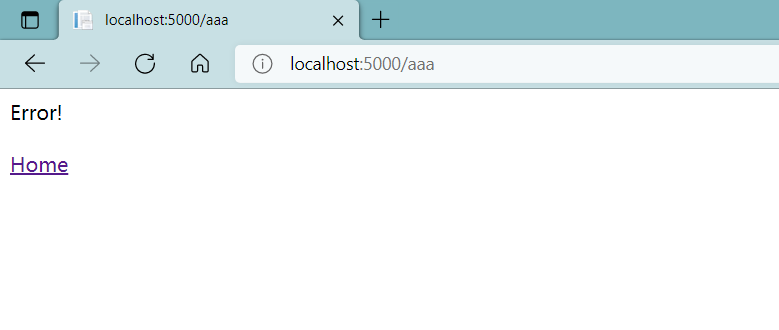
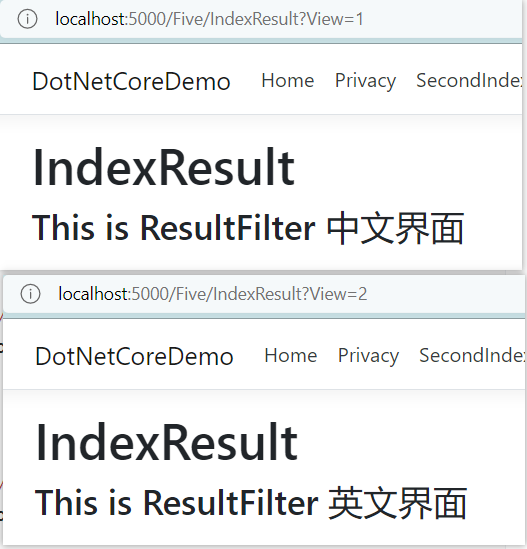
ResultFilter
这个过滤器是为了Action 方法里 return view() 服务的,类似AOP这种写法。
下面代码综合之前的Filter的磨砺,路子都差不多,新建一个自定义特性类,继承 Attribute 实现 IResultFilter 方法。
- IModeIMetadataProvider 是为了接受参数的
- 通过接收的参数在Controller 标记
[TypeFilter(typeof(CustomResultFilterAttribute))]Action 方法中,在return View() 这个操作时,判断参数跳转不同的cshtml页。
1 | |
鉴权授权方式
Cookie
代码:SevenController
基础授权
使用鉴权
app.UseAuthentication()必须放在app.UseRouting();后面Startup.cs - ConfigureServices
1
2
3
4
5
6
7
8#region Auth-cookie-验证
services.AddAuthentication("Cookies").AddCookie(option =>
{
option.LoginPath = new Microsoft.AspNetCore.Http.PathString("/Seven/LoginOut");
});
#endregion正文
1
2
3
4
5
6
7
8
9
10
11
12
13
14
15
16
17
18
19
20
21
22
23
24
25
26
27
28
29
30
31
32
33
34
35
36
37
38
39
40
41
42
43
44
45
46
47using Microsoft.AspNetCore.Authentication;
using Microsoft.AspNetCore.Authorization;
using Microsoft.AspNetCore.Mvc;
using System;
using System.Collections.Generic;
using System.Linq;
using System.Security.Claims;
using System.Threading.Tasks;
namespace DotNetCoreDemo.Controllers
{
/// <summary>
/// Auth Cookie
/// </summary>
public class SevenController : Controller
{
[Authorize]
public IActionResult Index()
{
return View();
}
public IActionResult Login()
{
List<Claim> Claims = new List<Claim>
{
new Claim(ClaimTypes.Name,"Harris"),
new Claim(ClaimTypes.Email,"hou3125378@126.com"),
new Claim("Xing","Hou")
};
ClaimsIdentity identity = new ClaimsIdentity(Claims, "HarrisIdentity");
HttpContext.SignInAsync(new ClaimsPrincipal(identity));
return View();
}
public IActionResult LoginOut()
{
HttpContext.SignOutAsync();
return View();
}
}
}上述代码:可以打开F12,Application-Cookie,观察Cookie的变化。
如果没有Cookie 去访问Index的时候,就会自动跳转到LoginOut,这时候访问Login,记录下Cookie之后,再访问Index就可以了,最后,访问LoginOut,清除Cookie.
JWT

上图是访问的过程。
搭建授权中心(WEBAPI)
Nugget

appsettings.json主要关注JWTTokenOptions1
2
3
4
5
6
7
8
9
10
11
12
13
14
15{
"Logging": {
"LogLevel": {
"Default": "Information",
"Microsoft": "Warning",
"Microsoft.Hosting.Lifetime": "Information"
}
},
"AllowedHosts": "*",
"JWTTokenOptions": {
"Audience": "http://localhost:5200",
"Issuer": "http://localhost:5200",
"SecurityKey": "MIGfMA0GCSqGSIb3DQEBAQUAA4GNADCBiQKBgQDI2a2EJ7m872v0afyoSDJT2o1+SitIeJSWtLJU8/Wz2m7gStexajkeD+Lka6DSTy8gt9UwfgVQo6uKjVLG5Ex7PiGOODVqAEghBuS7JzIYU5RvI543nNDAPfnJsas96mSA7L/mD7RTE2drj6hf3oZjJpMPZUQI/B1Qjb5H3K3PNwIDAQAB"
}
}注册
1
2
3
4
5
6
7
8
9
10
11
12
13
14
15
16
17
18
19
20
21
22
23
24
25
26
27
28
29
30
31
32
33
34
35
36
37
38
39
40
41
42
43
44
45
46
47
48
49
50
51
52
53
54
55
56
57
58
59
60
61
62
63
64using DotNetCoreDemo.AuthenticationCenter.Utility;
using Microsoft.AspNetCore.Builder;
using Microsoft.AspNetCore.Hosting;
using Microsoft.AspNetCore.HttpsPolicy;
using Microsoft.AspNetCore.Mvc;
using Microsoft.Extensions.Configuration;
using Microsoft.Extensions.DependencyInjection;
using Microsoft.Extensions.Hosting;
using Microsoft.Extensions.Logging;
using Microsoft.OpenApi.Models;
using System;
using System.Collections.Generic;
using System.Linq;
using System.Threading.Tasks;
namespace DotNetCoreDemo.AuthenticationCenter
{
public class Startup
{
public Startup(IConfiguration configuration)
{
Configuration = configuration;
}
public IConfiguration Configuration { get; }
// This method gets called by the runtime. Use this method to add services to the container.
public void ConfigureServices(IServiceCollection services)
{
//HS加密方式
//services.AddTransient<ICustomJWTService, CustomHSJWTService>();
//RSS加密方式
services.AddTransient<ICustomJWTService, CustomRSSJWTervice>();
services.Configure<JWTTokenOptions>(this.Configuration.GetSection("JWTTokenOptions"));
services.AddControllers();
services.AddSwaggerGen(c =>
{
c.SwaggerDoc("v1", new OpenApiInfo { Title = "DotNetCoreDemo.AuthenticationCenter", Version = "v1" });
});
}
// This method gets called by the runtime. Use this method to configure the HTTP request pipeline.
public void Configure(IApplicationBuilder app, IWebHostEnvironment env)
{
if (env.IsDevelopment())
{
app.UseDeveloperExceptionPage();
app.UseSwagger();
app.UseSwaggerUI(c => c.SwaggerEndpoint("/swagger/v1/swagger.json", "DotNetCoreDemo.AuthenticationCenter v1"));
}
app.UseHttpsRedirection();
app.UseRouting();
app.UseAuthorization();
app.UseEndpoints(endpoints =>
{
endpoints.MapControllers();
});
}
}
}入口
1
2
3
4
5
6
7
8
9
10
11
12
13
14
15
16
17
18
19
20
21
22
23
24
25
26
27
28
29
30
31
32
33
34
35
36
37
38
39
40
41
42
43
44
45
46
47
48
49
50
51
52
53
54using DotNetCoreDemo.AuthenticationCenter.Utility;
using Microsoft.AspNetCore.Mvc;
using Newtonsoft.Json;
using System;
using System.Collections.Generic;
using System.Linq;
using System.Threading.Tasks;
namespace DotNetCoreDemo.AuthenticationCenter.Controllers
{
[Route("api/[controller]")]
[ApiController]
public class AuthenticationController : Controller
{
//构造函数注入
private ICustomJWTService _iJWTService = null;
public AuthenticationController(ICustomJWTService customJWTService)
{
_iJWTService = customJWTService;
}
//[Route("Get")]
//[HttpGet]
//public IEnumerable<int> Get()
//{
// return new List<int>() { 1, 2, 3, 4, 6, 7 };
//}
[Route("Login")]
[HttpPost]
public string Login(string name, string password)
{
//在这里需要去数据库中做数据验证
if ("Harris".Equals(name) && "123456".Equals(password))
{
//就应该生成Token
string token = this._iJWTService.GetToken(name, password);
return JsonConvert.SerializeObject(new
{
result = true,
token
});
}
else
{
return JsonConvert.SerializeObject(new
{
result = false,
token = ""
});
}
}
}
}抽象类
1
2
3
4public interface ICustomJWTService
{
string GetToken(string UserName, string password);
}HS JWT
1
2
3
4
5
6
7
8
9
10
11
12
13
14
15
16
17
18
19
20
21
22
23
24
25
26
27
28
29
30
31
32
33
34
35
36
37
38
39
40
41
42
43
44
45
46
47
48
49
50
51
52using Microsoft.Extensions.Options;
using Microsoft.IdentityModel.Tokens;
using System;
using System.Collections.Generic;
using System.IdentityModel.Tokens.Jwt;
using System.Linq;
using System.Security.Claims;
using System.Text;
using System.Threading.Tasks;
namespace DotNetCoreDemo.AuthenticationCenter.Utility
{
public class CustomHSJWTService : ICustomJWTService
{
private readonly JWTTokenOptions _JWTTokenOptions;
public CustomHSJWTService(IOptionsMonitor<JWTTokenOptions> jwtTokenOptions)
{
this._JWTTokenOptions = jwtTokenOptions.CurrentValue;
}
public string GetToken(string UserName, string password)
{
#region 有效载荷,大家可以自己写,爱写多少写多少;尽量避免敏感信息
var claims = new[]
{
new Claim(ClaimTypes.Name, UserName),
new Claim("NickName",UserName),
new Claim("Role","Administrator"),//传递其他信息
new Claim("ABCC","ABCC"),
new Claim("Student","甜酱油")
};
//需要加密:需要加密key:
//Nuget引入:Microsoft.IdentityModel.Tokens
SymmetricSecurityKey key = new SymmetricSecurityKey(Encoding.UTF8.GetBytes(_JWTTokenOptions.SecurityKey));
SigningCredentials creds = new SigningCredentials(key, SecurityAlgorithms.HmacSha256);
//Nuget引入:System.IdentityModel.Tokens.Jwt
JwtSecurityToken token = new JwtSecurityToken(
issuer: _JWTTokenOptions.Issuer,
audience: _JWTTokenOptions.Audience,
claims: claims,
expires: DateTime.Now.AddMinutes(5),//5分钟有效期
signingCredentials: creds);
string returnToken = new JwtSecurityTokenHandler().WriteToken(token);
return returnToken;
#endregion
}
}
}RSA JWT
1
2
3
4
5
6
7
8
9
10
11
12
13
14
15
16
17
18
19
20
21
22
23
24
25
26
27
28
29
30
31
32
33
34
35
36
37
38
39
40
41
42
43
44
45
46
47
48
49
50
51
52
53
54
55
56
57using Microsoft.Extensions.Options;
using Microsoft.IdentityModel.Tokens;
using System;
using System.Collections.Generic;
using System.IdentityModel.Tokens.Jwt;
using System.IO;
using System.Linq;
using System.Security.Claims;
using System.Security.Cryptography;
using System.Threading.Tasks;
namespace DotNetCoreDemo.AuthenticationCenter.Utility
{
public class CustomRSSJWTervice : ICustomJWTService
{
#region Option注入
private readonly JWTTokenOptions _JWTTokenOptions;
public CustomRSSJWTervice(IOptionsMonitor<JWTTokenOptions> jwtTokenOptions)
{
_JWTTokenOptions = jwtTokenOptions.CurrentValue;
}
#endregion
public string GetToken(string UserName, string password)
{
#region 使用加密解密Key 非对称
string keyDir = Directory.GetCurrentDirectory();
if (RSAHelper.TryGetKeyParameters(keyDir, true, out RSAParameters keyParams) == false)
{
keyParams = RSAHelper.GenerateAndSaveKey(keyDir);
}
#endregion
//string jtiCustom = Guid.NewGuid().ToString();//用来标识 Token
Claim[] claims = new[]
{
new Claim(ClaimTypes.Name, UserName),
new Claim(ClaimTypes.Role,"admin"),
new Claim("password",password)
};
SigningCredentials credentials = new SigningCredentials(new RsaSecurityKey(keyParams), SecurityAlgorithms.RsaSha256Signature);
var token = new JwtSecurityToken(
issuer: this._JWTTokenOptions.Issuer,
audience: this._JWTTokenOptions.Audience,
claims: claims,
expires: DateTime.Now.AddMinutes(60),//5分钟有效期
signingCredentials: credentials);
var handler = new JwtSecurityTokenHandler();
string tokenString = handler.WriteToken(token);
return tokenString;
}
}
}JWTTokenOptions1
2
3
4
5
6
7
8
9
10
11
12
13
14
15
16
17
18
19
20
21
22
23
24
25
26
27
28
29
30
31using System;
using System.Collections.Generic;
using System.Linq;
using System.Threading.Tasks;
namespace DotNetCoreDemo.AuthenticationCenter.Utility
{
public class JWTTokenOptions
{
public string Audience
{
get;
set;
}
public string SecurityKey
{
get;
set;
}
//public SigningCredentials Credentials
//{
// get;
// set;
//}
public string Issuer
{
get;
set;
}
}
}RSA Helper
1
2
3
4
5
6
7
8
9
10
11
12
13
14
15
16
17
18
19
20
21
22
23
24
25
26
27
28
29
30
31
32
33
34
35
36
37
38
39
40
41
42
43
44
45
46
47
48
49
50
51
52
53
54
55
56
57
58
59
60using Newtonsoft.Json;
using System;
using System.Collections.Generic;
using System.IO;
using System.Linq;
using System.Security.Cryptography;
using System.Threading.Tasks;
namespace DotNetCoreDemo.AuthenticationCenter.Utility
{
public class RSAHelper
{
/// <summary>
/// 从本地文件中读取用来签发 Token 的 RSA Key
/// </summary>
/// <param name="filePath">存放密钥的文件夹路径</param>
/// <param name="withPrivate"></param>
/// <param name="keyParameters"></param>
/// <returns></returns>
public static bool TryGetKeyParameters(string filePath, bool withPrivate, out RSAParameters keyParameters)
{
string filename = withPrivate ? "key.json" : "key.public.json";
string fileTotalPath = Path.Combine(filePath, filename);
keyParameters = default(RSAParameters);
if (!File.Exists(fileTotalPath))
{
return false;
}
else
{
keyParameters = JsonConvert.DeserializeObject<RSAParameters>(File.ReadAllText(fileTotalPath));
return true;
}
}
/// <summary>
/// 生成并保存 RSA 公钥与私钥
/// </summary>
/// <param name="filePath">存放密钥的文件夹路径</param>
/// <returns></returns>
public static RSAParameters GenerateAndSaveKey(string filePath, bool withPrivate = true)
{
RSAParameters publicKeys, privateKeys;
using (var rsa = new RSACryptoServiceProvider(2048))//即时生成
{
try
{
privateKeys = rsa.ExportParameters(true);
publicKeys = rsa.ExportParameters(false);
}
finally
{
rsa.PersistKeyInCsp = false;
}
}
File.WriteAllText(Path.Combine(filePath, "key.json"), JsonConvert.SerializeObject(privateKeys));
File.WriteAllText(Path.Combine(filePath, "key.public.json"), JsonConvert.SerializeObject(publicKeys));
return withPrivate ? privateKeys : publicKeys;
}
}
}
权限消费端
appsetting.json主要关注JWTTokenOptions1
2
3
4
5
6
7
8
9
10
11
12
13
14
15
16
17
18
19
20
21
22
23
24
25
26
27
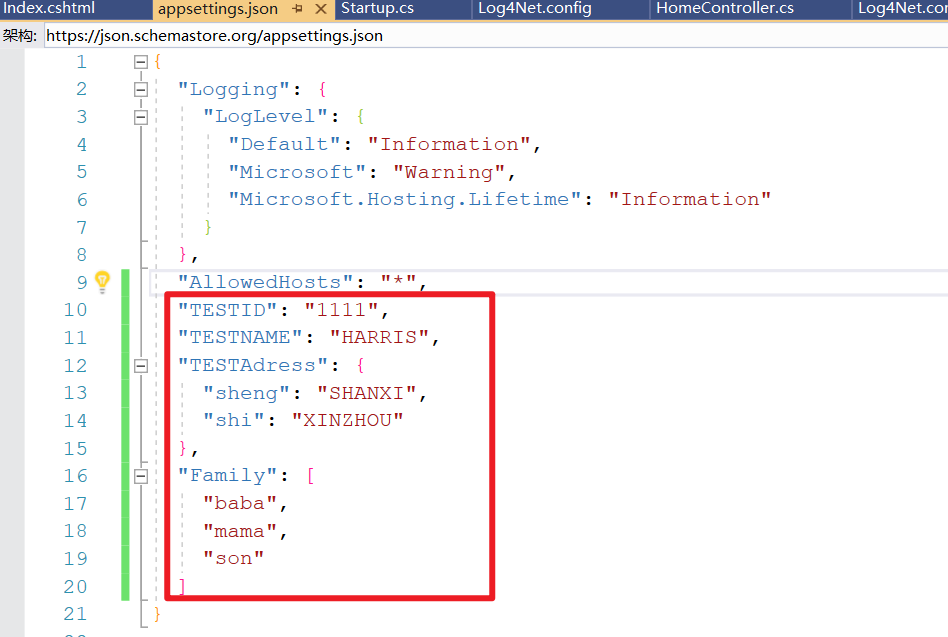
28{
"Logging": {
"LogLevel": {
"Default": "Information",
"Microsoft": "Warning",
"Microsoft.Hosting.Lifetime": "Information"
}
},
"AllowedHosts": "*",
"TEST": {
"TESTID": "1111",
"TESTNAME": "HARRIS",
"_TESTAdress": {
"Sheng": "SHANXI",
"Shi": "XINZHOU"
},
"Family": [
"baba",
"mama",
"son"
]
},
"JWTTokenOptions": {
"Audience": "http://localhost:5200",
"Issuer": "http://localhost:5200",
"SecurityKey": "MIGfMA0GCSqGSIb3DQEBAQUAA4GNADCBiQKBgQDI2a2EJ7m872v0afyoSDJT2o1+SitIeJSWtLJU8/Wz2m7gStexajkeD+Lka6DSTy8gt9UwfgVQo6uKjVLG5Ex7PiGOODVqAEghBuS7JzIYU5RvI543nNDAPfnJsas96mSA7L/mD7RTE2drj6hf3oZjJpMPZUQI/B1Qjb5H3K3PNwIDAQAB"
}
}Startup.cs中ConfigureServices方法,先把之前测试Cookie的方法注释掉。1
2
3
4
5
6
7
8
9
10
11
12
13
14
15
16
17
18
19
20
21
22
23
24
25
26
27
28
29
30
31
32
33
34
35
36
37
38
39
40
41
42
43
44
45
46
47
48
49
50
51
52
53
54
55
56
57
58
59
60
61
62
63
64
65
66
67
68
69
70
71
72
73#region RSA
{
// 读取公钥
string path = Path.Combine(Directory.GetCurrentDirectory(), "key.public.json");
string key = File.ReadAllText(path);//this.Configuration["SecurityKey"];
Console.WriteLine($"KeyPath:{path}");
var keyParams = JsonConvert.DeserializeObject<RSAParameters>(key);
//SigningCredentials credentials = new SigningCredentials(new RsaSecurityKey(keyParams), SecurityAlgorithms.RsaSha256Signature);
JWTTokenOptions tokenOptions = new JWTTokenOptions();
Configuration.Bind("JWTTokenOptions", tokenOptions);
services.AddAuthentication(JwtBearerDefaults.AuthenticationScheme)
.AddJwtBearer(options =>
{
options.TokenValidationParameters = new TokenValidationParameters
{
ValidateIssuer = true,//是否验证Issuer
ValidateAudience = true,//是否验证Audience
ValidateLifetime = true,//是否验证失效时间
ValidateIssuerSigningKey = true,//是否验证SecurityKey
ValidAudience = tokenOptions.Audience,//Audience
ValidIssuer = tokenOptions.Issuer,//Issuer,这两项和前面签发jwt的设置一致
IssuerSigningKey = new RsaSecurityKey(keyParams),
//IssuerSigningKeyValidator = (m, n, z) =>
// {
// Console.WriteLine("This is IssuerValidator");
// return true;
// },
//IssuerValidator = (m, n, z) =>
// {
// Console.WriteLine("This is IssuerValidator");
// return "http://localhost:5726";
// },
//AudienceValidator = (m, n, z) =>
//{
// Console.WriteLine("This is AudienceValidator");
// return true;
// //return m != null && m.FirstOrDefault().Equals(this.Configuration["Audience"]);
//},//自定义校验规则,可以新登录后将之前的无效
};
});
}
#endregion
3. 具体入口 `SixController` 特性 `[Authorize]`
``` CSharp
using Microsoft.AspNetCore.Authorization;
using Microsoft.AspNetCore.Mvc;
using System;
using System.Collections.Generic;
using System.Linq;
using System.Threading.Tasks;
namespace DotNetCoreDemo.Controllers
{
public class SixController : Controller
{
[Authorize] //2.第二部:标记特性,表示Privacy 可以支持验证
public IActionResult Index()
{
var user = HttpContext.User;
return View();
}
public IActionResult Login()
{
return View();
}
}
}View
1
2
3
4
5
6
7
8
@{
ViewData["Title"] = "Index";
}
<h1>Six Index</h1>
<h3>HS 授权完毕</h3>
测试过程
生成+获取
Token生成
key.json和key.public.json授权中心通过WebApi 访问,生产
key.json和key.public.json。key.json与key.public.json是互相呼应的。图一:
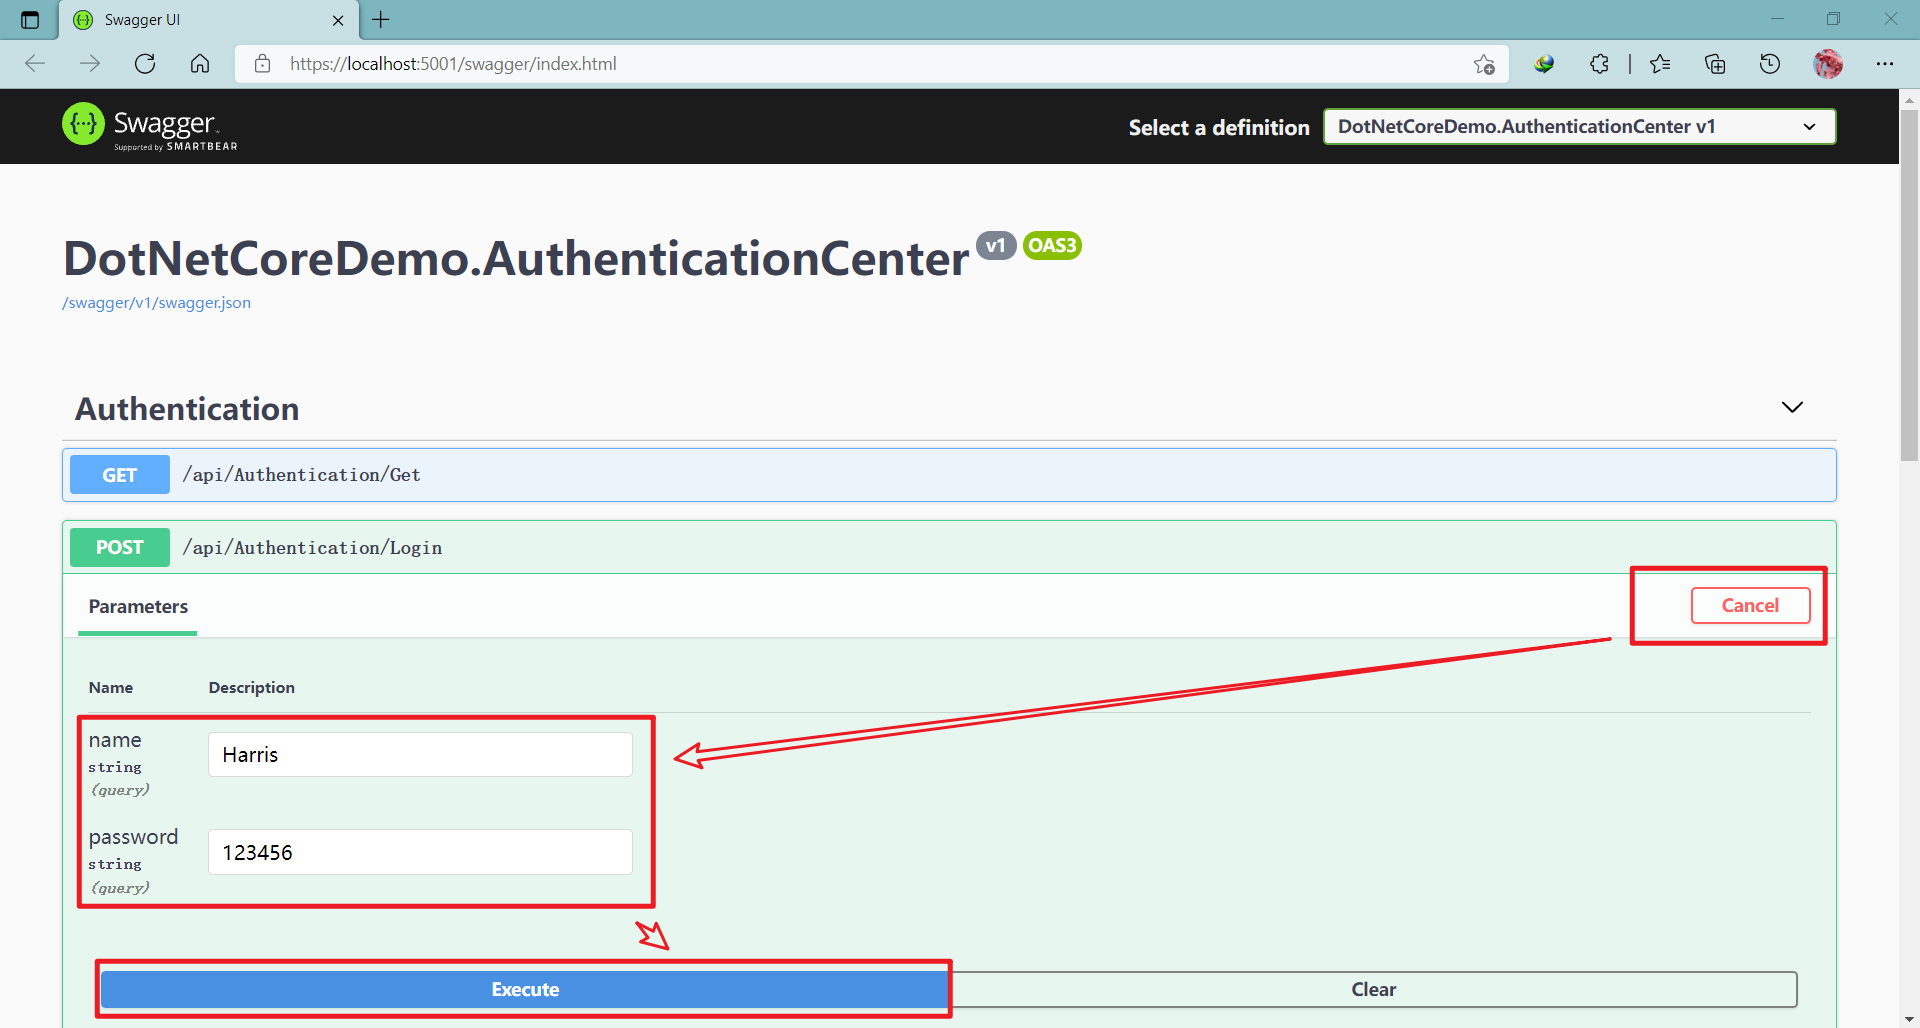
- 点击
Tryitout按钮到 - 输入
name&password - 点击
Execute按钮,生成如下内容。
图二:
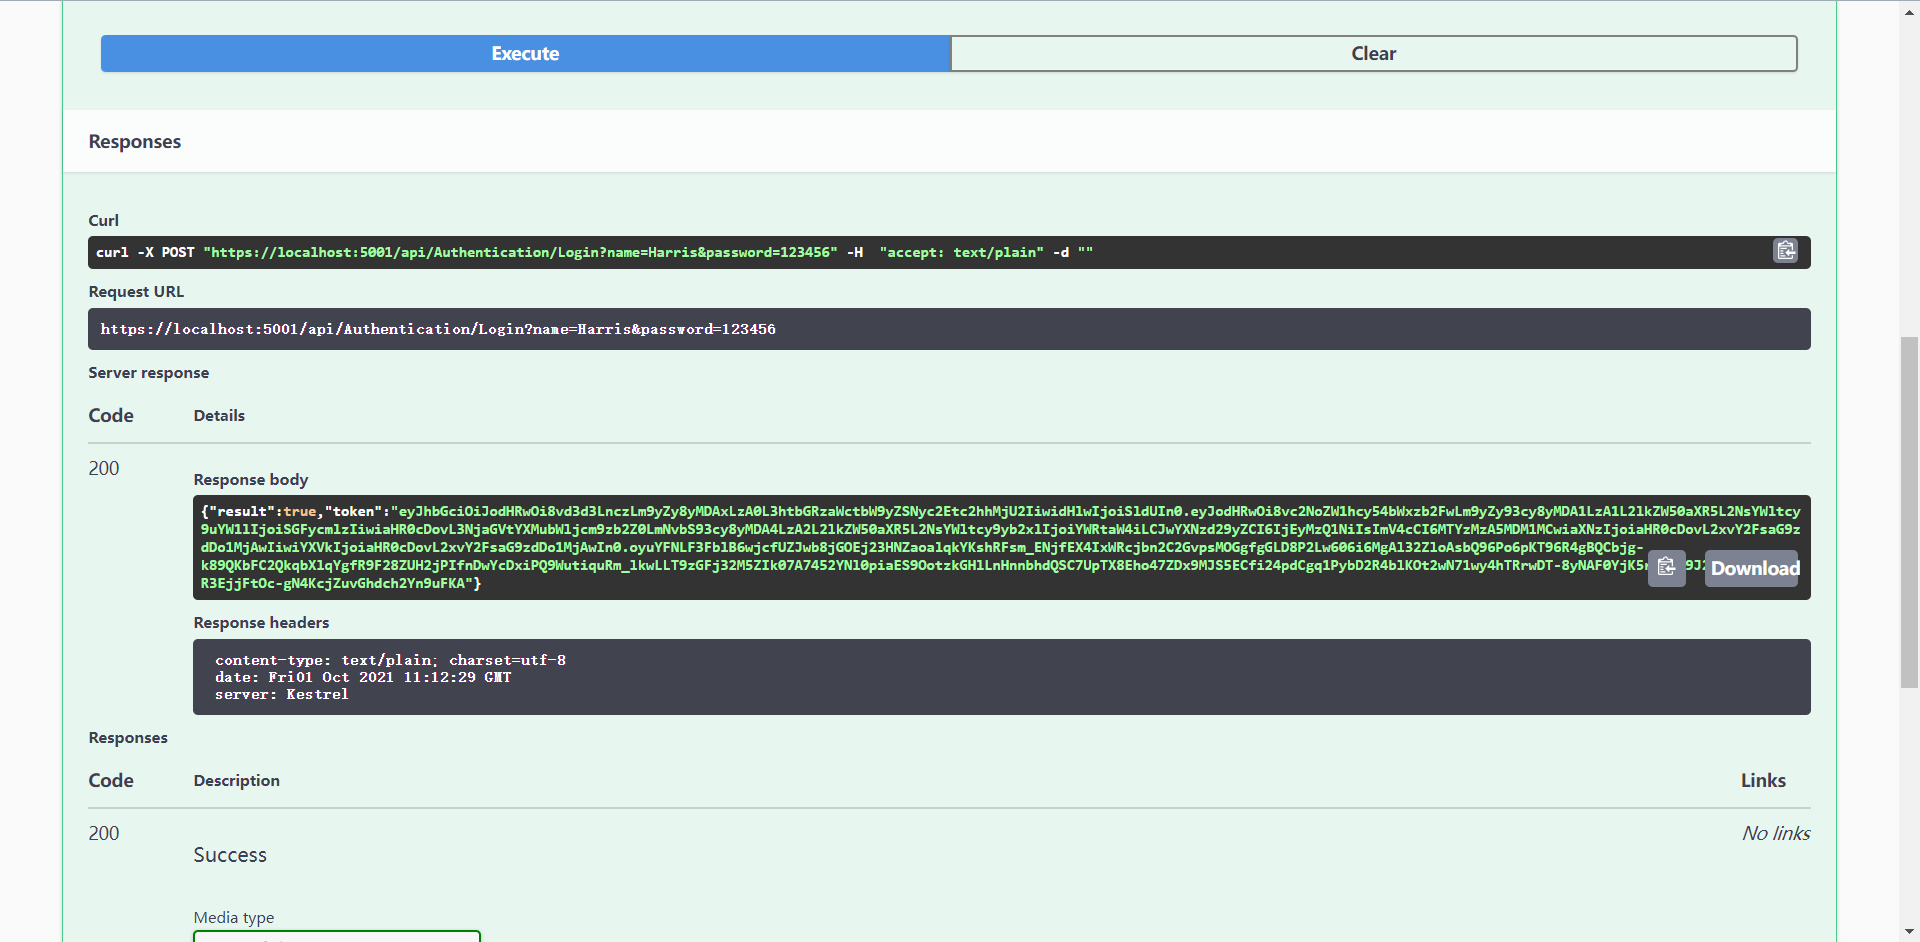
Response body 内容作为备用。
将
key.public.json文件放到访问的相对位置,本地放到
- 点击
启动
PostMan工具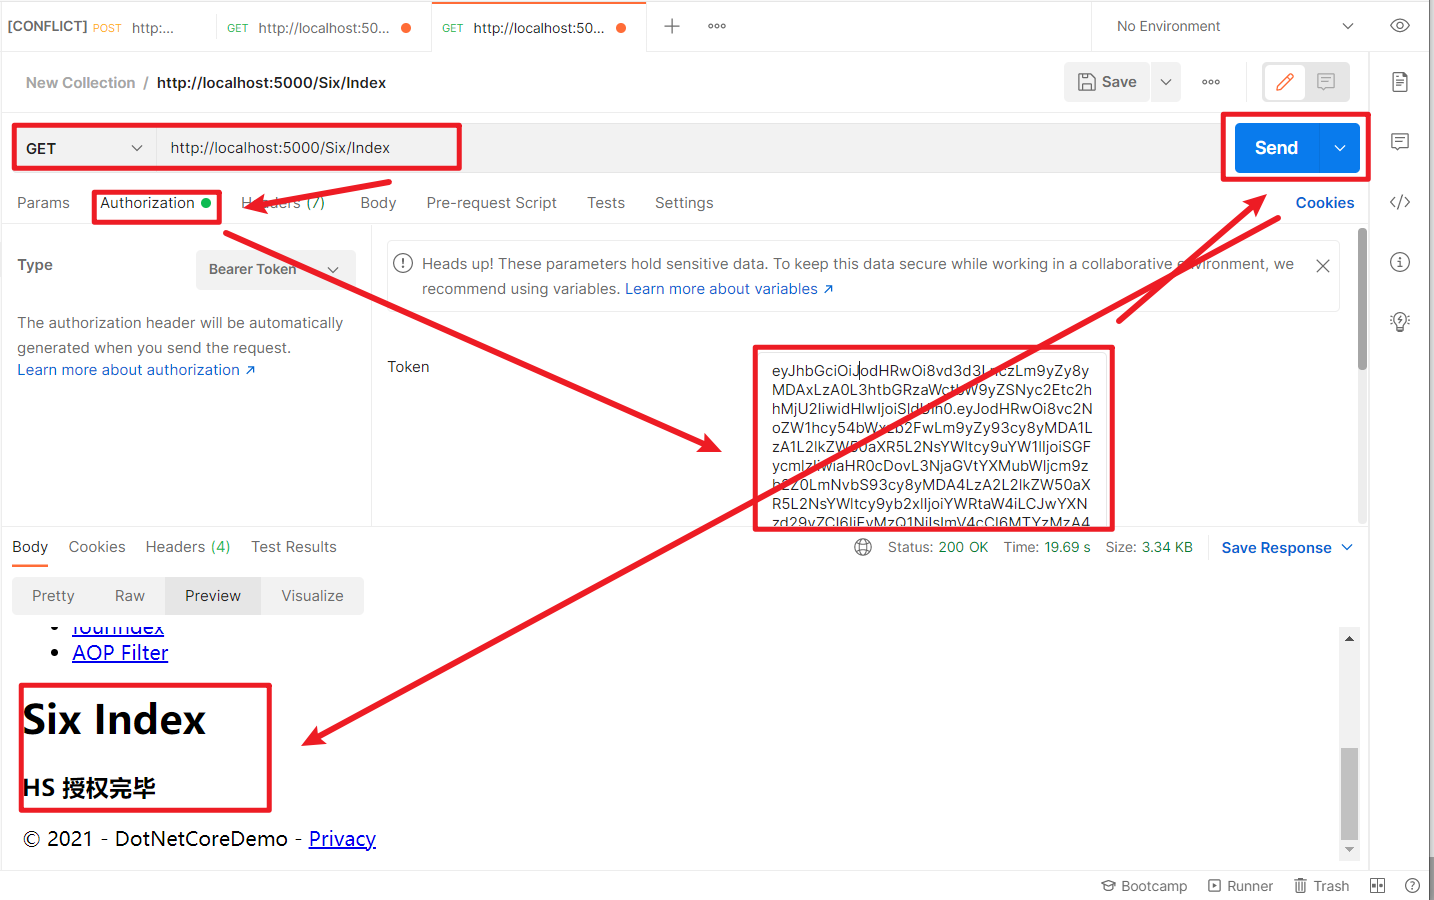
Authorization选择Bearer Token输入 图二 中Response body中Token内容.点击
Send提交,则可以看到访问成功。否则 则报
401错误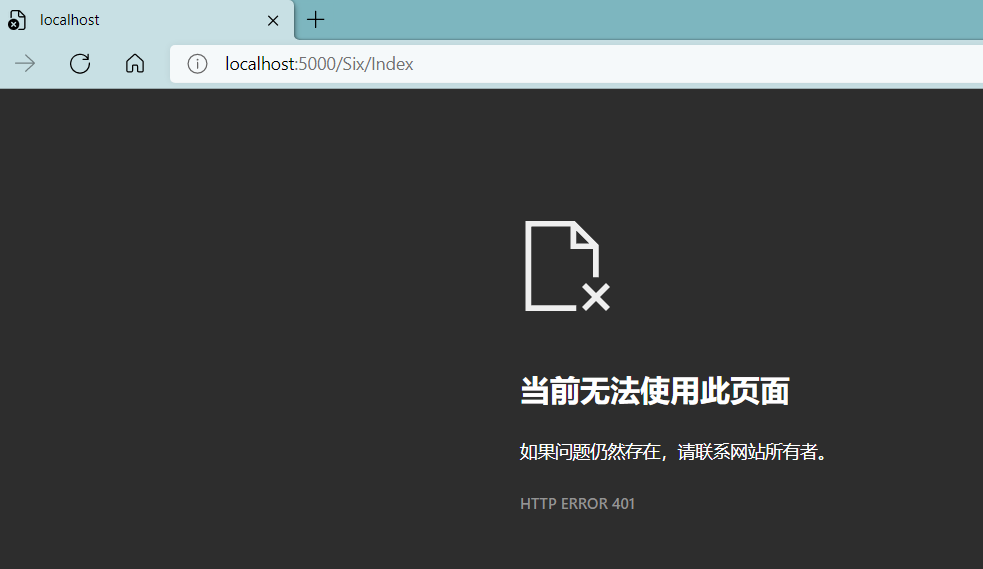
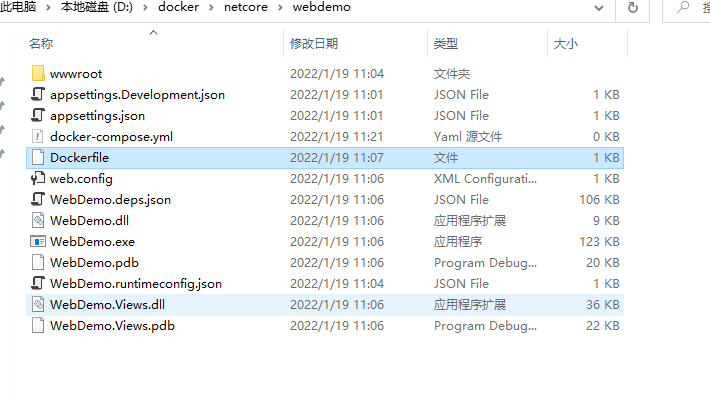
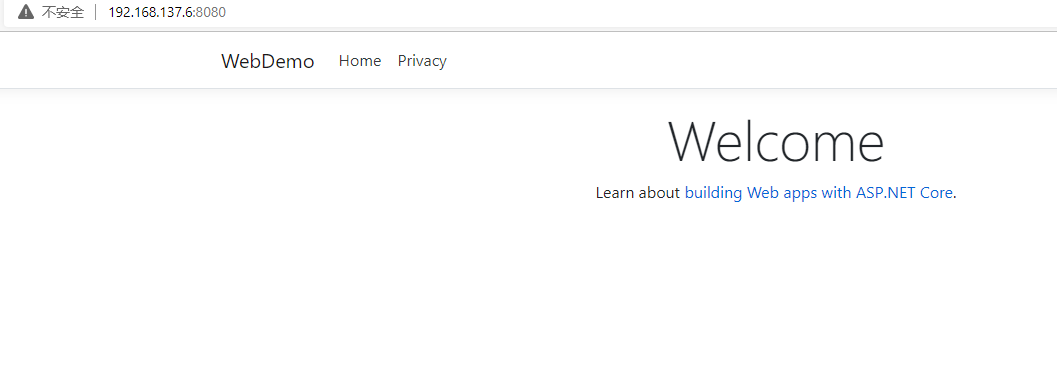
.NetCore Docker Nginx

Test Program
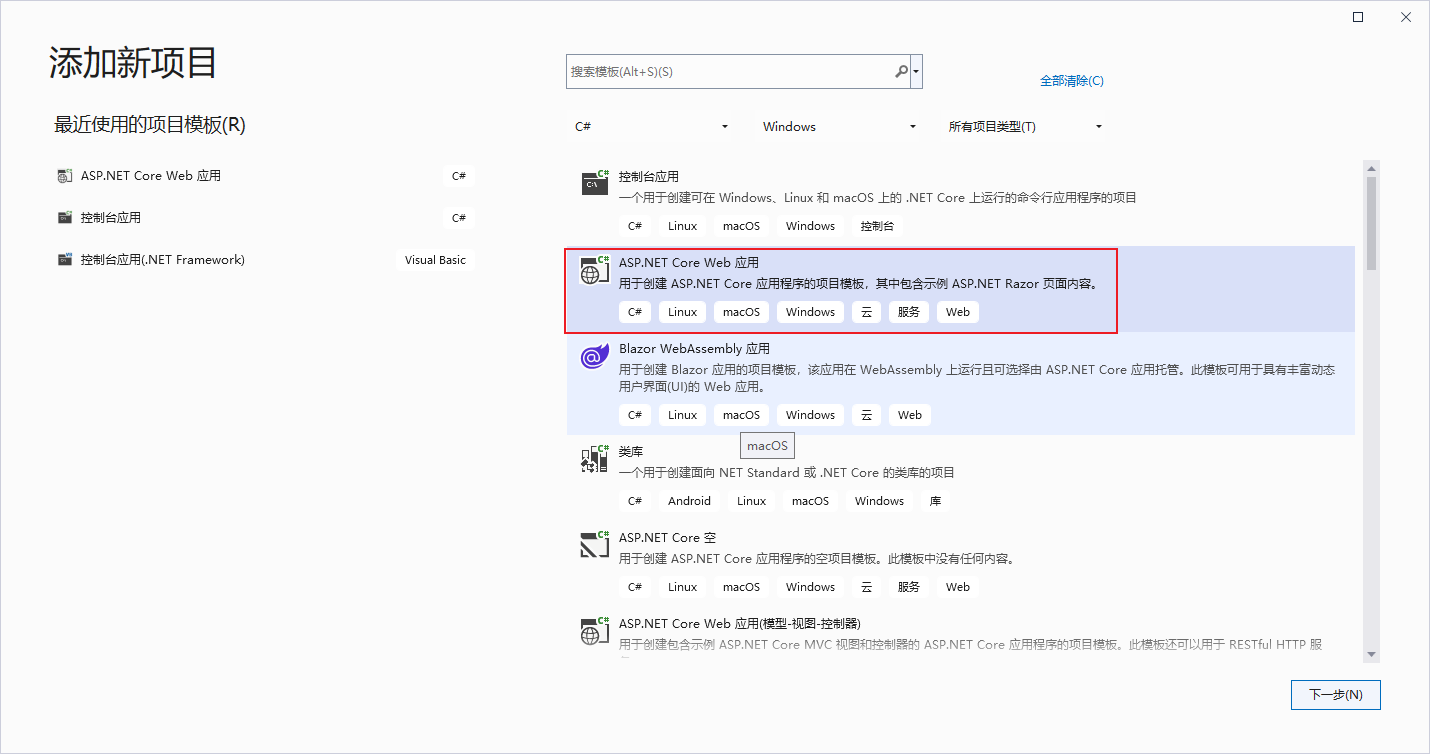
新建 .net core web应用
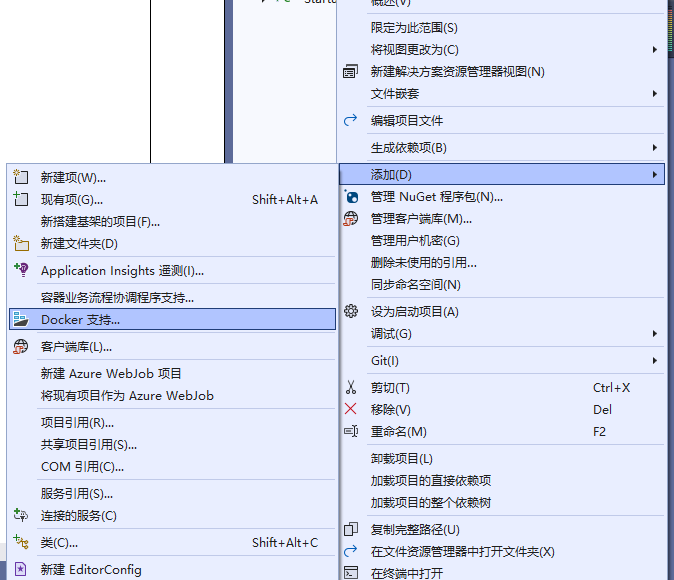
添加Docker 支持-linux
发布

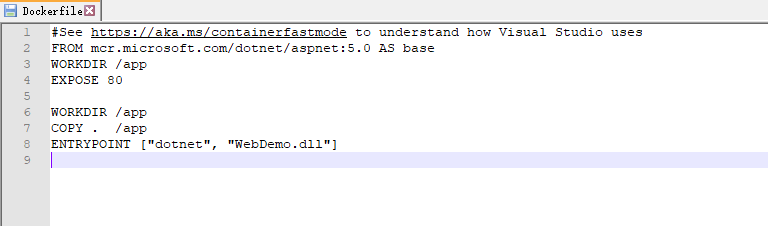
修改发布后的DockerFile
1 | |
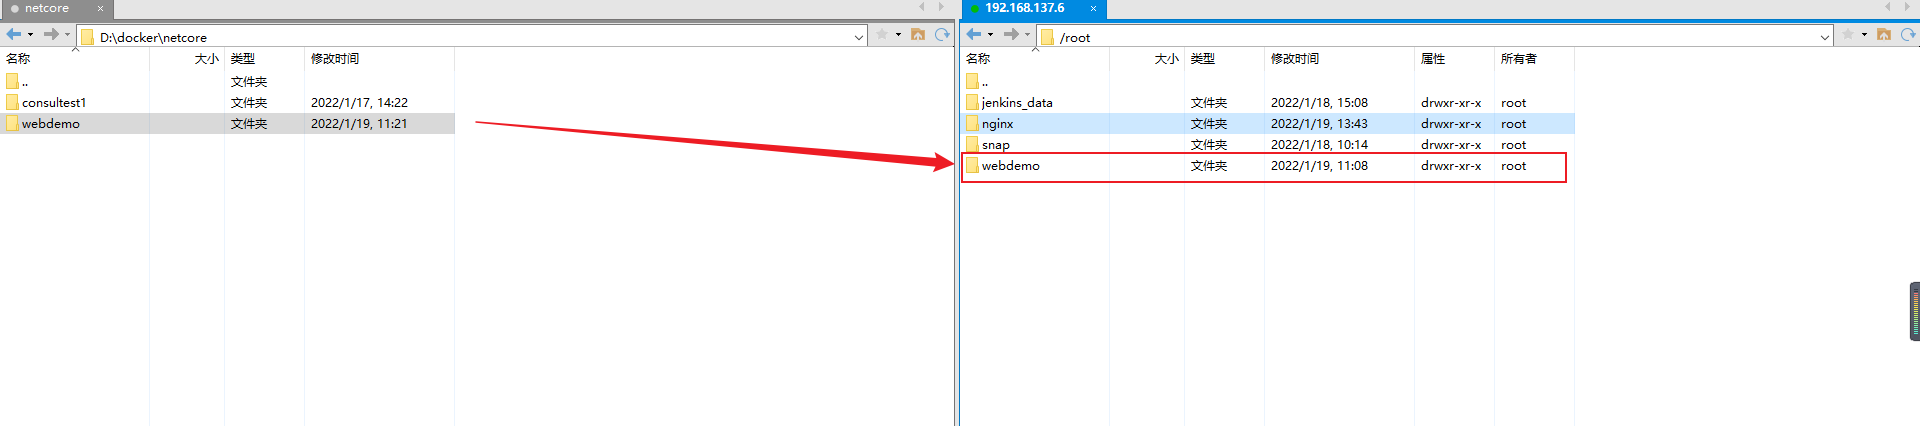
上传到服务器
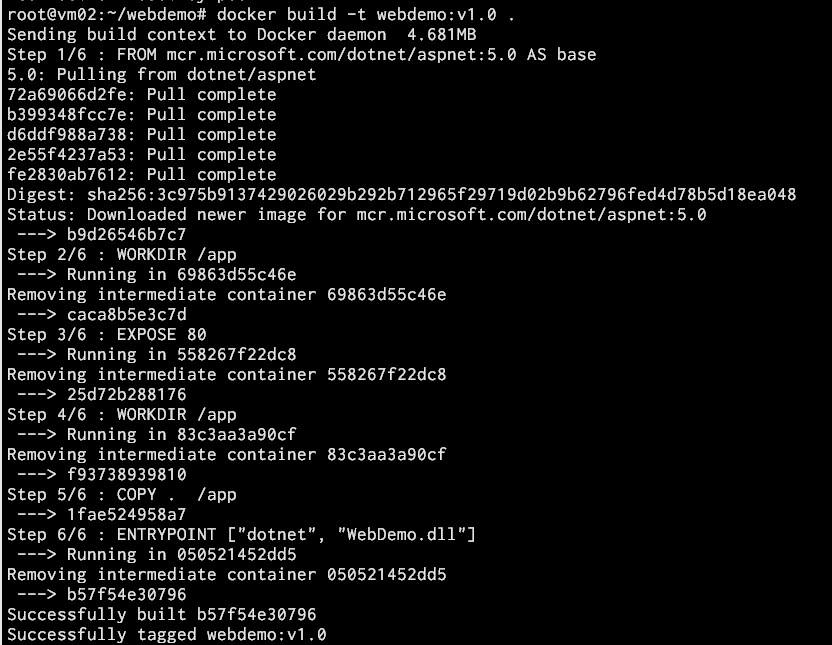
Docker image
build test program
pull nginx
1 | |
Docker Run
run test program image
1 | |
添加Nginx配置
myNginx.conf,192.168.137.6为宿主IP
1 | |
run nignx image
挂载到/root/nginx/my_nginx.conf
1 | |
Last
本篇主要是将.Net core web应用放到Linux服务器中,使用Nginx反向代理,进行访问。


EFCore
what
简单来说EFCore是一种ORM的技术.
EF主要有三种模式进行开发:DataFirst、CodeFirst、ModelFirst
EFCore主要支持两种开发方法: 1. CodeFirst(代码优先) 2. DataFirst(数据库优先)
EFCore主要针对代码优先方法,很少提供对数据库优先方法的支持,因为从EF Core 2.0开始不支持可视化的DB模型设计器或向导
why
特点
- 支持多中关系型数据库
- 支持linq查询
- 支持反向工程,可以将数据库表与EFCore模型同步。
- 支持迁移,EFCore模型的更改可以通过迁移同步到数据库
- 支持日志记录
- 支持原生SQL对数据库进行操作,半自动ORM
支持的数据库和Nugget库
| 数据库 | Nuget程序包 |
|---|---|
| SQL Server | Microsoft.EntityFrameworkCore.SqlServer |
| MySQL | MySql.Data.EntityFrameworkCore(官方版,不建议使用) |
| MySQL | Pomelo.EntityFrameworkCore(第三方提供,Bug少建议使用) |
| PostgreSQL | Npgsql.EntityFrameworkCore.PostgreSQL |
| SQLite | Microsoft.EntityFrameworkCore.SQLite |
| SQL Compact | Microsoft.EntityFrameworkCore.SQLite |
| In-memory | Microsoft.EntityFrameworkCore.InMemory |
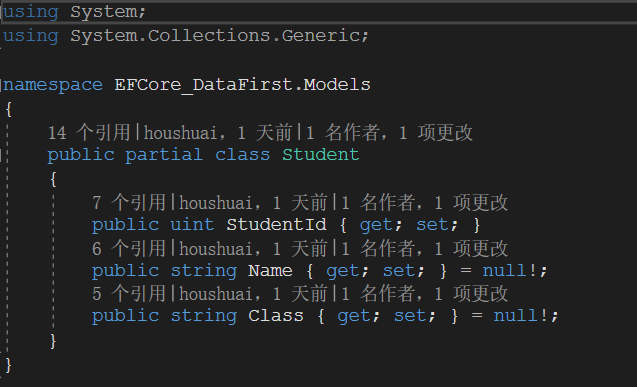
DataFirst
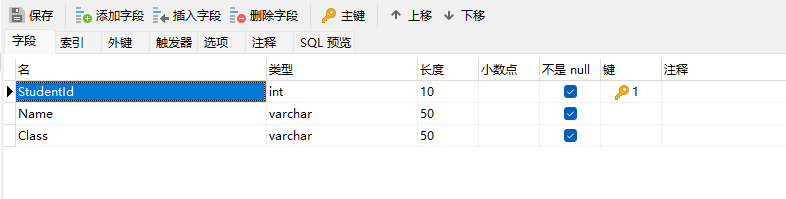
通过数据库表生产相关模型类
Mysql
1 | |
新建项目
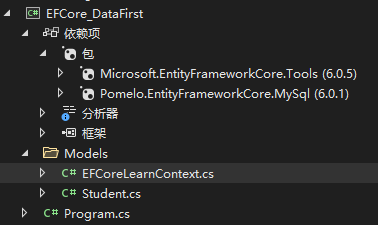
我本地测试新建的.net 6 的控制台程序
项目Nugget安装
1 | |
通过Nugget 控制台管理
1 | |
通过动态库 Pomelo.EntityFrameworkCore.MySql、连接字符串,生产Model类
生产结果
连接类
1 | |
生产实体类
1 | |
CURD
1 | |
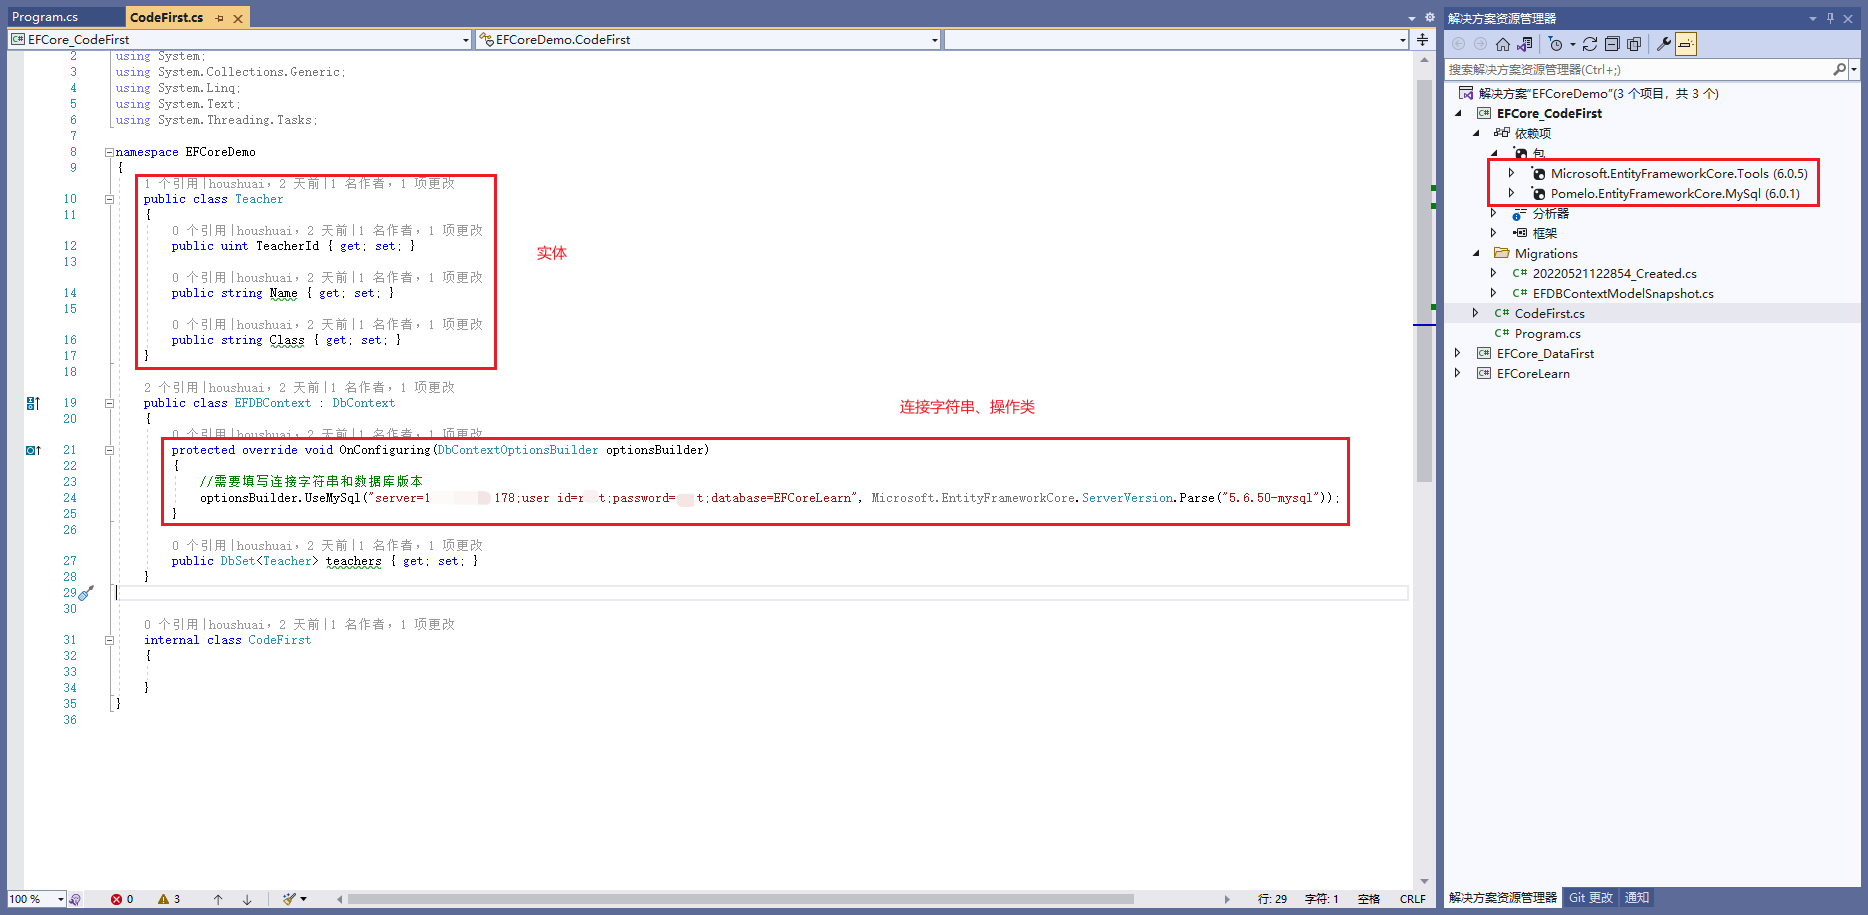
CodeFirst
nugget 添加右侧动态库
Nugget 控制台管理中输入
- Add-Migration Initial – 添加迁移
- Update-DataBase –提交到数据库
Data Migration
Model
1 | |
CodeFirst
- Add-Migration Initial – 添加迁移
- Update-DataBase –提交到数据库
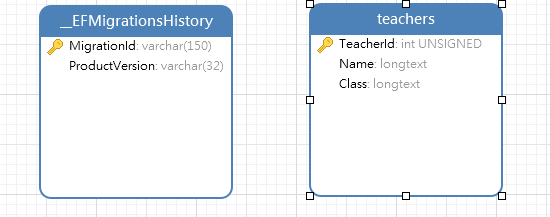
EFLearnDbContext
1 | |
测试数据
1 | |
数据库